Hello guys,
This is the interest thread for a metal (aluminium and brass) upgrade kit for Jake’s 3D printed ZF-1 kit:
Interest - 'The Fifth Element' ZORG Industries ZF1 - Kit interest (Metal frame, 3D printed components, full electronic movements and lighting)
A WIP thread can be found here where I started doing the parts on my spare time, not everything is here yet and not everything there is part of the kit:
Upgrading with metal parts Jake's ZF-1 kit
This kit complements Jake’s own deluxe upgrade kit that already includes a few metal parts and a lot of higher quality resin parts.
Sorry, this is a bit long but please read this:
A few items are going to overlap as Jake is already offering most of the parts in resin; this is something we can hardly avoid as we are two different professionals with two different offerings. Additionally, some people might not buy both kits and will need the extra resin parts. That is the best way we found to move forward on that project, not cut the grass under each other’s feet and offer metal parts while Jake can focus on offering more awesome kits to more happy fans. Jake’s offering has been amazing from the start; his deluxe upgrade kit is extremely affordable for the very large amount of parts it includes and will easily compensate for the few unused parts you’ll get if you buy my own kit. People buying both upgrade kits will end up with an extremely nice and mostly metal ZF-1 with a few very clever hidden 3D printed parts; it is quite an awesome opportunity for anyone that couldn’t afford the previous ZF-1 on the market but still want something super accurate, lit, animated and largely metal for a much more manageable price point. I know that I’m happy with that as this might be my most wanted dream prop ever and I could never have afforded it before")
Initial plan for the kit when i did the interest request was:


assembly help can be found here:

 www.therpf.com
here is a photo of the final kits now that they are finished, those are all the parts included in the 440€ base kit:

There will normally be a few parts in option in very limited supply; no reservations or anything yet ;-):
* For the clippard parts: I have tried really hard to find really good deals on big lots of parts to offer something cheap for everyone. I have managed to secure the main MJV-3 part for everyone and drilled the mounting holes in them. The L fittings at the bottom and screws are included as well. However, the supply of MPA-3 parts is limited. they are easy to source in the US, so it shouldn't be a problem for you guys
** For the maglites:
Price:
Since the large maglites holder rectangle part has been added, final price is 440€ for the base kit above. Shipping costs will be additional.
this is discussed in details here:
www.therpf.com
How/Where to buy:
As usual, everything I sell can only be purchased on my website, supergreenprops.com:
Supergreen props - Handcrafted collectibles
I am obligated by the French law to edit an invoice for any money that goes into my bank account and the invoices have to be sequenced. The only way for me to handle that is through my website. It is easy for you, the website is fun and bilingual, it is perfectly secured and the payments completely handled by Paypal. You just need to register, enter your shipping address and the shipping costs will be calculated automatically. Make sure to enter your address as soon as you create your account as shipping costs are shown for France by default.
I know that some people might feel uncomfortable with a website, but please understand that I have no choice and that, even though there is a website, it’s still me, eethan/Matthieu, behind everything and you can reach out anytime for any question here or by mail contact@supergreenprops.com
I’ll always be happy to help or have a chat; really, you know I’m a friendly and talkative guy and love to talk about cool props, so, don’t hesitate!
Payment:
As explained above, I am obligated by the law to edit a sequenced invoice with all my sales, this goes exclusively through my website. The payments are completely handled by Paypal checkout, with buyer protection, and you can choose to pay directly with paypal, credit cards through Paypal (even if you don’t have a Paypal account), or even local payment options like iDeal, Sofort, Bancontact, Giropay, MyBank, P24, EPS... At no time will I have access to your payment information or bank details, never. When the order is paid, you’ll receive confirmations by mail for every step of the order and an invoice.
Shipping:
When you are logged in and have created an address, shipping costs are automatically calculated in your cart. There are two options, less than 3cm in thickness or more than 3cm. I encourage you to take the less than 3cm option when available as it is much cheaper and still tracked
All shipments are shipped with the French post service and tracked; you’ll receive the tracking number by mail when the package ships. It can be tracked directly on your local post website, usps, royal mail and so on. No need to use the French post website link included in the shipping notice mail if you are not in France. If you didn’t receive a tracking number, please check in your spam folder or don’t hesitate to contact me, it’s important to get it
Shipping time varies greatly and we all know it has been pretty unreliable lately, however, to give you an idea, it should usually take between 5 to 12 working days to get from France to the US, there can be some rare wild exceptions that I sadly can’t foresee, however, so far, I have never had a lost package, so fingers crossed, it continues that way!
Customs taxes:
All orders are shipped from France. If you are outside Europe, it is possible that your country collects customs taxes or fees, I can only let you know that this is a possibility and encourage you to know how your country deals with international packages and know if you have to pay taxes and how much they are. Please understand that this is out of my control.
Always eco-friendly whenever possible:
As I explain on my website, I try to be as eco-friendly as possible. I live and work in a farm in the south of France, I have all kind of animals around me and we try to respect nature as much as possible.
This kind of work, let's be honest is not by definition eco-friendly since it's purely for our enjoyment and not something we all need to survive (or do we?). That being said, I do my best to always use recycled and recyclable shipping materials or even clean re-used materials sometimes. I also try to do as much as I can for the projects themselves. International customers might notice the very light 50g/m2 ecological paper I use for all mandatory invoices and customs declarations, so light!
For this run in particular, I used mostly re-used boxes that I selected for their good condition and sturdiness, you'll see that I have reinforced most of them with thick cardboard inside as well; I don't think any package will get damaged! You'll notice that each part has been wrapped in a thin "air plastic wrap", I don't know how it's called exactly, it's all clean re-used stock that I carefully kept from my own online orders, I only buy recycled wrapping paper and cardboard for my runs. I hope the packing will be up to your standards
All right! I hope that I didn't forget anything. Please don't hesitate to reach out to me for any question, I’ll be happy to answer them or have a small chat with you as usual
cheers
This is the interest thread for a metal (aluminium and brass) upgrade kit for Jake’s 3D printed ZF-1 kit:
Interest - 'The Fifth Element' ZORG Industries ZF1 - Kit interest (Metal frame, 3D printed components, full electronic movements and lighting)
A WIP thread can be found here where I started doing the parts on my spare time, not everything is here yet and not everything there is part of the kit:
Upgrading with metal parts Jake's ZF-1 kit
This kit complements Jake’s own deluxe upgrade kit that already includes a few metal parts and a lot of higher quality resin parts.
Sorry, this is a bit long but please read this:
A few items are going to overlap as Jake is already offering most of the parts in resin; this is something we can hardly avoid as we are two different professionals with two different offerings. Additionally, some people might not buy both kits and will need the extra resin parts. That is the best way we found to move forward on that project, not cut the grass under each other’s feet and offer metal parts while Jake can focus on offering more awesome kits to more happy fans. Jake’s offering has been amazing from the start; his deluxe upgrade kit is extremely affordable for the very large amount of parts it includes and will easily compensate for the few unused parts you’ll get if you buy my own kit. People buying both upgrade kits will end up with an extremely nice and mostly metal ZF-1 with a few very clever hidden 3D printed parts; it is quite an awesome opportunity for anyone that couldn’t afford the previous ZF-1 on the market but still want something super accurate, lit, animated and largely metal for a much more manageable price point. I know that I’m happy with that as this might be my most wanted dream prop ever and I could never have afforded it before
Initial plan for the kit when i did the interest request was:
- 2 small threaded tubes for the back scope structure (1)
- All 3 brass clippard found parts for the flame thrower * (2)
- Ice cube nozzle (blue)(3)
- Rocket tube and back support (4)
- 2 turned maglite tips (5)
- 2 real maglites (non fonctional)**(6)
- Butane torch holder tube (with orientable brass end) (7)
- Yellow button base ring (8)
- Red button base ring (9)
- 2 rocket vents mounting rings (10)
- Flame thrower (aluminum body and brass tip) (11)
- Butane torch rectangle holder (blue) (12)
- Rocket holder (blue) (attaching to the top of the butane torch rectangle) (13)
assembly help can be found here:
Done / Completed - Metal fifth element ZF-1 upgrade kit for Jake's kit
Mine arrived today too. I'm nervous that opening the box will mean I have to start on the project and I don't have the sandpaper and paint right now. I want to do it all 110% correct. ahah, just open the box, seing the parts will motivate you :-)
www.therpf.com
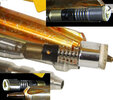
here is a mockup photo of the parts I already started or finished or the 3D printed parts that i haven't started yet but will be replaced with that kit:
- fins of the rocket will need to be recuperated from the base kit
- real torch lighter tip shown here is an option, not in the base price

- fins of the rocket will need to be recuperated from the base kit
- real torch lighter tip shown here is an option, not in the base price
here is a photo of the final kits now that they are finished, those are all the parts included in the 440€ base kit:
There will normally be a few parts in option in very limited supply; no reservations or anything yet ;-):
- Real Red button (45€)(will need to be adapted to light up or use Jake’s led)
- Proxxon Butane torch tip (42€) by popular demand because I have a source and can disassemble the tip. But this is a part you might find cheaper locally if you are lucky. It used to be simple to find I think, especially in the US, but it got more expensive and although the one I found is pretty damn accurate, it doesn’t have a white tip.
- set of 4 knobs for the lateral rails (30€)
* For the clippard parts: I have tried really hard to find really good deals on big lots of parts to offer something cheap for everyone. I have managed to secure the main MJV-3 part for everyone and drilled the mounting holes in them. The L fittings at the bottom and screws are included as well. However, the supply of MPA-3 parts is limited. they are easy to source in the US, so it shouldn't be a problem for you guys
** For the maglites:
- I found an awesome source for maglite spare parts that allows me to get a non functional version of the maglites for very cheap. I decided to go that route to make it easy for everyone to get real maglite parts without paying the full price and any shipping cost individually. But, they are non functional.
- A functioning maglite would not fit Jake’s kit in length; I’m not using the small back part that adds almost a cm to the lights.
- In any case, you’ll need to wrap some tape or use a screw from the back of the support piece as the real lights are a bit thinner than the cavity on Jake’s kit. That’s not a big deal, but you should know it
Price:
Since the large maglites holder rectangle part has been added, final price is 440€ for the base kit above.
Shipping costs will be additional.this is discussed in details here:
Done / Completed - Metal fifth element ZF-1 upgrade kit for Jake's kit
eethan , I can't thank you enough for sharing your process along the way. It's like we're inside your brains! hehe. It's pretty incredible seeing the solutions you come up with for puzzles along the way. Thank you for sharing! Thank you :-) and you are welcome! I wouldn't imagine doing it...
www.therpf.com
How/Where to buy:
As usual, everything I sell can only be purchased on my website, supergreenprops.com:
Supergreen props - Handcrafted collectibles
I am obligated by the French law to edit an invoice for any money that goes into my bank account and the invoices have to be sequenced. The only way for me to handle that is through my website. It is easy for you, the website is fun and bilingual, it is perfectly secured and the payments completely handled by Paypal. You just need to register, enter your shipping address and the shipping costs will be calculated automatically. Make sure to enter your address as soon as you create your account as shipping costs are shown for France by default.
I know that some people might feel uncomfortable with a website, but please understand that I have no choice and that, even though there is a website, it’s still me, eethan/Matthieu, behind everything and you can reach out anytime for any question here or by mail contact@supergreenprops.com
I’ll always be happy to help or have a chat; really, you know I’m a friendly and talkative guy and love to talk about cool props, so, don’t hesitate!
Payment:
As explained above, I am obligated by the law to edit a sequenced invoice with all my sales, this goes exclusively through my website. The payments are completely handled by Paypal checkout, with buyer protection, and you can choose to pay directly with paypal, credit cards through Paypal (even if you don’t have a Paypal account), or even local payment options like iDeal, Sofort, Bancontact, Giropay, MyBank, P24, EPS... At no time will I have access to your payment information or bank details, never. When the order is paid, you’ll receive confirmations by mail for every step of the order and an invoice.
Shipping:
When you are logged in and have created an address, shipping costs are automatically calculated in your cart. There are two options, less than 3cm in thickness or more than 3cm. I encourage you to take the less than 3cm option when available as it is much cheaper and still tracked
All shipments are shipped with the French post service and tracked; you’ll receive the tracking number by mail when the package ships. It can be tracked directly on your local post website, usps, royal mail and so on. No need to use the French post website link included in the shipping notice mail if you are not in France. If you didn’t receive a tracking number, please check in your spam folder or don’t hesitate to contact me, it’s important to get it
Shipping time varies greatly and we all know it has been pretty unreliable lately, however, to give you an idea, it should usually take between 5 to 12 working days to get from France to the US, there can be some rare wild exceptions that I sadly can’t foresee, however, so far, I have never had a lost package, so fingers crossed, it continues that way!
Customs taxes:
All orders are shipped from France. If you are outside Europe, it is possible that your country collects customs taxes or fees, I can only let you know that this is a possibility and encourage you to know how your country deals with international packages and know if you have to pay taxes and how much they are. Please understand that this is out of my control.
Always eco-friendly whenever possible:
As I explain on my website, I try to be as eco-friendly as possible. I live and work in a farm in the south of France, I have all kind of animals around me and we try to respect nature as much as possible.
This kind of work, let's be honest is not by definition eco-friendly since it's purely for our enjoyment and not something we all need to survive (or do we?). That being said, I do my best to always use recycled and recyclable shipping materials or even clean re-used materials sometimes. I also try to do as much as I can for the projects themselves. International customers might notice the very light 50g/m2 ecological paper I use for all mandatory invoices and customs declarations, so light!
For this run in particular, I used mostly re-used boxes that I selected for their good condition and sturdiness, you'll see that I have reinforced most of them with thick cardboard inside as well; I don't think any package will get damaged! You'll notice that each part has been wrapped in a thin "air plastic wrap", I don't know how it's called exactly, it's all clean re-used stock that I carefully kept from my own online orders, I only buy recycled wrapping paper and cardboard for my runs. I hope the packing will be up to your standards
All right! I hope that I didn't forget anything. Please don't hesitate to reach out to me for any question, I’ll be happy to answer them or have a small chat with you as usual
cheers
Last edited: