I hope I put this post in the right place.
This is my 2013 halloween costume contest entry for the kids category.
My son is 5 and loves Star Wars. His favorite character is Jango Fett and when asked what he wanted to be for halloween that came up right away. I was looking around at costume on the net to buy but was disappointed with the quality and the look of everything I saw. I have been following Bill Doran from Punished Props as well as Harrison Krix from Volpin Props and was inspired to try to build a costume for my son.
I am a new builder. I used to do plastic models when I was a kid but haven't made props or costumes before. I have limited construction skills and a few tools in my garage but I am not afraid to learn new skills. I have 2 full time jobs (one is a real one I am a paramedic, the other is my small photography business) so I new time was going to be a problem. To start the project I pored over reference photos and relied very heavy on the RPF as well as the Dented Helmet for construction tips and material ideas.
For me this project was a 10/10 in difficulty. I had to learn all the skills to complete it. I have never worked with fiberglass or bondo prior to this and my painting skills were nominal to say the least. I talked to allot of people and got their opinions on mixing bondo and learning tricks to using fiberglass. You Tube is a great place to learn something as well.
The helmet was done with the Pep technique using 100 weight cardstock for the basic model. After scaling the model to my sons head size and making 3 helmets shells until I was happy with the model I then used resin to strengthen the shell and followed that up with 2 layers of fiber glass on the inside. After the fiber glass was the bondo to smooth out the shape. ( I learned allot of lessons doing this. In the future I will sand down the facets to a smooth shape. i had enough fiberglass on the inside and it would of saved a lot of bondo.) After many layer and countless hours of sanding It was ready for glazing putty and wet sanding. Primed and then painted with enamel rattle can paint. I wanted to go for a non traditional clean look for this Jango armor. I wanted it to look really used so I weathered it quite heavy. I scuffed it up a bit and dry brushed rub and buff on to look like the paint was coming off. I used black and brown acrylics for the grim. The inside has foam for comfort. No visor present in these photos.


The jetpack was a big challenge for me. There are allot of curves and tapers that I was unsure how to do. I used EVA foam for the flat surfaces with a square piece of MDF for strength on the back. The cylinders were objects that I had on hand. The main "gas tank" was from a tall beer that i had "on hand". For the tapered sections I scrounged up a McDonalds cup and a couple of rattle can lids. They all fit together so they made it into the model. The thruster tubes were paper towel rolls that I strengthened with resin. I wanted to use PVC but I had to save weight. I ran a long piece of PVC for the missile on top was made with 2 dixie cups glued together with an easter egg on top to make a point. The thrusters were from dixie cups and PVC. I used hot glue to hold everything together. To seal up all the foam I covered it in mog podge and then used bondo to fill the gaps and make flat smooth surfaces. Details were done with styrene. Painted it with rattle cans and weathered with acrylics and rub and buff. I wish I would have taken a picture of it before the primer because it looked hilarious. I screwed some snaps on the back to attach it to a harness under his flack vest. The jetpack weighs in at just over 1 1/2 pounds. Now I know that this version of Jango's jetpack does not have this type of missile on it but the boy insisted on having one and I liked the color of this version.


For the Flack vest I found some clearance textured black vinyl . I made a paper pattern on him and then sewed the vest together. There is a seam on the back with velcro to get him in it. I scuffed up and weathered the vest to make it look use. The armor was done with styrene. I started out with paper pinned to the vest for size and then transferred to the styrene. A heat gun was used to form it to the correct contour. They were primed and then painted with a brushed nickel. I didn't really like the look so I used rub and buff to make them look a little more like metal. Again they were weathered with black and brown acrylics and scuffed up to look used. Velcro holds them to the vest.
At this point i learned that a 5 year old does not like standing there to size things so I took a bunch of measurements of him and built a fitting mannequin out of insulation foam. It has way more patience than him but really helped out in the construction.
I didn't have the time to sew a jumpsuit for him so I went to the net and found a child's size boiler suit. I washed it about a dozen times to fade it a little and weathered it with spray paint.


The girth belt was made with some cheep nylon rope that was glued to some brown vinyl and then painted with browns to look like leather.
The pouches and holsters were made from some brown vinyl head liner that I found on a clearance rack. I used hot glue and pop rivets to hold everything together. The original color and texture of the vinyl was bad so I spent a lot of time wrinkling and beating up the pouches to make them look more like used leather and then painted them with layers of acrylic paint for the right color. I sanded the edges to lighten the color and they ended up with a used. look. Also pop rivets are amazing for holding this type of material together. Thanks to Adam Savage for that tip from an interview he gave.
Here is a pic of the harness, holster, straps, and pouches. Didn't take any before painting pics.

I scaled the blasters to fit his body size. I used PVC and styrene for the cylinder and details. The handles were carved from MDF.
the muzzle break was sculpted from plumbers putty. Primed and used rub and buff for a shiny metal look. Weathered with acrylics to make them dirty. I still need to photograph the finished blasters so this is one with it half done.

The arm gauntlets were made from carboard, EVA foam and styrene. The missle on his left one was pvc with styrene and some plubing parts for the end cap and tip. I coated them with bondo sanded and painted them the same as previous parts. I added some electronic parts for details just for fun.


View attachment 247638View attachment 247639
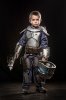
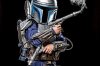
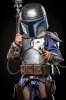
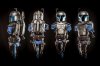
At this point I was just about done with the costume. I had my studio set up for a client so I had my boy suit up for some pics. I am very happy with the end result. I still cant believe I finished this project and everyone who has seen it loves it and want to place an order for next year (LOL). I still need to connect his fuel lines better they keep pulling out of the suit. I learned a lot about building props and costumes and cant wait to start the next project. Below are the studio pics I did of him. I need to do one more with an RPF sign in it for the contest. The photos with out the smoke from the blasters have light adjustments made in adobe lightroom. I used alot of lighting to het this look.
enjoy
Proof pic for contest below

This is my 2013 halloween costume contest entry for the kids category.
My son is 5 and loves Star Wars. His favorite character is Jango Fett and when asked what he wanted to be for halloween that came up right away. I was looking around at costume on the net to buy but was disappointed with the quality and the look of everything I saw. I have been following Bill Doran from Punished Props as well as Harrison Krix from Volpin Props and was inspired to try to build a costume for my son.
I am a new builder. I used to do plastic models when I was a kid but haven't made props or costumes before. I have limited construction skills and a few tools in my garage but I am not afraid to learn new skills. I have 2 full time jobs (one is a real one I am a paramedic, the other is my small photography business) so I new time was going to be a problem. To start the project I pored over reference photos and relied very heavy on the RPF as well as the Dented Helmet for construction tips and material ideas.
For me this project was a 10/10 in difficulty. I had to learn all the skills to complete it. I have never worked with fiberglass or bondo prior to this and my painting skills were nominal to say the least. I talked to allot of people and got their opinions on mixing bondo and learning tricks to using fiberglass. You Tube is a great place to learn something as well.
The helmet was done with the Pep technique using 100 weight cardstock for the basic model. After scaling the model to my sons head size and making 3 helmets shells until I was happy with the model I then used resin to strengthen the shell and followed that up with 2 layers of fiber glass on the inside. After the fiber glass was the bondo to smooth out the shape. ( I learned allot of lessons doing this. In the future I will sand down the facets to a smooth shape. i had enough fiberglass on the inside and it would of saved a lot of bondo.) After many layer and countless hours of sanding It was ready for glazing putty and wet sanding. Primed and then painted with enamel rattle can paint. I wanted to go for a non traditional clean look for this Jango armor. I wanted it to look really used so I weathered it quite heavy. I scuffed it up a bit and dry brushed rub and buff on to look like the paint was coming off. I used black and brown acrylics for the grim. The inside has foam for comfort. No visor present in these photos.
The jetpack was a big challenge for me. There are allot of curves and tapers that I was unsure how to do. I used EVA foam for the flat surfaces with a square piece of MDF for strength on the back. The cylinders were objects that I had on hand. The main "gas tank" was from a tall beer that i had "on hand". For the tapered sections I scrounged up a McDonalds cup and a couple of rattle can lids. They all fit together so they made it into the model. The thruster tubes were paper towel rolls that I strengthened with resin. I wanted to use PVC but I had to save weight. I ran a long piece of PVC for the missile on top was made with 2 dixie cups glued together with an easter egg on top to make a point. The thrusters were from dixie cups and PVC. I used hot glue to hold everything together. To seal up all the foam I covered it in mog podge and then used bondo to fill the gaps and make flat smooth surfaces. Details were done with styrene. Painted it with rattle cans and weathered with acrylics and rub and buff. I wish I would have taken a picture of it before the primer because it looked hilarious. I screwed some snaps on the back to attach it to a harness under his flack vest. The jetpack weighs in at just over 1 1/2 pounds. Now I know that this version of Jango's jetpack does not have this type of missile on it but the boy insisted on having one and I liked the color of this version.
For the Flack vest I found some clearance textured black vinyl . I made a paper pattern on him and then sewed the vest together. There is a seam on the back with velcro to get him in it. I scuffed up and weathered the vest to make it look use. The armor was done with styrene. I started out with paper pinned to the vest for size and then transferred to the styrene. A heat gun was used to form it to the correct contour. They were primed and then painted with a brushed nickel. I didn't really like the look so I used rub and buff to make them look a little more like metal. Again they were weathered with black and brown acrylics and scuffed up to look used. Velcro holds them to the vest.
At this point i learned that a 5 year old does not like standing there to size things so I took a bunch of measurements of him and built a fitting mannequin out of insulation foam. It has way more patience than him but really helped out in the construction.
I didn't have the time to sew a jumpsuit for him so I went to the net and found a child's size boiler suit. I washed it about a dozen times to fade it a little and weathered it with spray paint.
The girth belt was made with some cheep nylon rope that was glued to some brown vinyl and then painted with browns to look like leather.
The pouches and holsters were made from some brown vinyl head liner that I found on a clearance rack. I used hot glue and pop rivets to hold everything together. The original color and texture of the vinyl was bad so I spent a lot of time wrinkling and beating up the pouches to make them look more like used leather and then painted them with layers of acrylic paint for the right color. I sanded the edges to lighten the color and they ended up with a used. look. Also pop rivets are amazing for holding this type of material together. Thanks to Adam Savage for that tip from an interview he gave.
Here is a pic of the harness, holster, straps, and pouches. Didn't take any before painting pics.
I scaled the blasters to fit his body size. I used PVC and styrene for the cylinder and details. The handles were carved from MDF.
the muzzle break was sculpted from plumbers putty. Primed and used rub and buff for a shiny metal look. Weathered with acrylics to make them dirty. I still need to photograph the finished blasters so this is one with it half done.
The arm gauntlets were made from carboard, EVA foam and styrene. The missle on his left one was pvc with styrene and some plubing parts for the end cap and tip. I coated them with bondo sanded and painted them the same as previous parts. I added some electronic parts for details just for fun.
View attachment 247638View attachment 247639
At this point I was just about done with the costume. I had my studio set up for a client so I had my boy suit up for some pics. I am very happy with the end result. I still cant believe I finished this project and everyone who has seen it loves it and want to place an order for next year (LOL). I still need to connect his fuel lines better they keep pulling out of the suit. I learned a lot about building props and costumes and cant wait to start the next project. Below are the studio pics I did of him. I need to do one more with an RPF sign in it for the contest. The photos with out the smoke from the blasters have light adjustments made in adobe lightroom. I used alot of lighting to het this look.
enjoy
Proof pic for contest below
Attachments

Last edited:

