Making my first prop: The Mandalorian Helmet

Numitor

New Member
Hi RPF,

As a new member let me first introduce myself:

My name is Philip, 41 from Belgium. I've been a dentist for almost 20 years and i love movies and making stuff. I've been following RPF forums for a couple of years now and finally decided to actively participate and start making my own props and costumes...

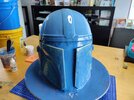
As a first project... yeah i know, not very original, but i just looooove the show; The Mandalorian helmet!

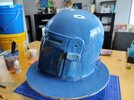
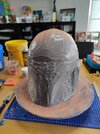
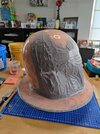
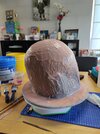
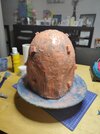
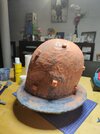
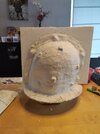
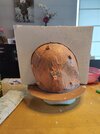
Been working on it for a few months already, modelling with 3dMax, printing it on my Prusa Mk2S (it's an oldtimer, 120km of printing!), glueing, filling, priming,... you know the drill.

Anyway this is how far i got:
_1144756.JPG
_1144757.JPG
_1144759.JPG
_1144760.JPG
_1144761.JPG
_1144764.JPG
_1144763.JPG


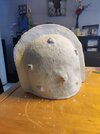
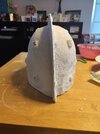
I used the bolts as a way of attaching both the earpieces and the future visor, of course they will be trimmed ;-). I designed the earpieces to have an hexagonal slot that fits, that way it's easier to paint them and attach them later.

I now have the following dilemma:

1. start the paintjob, at the risk of making mistakes and ruining it all
2. Mold and cast the piece in resin (i've got the materials) so i can keep the "master" as is, and can experiment on the copies, maybe sell some too as a kit.

What would you guys do? You think it's good enough to mold it?
Any comments are really appreciated...
 
Welcome Philip and fellow Belgian (I'm from Brussels, originally). Helmet is the bomb; really sharp and I'm sure the specialists on the RPF will deconstruct each and every details;):D Saying that, this thread should be in the StarWars section. Eager to see your next update(y)
 
Welcome Philip and fellow Belgian (I'm from Brussels, originally). Helmet is the bomb; really sharp and I'm sure the specialists on the RPF will deconstruct each and every details;):D Saying that, this thread should be in the StarWars section. Eager to see your next update(y)
Should've known that there's a Star Wars section... So this is not the way i guess, pun intended ;-). Can i move it myself or do i delete and repost?
Thanks for the welcome anyway.
 
Just my opinion, I find it is almost always worth it to mold and cast, vs finishing a filament print.
I would absolutely mold it and cast in resin or fiberglass.
 
The die is cast, the helmet will be too :lol:.
I never molded something this big, never did some rotocasting as well, so it will be an adventure.
I'll try to document the process as good as i can, so you guys can keep an eye on me in case i make stupid mistakes...
Geronimoooo! :ninja:
 
This is your first build!? Stellar work!! I'm so impressed :D

As swgeek said above, yours looks fantastic. I've been working on my own all year and feel like I know this hemet like the back of my hand - this one is really great.
 
A paint job can always be stripped and started again if you muck it up. But you did a fine job of sanding and filling so it is definitely good for a resin cast. I'm sure you know there will be a lot more work and money in making a mould for it. If you do a great job on the first casting, would you need more? (I'm sure you could sell castings to locals or ship them around Europe for a fair price).

TazMan2000
 
Last edited:
It looks amazing and really sharp! I do not know too much about the accuracy of the Mando helmet but this one looks spot on. I'm in Europe and I would definetly buy one cast in the future if these are avaiable.
 
Hi
Nice to see your first project and how happy you are doing this helmet. If I can give you few advices about 3d printed parts like this helmet maybe will help you later with the project.

1) I use 3d pen with same material(PLA) to glue parts together. From inside I do proper welding with going heavy inside the parts using hot tip of the 3d pen. From outside I just set up 3d pen for very slow speed for small details areas or fast in open lines like your helmet. Just to glue and fill gaps.

2) Do not go more than primer if you want to make silicone mould and cast. If you will make mistake with paint will be painful to sand it down and smooth helmet again( I did it few times because trying something new or paint was wrong and sticky.... ) . Use automotive primer- I use Motip grey primer few years and filler primer for second layers to fill small scratches -sanding after 24 hours.

3) For this shape of helmet the best will be glove type mould using something elastic and strong like Plat-Sil fs 10 or 20 maybe. This will help you to avoid connection line and cutting silicone. Other type maybe can be two part mould but you will spend more time making clay wall around and locking for two halfs of silicone mould. My general all round silicone is RTV condensation cure mould silicone 30 shore hardness. I use it many years and you can do everything with this. IF you are in Europe try Polycraft GP3481-F General Purpose RTV Condensation Cure Mould Making Silicone Rubber.
For your helmet you will use around 4-6 kg of silicone.
For shell you can use casting resin with poly paste 2 to make strong shell butt keep in mind this mould can be heavy with silicone and you have to make stand for it or reinforcement for shell to not change shape after time.
I have next to me huge silicone mould of Crysis costume body made from this materials and it is around 50kg and still holding shape.

4) Be sure to to check what mould release you can use with your silicone (you have Platinum and Tin base silicones ) . I tested what will happen when will make bottom part of Platinum silicone and top using Tin base silicone(used soft wax release agent between) and was jelly between in places where silicone was touching other type silicone.
Hi,
Thanks for the tips!

1) I used epoxyglue together with Gyproc fiberglass tape, does the job for me. Actually i don't have a 3d pen... Maybe in the future.
2) Yep, it's all primer you see in the pics, Motip primer and filler to be exact. Sanded with 220 grit in between layers, about 4 or 5 layers iirc.
3) planning on doing the glove-type mold. Got loads of Smooth-on Rebound 25 here. For the shell i was planning on using plaster bandages. Maybe not as strong as resin but it's cheap and i think it will hold up for the few casts i'm planning to do.
4) mold release will be Mann Ease Release 200, should be compatible.

Today i made the helmet mold-ready: closed the visor-opening with cardboard, put the helmet on a clay wall and did some final sanding and filling some small imperfections. Pics will follow.
 
So the moulding went ok yesterday, I was fighting a bit with the silicone; the more Thivex i added, the messier it got :D.

Making the hard shell I did this morning. I hope it will be strong enough...
Now watching it dry... *sigh*
:sleep:
 

Attachments

  • IMG_20201220_134642.jpg
    IMG_20201220_134642.jpg
    3 MB · Views: 131
  • IMG_20201220_134653.jpg
    IMG_20201220_134653.jpg
    3.1 MB · Views: 132
  • IMG_20201220_150408.jpg
    IMG_20201220_150408.jpg
    3 MB · Views: 120
  • IMG_20201220_150417.jpg
    IMG_20201220_150417.jpg
    3.2 MB · Views: 129
  • IMG_20201220_184732.jpg
    IMG_20201220_184732.jpg
    3 MB · Views: 160
  • IMG_20201220_184741.jpg
    IMG_20201220_184741.jpg
    3.1 MB · Views: 130
  • IMG_20201221_142421.jpg
    IMG_20201221_142421.jpg
    3 MB · Views: 120
  • IMG_20201221_142431.jpg
    IMG_20201221_142431.jpg
    2.8 MB · Views: 125
  • IMG_20201221_155813.jpg
    IMG_20201221_155813.jpg
    2.7 MB · Views: 157
  • IMG_20201221_155824.jpg
    IMG_20201221_155824.jpg
    2.2 MB · Views: 141

Your message may be considered spam for the following reasons:

If you wish to reply despite these issues, check the box below before replying.
Be aware that malicious compliance may result in more severe penalties.
Back
Top