Making iron man costume w/ EVA foam

jasminebcg

New Member
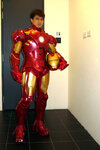
hey guys, I'm planning to purchase the mark 4 template off of XiengProd on etsy. I've never ever done something like this before, but I'll be able to do it. The thing is, I'm not sure how to size it for myself.

The costume files are for mens large, and you increase/decrease the pdf in 5% increments before printing to go up or down in size. However, I'm a girl. 5'4", smaller build. Usually a small/medium in womens, so basically small in mens. Is there any trick where I can easily figure out sizing without having to reprint and cut out endless pages of paper before transferring to foam? Or do I kind of just have to find out through trial and error? I'm guessing my size will be 90% for the most part but I'm not too sure.

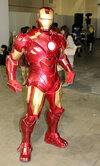
Also the costume obviously has some pieces where there are both gold and red on it. How would I go about spray painting this? Should I just hand paint the gold? Should I paint before gluing the pieces together, or after?

I just want overall tips and tricks on how to make sure this goes smoothly.
Also would like to add more detailing in the costume, nothing crazy but if you have tips for that I'd like to know that as well. I also think itd be nice if I knew how to put a hinge on the mask so I can push the front part up.

Thank you!
 
Last edited:
Hey!! So for sizing I would just go with trial and error but make sure that there is wiggle room when test fitting the templates to account for the thickness of the foam. For painting you can paint the areas that you need to be gold first then put masking tape over them and spray the red. I wouldn't paint them first because you might need to do seam filling or general clean up and you would just have to repaint. What kind of detailing were you thinking because there are a ton of different techniques. I can't really be of much help for motorizing the faceplate but I know there are lots of videos out there. If you don't want to mess with electronics though you could make a hinge that would slide out and move up, idk if that makes any sense but kind of like the hinges that are on chests except the hinge point slides.
 
Hey!! So for sizing I would just go with trial and error but make sure that there is wiggle room when test fitting the templates to account for the thickness of the foam. For painting you can paint the areas that you need to be gold first then put masking tape over them and spray the red. I wouldn't paint them first because you might need to do seam filling or general clean up and you would just have to repaint. What kind of detailing were you thinking because there are a ton of different techniques. I can't really be of much help for motorizing the faceplate but I know there are lots of videos out there. If you don't want to mess with electronics though you could make a hinge that would slide out and move up, idk if that makes any sense but kind of like the hinges that are on chests except the hinge point slides.
hey! thanks for getting back to me. I guess I'll just have to deal with the trial and error, I don't think I'll botch it too bad. In terms of detailing, I might add some little divots here and there that weren't added on the template. xieng prod has a mark 4 iron man suit template that he simplified, so I want to go in and add a little more detail--he uses a wood burner for some of the indentations, so I'll just refer to photos and see what I want to add.

I might not add faceplate mechanisms just to keep it simple for now--and in terms of seam filling and coating, I'm not sure what to seam fill with? I was going to finish the foam by coating it in modge podge, then paint, then a gloss varnish since I don't want to do resin or fiberglass.
of course! Yeah a woodburner is great for detailing you could also use a dremel if you have one. For seam filling I use kwik seal, its really only necessary if you have gaps in your seams. Mod podge is good, its what I use.
 
Hi! I think it's very cool that you are using XiengProd's templates as they are great for the beginner level. If you need reference for any of the details, a great example is roy. His suit has amazing details, and he has pictures showing it from all sides. It is quite honestly my favourite Iron Man suit, and you can see some of the work-in-progress shots on this thread here: Our Iron Man Mark IV. Other great examples are on this thread: Show me your Iron Man suit. I hope this helps.
(roy I hope you don't mind me using you as an example :) )
 
Last edited:
A couple of photos:)
(DISCLAIMER: These photos are in no way mine, but photos roy has posted on his thread and the Show me your Iron Man suit thread)
 

Attachments

  • ROYIM1.jpg
    ROYIM1.jpg
    109.1 KB · Views: 261
  • ROYIM4.jpg
    ROYIM4.jpg
    76.4 KB · Views: 154
  • ROYIM5.jpg
    ROYIM5.jpg
    82.2 KB · Views: 119
  • ROYIM6.jpg
    ROYIM6.jpg
    430.7 KB · Views: 125
  • ROYIM7.jpg
    ROYIM7.jpg
    95.5 KB · Views: 142
  • ROYIM8.jpg
    ROYIM8.jpg
    90.8 KB · Views: 147
Hi! I think it's very cool that you are using XiengProd's templates as they are great for the beginner level. If you need reference for any of the details, a great example is roy. His suit has amazing details, and he has pictures showing it from all sides. It is quite honestly my favourite Iron Man suit, and you can see some of the work-in-progress shots on this thread here: Our Iron Man Mark IV. Other great examples are on this thread: Show me your Iron Man suit. I hope this helps.
(roy I hope you don't mind me using you as an example :) )
Hey! I actually haven’t started making the suit yet, I don’t really like the 4 that much anymore and want to attempt to make the 43 model. Which might be a huge stretch for someone that has never worked with Eva foam or cosplay for that matter?? Hahaha but if I end up going through with this I’ll really take my time.
 
Do you have any mk 42/43 pepakura files to work with yet?
That suit is a little more difficult to make than say the Mk 3/4/6/7, but nothing crazy. Of you haven't found foam files yet, If not, I can dig through my stuff and upload the set I used to use (like 7 years ago lol)

0223 suit hd.jpg
 
thats super cool!!
I was looking at these, the files are under Mark 42: Cosplay Archive - Iron man papercraft

I started attempting to fit the helmet first on pepakura and printed out two trials. First trial was too big, never got around to the second fitment because I developed shoulder injuries and still am recovering so I couldn't really cut but I feel like it could have been too small. I think the most frustrating part will be just getting the fitment and ratios right.

It seems like you used the same thickness foam for the majority of the suit? thats another concern I have is layering and potentially buying a woodburner for detailing.
I believe on that particular suit I used 6mm/ quarter inch foam. Very easy to work with, especially nice if you can find a place that sells a) larger sheets and b) has it smooth on both sides; I am in the states and would order from a place called the Foam Factory. 2 sheets of 42 x 78" foam is plenty for a suit, I order enough so that shipping is free:
Cross-Linked Polyethylene Foam, Closed Cell Foam Padding, Foam Rubber Sheets

You can get away with doing all the parts and details with 1/4" foam, although you can also layer 2 or 3mm craft foam for finer details. For burning in detailing, woodburners work fine, but I would just use an old extra soldering iron. A heat gun is really handy to have as well; you can use it to help form shapes, make razor-cut detail lines open up, and also essentially anneal the foam so it is less porous and the shape is locked in.

Also, JFCustoms theads on the RPF are awesome to pick up tips/tricks that make building easier:

JFcustom's FOAM files
 

Your message may be considered spam for the following reasons:

If you wish to reply despite these issues, check the box below before replying.
Be aware that malicious compliance may result in more severe penalties.
Back
Top