So, quite a few updates on this one! I planned on making relatively small changes, but after royally messing up my triangle plate while trying to accomodate a set of new triangles, I decided to expand my modifications.
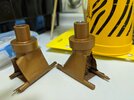
Initially planning to replace the triangle plate with whatever exisiting model I could get, I decided to take the plunge and 3D-model my own along with new t-tracks. I had some time on my hands and knew it would be a fun test!


Had both printed through Shapeways, with the triangle plate in Brushed Silver. The latter turned out a bit softer than expected, but still very nice and after a bit of extra brushing it blends in very nicely with the aluminium.

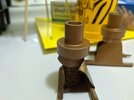
For the triangles themselves, I created small slabs of resin. After finding the right pigment, it came down to chopping them up and sanding down the cleanest pieces into the final triangles. Work in progress resin onslaught and painting of the rails:


To complete this round of modifications, I repainted and weathered parts of the grenade section to have a more accurate variation in size and also weathered the windvane to be a bit more in line with the current state of the prop -- more matte with a black wash on top.
Still a work in progress, but very happy so far!


Really happy here to have replicated the little peek at the reveal board underneath the clamp card.

Initially planning to replace the triangle plate with whatever exisiting model I could get, I decided to take the plunge and 3D-model my own along with new t-tracks. I had some time on my hands and knew it would be a fun test!
Had both printed through Shapeways, with the triangle plate in Brushed Silver. The latter turned out a bit softer than expected, but still very nice and after a bit of extra brushing it blends in very nicely with the aluminium.
For the triangles themselves, I created small slabs of resin. After finding the right pigment, it came down to chopping them up and sanding down the cleanest pieces into the final triangles. Work in progress resin onslaught and painting of the rails:
To complete this round of modifications, I repainted and weathered parts of the grenade section to have a more accurate variation in size and also weathered the windvane to be a bit more in line with the current state of the prop -- more matte with a black wash on top.
Still a work in progress, but very happy so far!
Really happy here to have replicated the little peek at the reveal board underneath the clamp card.