halrhyrr
Active Member
So I've made some decent progress on this build and as such I am now happy to post about it.
Many other Lucio builds I've seen have been missing parts, or skimping a bit on the small details. I'm hoping to fix that with this costume, go as accurate as possible while still being able to actually skate around in it.
This is my first foam build, my previous project (Daedric armor) was pep and resin, so while I have some experience these earlier pieces are a bit messy. I'm thinking of going back and re-doing them if I can afford the foam (oh the joys of being a student).
I have a soft deadline for June, ideally I want to finish it by Supanova Sydney as I think Jonny Cruz, the voice of Lucio, is a guest. My hard deadline is September, and Oz Comic Con.
Anyway, lets begin!
-----==========================-----
To begin with I collected references. I used a combination of the Blizzard reference kit and a ripped 3D model.


I don't have any pics of this next stage but then, using a combination of screenshots printed out to scale, rotating round the 3D model and measuring distances between points, duct tape, and a lot of trial and error (mostly error) I created templates. At this point I just did templates for all the main armor pieces of the leg.
Then, finally, I got started actually building it. I did the crotch/butt armor first, it was mostly just flat and relatively small, a good practice piece.


I am using 8mm and 2mm foam from The Hero Studio, and dowels (1.5cm and 2cm) from Lumin's workshop here.

I also sewed the singlet. I haven't done much sewing before and as such I am kinda terrible at it. I am planning to use iron on transfer paper to do the logo but I might redo the shirt in stretch vinyl rather than the t-shirt material I used, as well as finish off the seams properly.
.jpg")
Ok now back to the foam. I made the ankle bits (excuse my messy desk, I don't have all that much space to work)...

...And the toe bits.
(Not pictured)
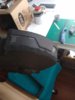
Then I started moving up the leg. I made the shin armor, plus created those funky bevels on the 'wings' by sandwiching two bits of foam together and cutting/sanding it to shape.


You can see a bit of a template to the side there haha. Once again the seams are a bit messy, but I'll either sand, fill, and clean them up, or I might just end up re-doing any bits that aren't up to standard with the rest of them.
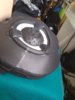
Next up, the knees. These are probably my favorite bits so far. The shape was really fun to put together, as were the details, and they are a scarily perfect fit. I apologize for the lighting in the next few photos, the light in my room is broken (the electrics not the bulbs) and so at night I use a couple of desk lamps and a head torch haha.
These knees were also taken from a flat template. They were cut out and one side was beveled at a 45 degree angle before sticking them together with contact cement. I then heated them up and gave them a bit more of a domed shape, then added the details. The circles on the sides are 3cm bevels from Lumin's workshop, cut to a 25cm length and stuck end to end, then detailing added inside.

At this point I also tested something with the fingers which ended up working surprisingly well. Lucio has these little bits of armor or something on the fingertips of his left hand. I was pondering how to do this when I thought about using foam clay (again from Lumin's Workshop). I moulded it around my fingers, carefully peeled it off, then let it sit and cure. 12 hours later I had some snug fitting little fingertips I cleaned up and added details to. I am yet to attach these to the glove (they connect to an armored plate that sits on the hand) but that's soon on my to-do list.


Oh yeah, those 'wires' were also foam clay, just rolled little sausages.
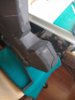
Now comes one of the bigger bits, the thighs. I had a template with the basic shapes which I then assembled in foam. Usual deal, trace, cut, bevel, glue. Excuse my terrible photo. Turns out it is quite hard to take photos of your own leg.

Next was the details in those holes. I traced out the shape and then with a bit of paper and tape assembled a quick template, before once again doing it in foam and attaching it. The thighs are a bit oversized, just due to the design of the armor but these bits plus some EVA foam on the back helps keep it snug against my leg. I'm planning to have them clip onto the belt too, so they don't slide down. I also did the few other details at this point, the little circles/bolts. I just pressed the grinding bit of my dremel into the foam and hoped it didn't careen off to the side.

Next was beginnings of the hip/upper thigh bits. There's a little plate that sits behind this armor at the front, it has some sort of speaker thingy on it. This was basically just a flat piece with a hole cut out and a bit of foam I heated up and domed stuck behind it. I also sanded down and beveled all the edges while I was at it.

And this is where I leave it for now. Next up will be those big circular bits on the thighs/hips. I'm planning to build a bit of storage space into those for the battery packs that will power the lights on the skates. Hopefully I'll be able to update again later today or tomorrow, I'm on holidays so I have a ton of free time to work on this.
Many other Lucio builds I've seen have been missing parts, or skimping a bit on the small details. I'm hoping to fix that with this costume, go as accurate as possible while still being able to actually skate around in it.
This is my first foam build, my previous project (Daedric armor) was pep and resin, so while I have some experience these earlier pieces are a bit messy. I'm thinking of going back and re-doing them if I can afford the foam (oh the joys of being a student).
I have a soft deadline for June, ideally I want to finish it by Supanova Sydney as I think Jonny Cruz, the voice of Lucio, is a guest. My hard deadline is September, and Oz Comic Con.
Anyway, lets begin!
-----==========================-----
To begin with I collected references. I used a combination of the Blizzard reference kit and a ripped 3D model.
I don't have any pics of this next stage but then, using a combination of screenshots printed out to scale, rotating round the 3D model and measuring distances between points, duct tape, and a lot of trial and error (mostly error) I created templates. At this point I just did templates for all the main armor pieces of the leg.
Then, finally, I got started actually building it. I did the crotch/butt armor first, it was mostly just flat and relatively small, a good practice piece.
I am using 8mm and 2mm foam from The Hero Studio, and dowels (1.5cm and 2cm) from Lumin's workshop here.
I also sewed the singlet. I haven't done much sewing before and as such I am kinda terrible at it. I am planning to use iron on transfer paper to do the logo but I might redo the shirt in stretch vinyl rather than the t-shirt material I used, as well as finish off the seams properly.
Ok now back to the foam. I made the ankle bits (excuse my messy desk, I don't have all that much space to work)...
...And the toe bits.
(Not pictured)
Then I started moving up the leg. I made the shin armor, plus created those funky bevels on the 'wings' by sandwiching two bits of foam together and cutting/sanding it to shape.
You can see a bit of a template to the side there haha. Once again the seams are a bit messy, but I'll either sand, fill, and clean them up, or I might just end up re-doing any bits that aren't up to standard with the rest of them.
Next up, the knees. These are probably my favorite bits so far. The shape was really fun to put together, as were the details, and they are a scarily perfect fit. I apologize for the lighting in the next few photos, the light in my room is broken (the electrics not the bulbs) and so at night I use a couple of desk lamps and a head torch haha.
These knees were also taken from a flat template. They were cut out and one side was beveled at a 45 degree angle before sticking them together with contact cement. I then heated them up and gave them a bit more of a domed shape, then added the details. The circles on the sides are 3cm bevels from Lumin's workshop, cut to a 25cm length and stuck end to end, then detailing added inside.
At this point I also tested something with the fingers which ended up working surprisingly well. Lucio has these little bits of armor or something on the fingertips of his left hand. I was pondering how to do this when I thought about using foam clay (again from Lumin's Workshop). I moulded it around my fingers, carefully peeled it off, then let it sit and cure. 12 hours later I had some snug fitting little fingertips I cleaned up and added details to. I am yet to attach these to the glove (they connect to an armored plate that sits on the hand) but that's soon on my to-do list.
Oh yeah, those 'wires' were also foam clay, just rolled little sausages.
Now comes one of the bigger bits, the thighs. I had a template with the basic shapes which I then assembled in foam. Usual deal, trace, cut, bevel, glue. Excuse my terrible photo. Turns out it is quite hard to take photos of your own leg.
Next was the details in those holes. I traced out the shape and then with a bit of paper and tape assembled a quick template, before once again doing it in foam and attaching it. The thighs are a bit oversized, just due to the design of the armor but these bits plus some EVA foam on the back helps keep it snug against my leg. I'm planning to have them clip onto the belt too, so they don't slide down. I also did the few other details at this point, the little circles/bolts. I just pressed the grinding bit of my dremel into the foam and hoped it didn't careen off to the side.
Next was beginnings of the hip/upper thigh bits. There's a little plate that sits behind this armor at the front, it has some sort of speaker thingy on it. This was basically just a flat piece with a hole cut out and a bit of foam I heated up and domed stuck behind it. I also sanded down and beveled all the edges while I was at it.
And this is where I leave it for now. Next up will be those big circular bits on the thighs/hips. I'm planning to build a bit of storage space into those for the battery packs that will power the lights on the skates. Hopefully I'll be able to update again later today or tomorrow, I'm on holidays so I have a ton of free time to work on this.
Last edited:
") I'm just finishing up the armband and the earpiece today so I'll post those later. Be warned, my contact cement is super messy on them RIP.
I'm just finishing up the armband and the earpiece today so I'll post those later. Be warned, my contact cement is super messy on them RIP.