Lost In Space-Jupiter II 2020

gt350pony66

Master Member
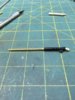
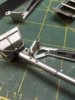
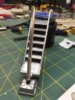
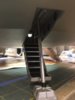
Ok, not much of a break since the Nautilus but the lighting kit and PE/Decal sets showed up today so I decided to dive in. I chopped of the landing struts and replaced them with brass rod covered with a perfect fit aluminum tubing. One set of boarding steps is finished. I took the liberty of blacking out the side rails and the backings to liven it up a bit. It looked pretty plain otherwise
 

Attachments

  • j2-1.jpeg
    j2-1.jpeg
    78.3 KB · Views: 347
hit post by accident, here's the rest of the pics
 

Attachments

  • j2-2.jpeg
    j2-2.jpeg
    56.9 KB · Views: 383
  • j2-4.jpeg
    j2-4.jpeg
    47.5 KB · Views: 341
  • j2-5.jpeg
    j2-5.jpeg
    52.1 KB · Views: 413
  • j2-6.jpeg
    j2-6.jpeg
    48.3 KB · Views: 409
  • j2-7.jpeg
    j2-7.jpeg
    58 KB · Views: 411
  • j2-8.jpeg
    j2-8.jpeg
    54.1 KB · Views: 399
  • j2-9.jpeg
    j2-9.jpeg
    56.6 KB · Views: 406
  • j2-10.jpeg
    j2-10.jpeg
    58.7 KB · Views: 397
Got a little done this weekend, the legs installed and the lower hull painted. I just couldn't deal with there not being any hull landing lights. I saw one on youtube with the LED's sticking through the hull, kinda ugly. So I tool some Evergreen tube and made some recessed cans and kept it subtle, only six. In the dark though it would seem to be enough for a good effect. I cut the panel behind the front main door so light will come through the window and I put a couple of FO strands in the control panel, one red sharpie and one green on the end and secured it with laser-bond...it great ****...
 

Attachments

  • jup2a.jpeg
    jup2a.jpeg
    35.7 KB · Views: 341
  • jup2b.jpeg
    jup2b.jpeg
    36.6 KB · Views: 349
  • jup2c.jpeg
    jup2c.jpeg
    34.2 KB · Views: 349
  • jup2d.jpeg
    jup2d.jpeg
    108.9 KB · Views: 349
  • jup2e.jpeg
    jup2e.jpeg
    79.9 KB · Views: 377
  • jup2f.jpeg
    jup2f.jpeg
    89.2 KB · Views: 353
Very nice work. I think of all the kits that are out there and one I have in my stash the JPII is probably the most intimidating to start so much to do. Your's is inspiring.
 
Very nice work. I think of all the kits that are out there and one I have in my stash the JPII is probably the most intimidating to start so much to do. Your's is inspiring.
Well thanks, most kind! At least though it's a lager scale that allows for modifications. I'm in the middle of hogging the partition walls that stick out into the main floor of the flight deck. In the show I noticed they are illuminated. It's a crap load of work to thin the pieces and there's only enough room for a 2mm LED. I cut strips of thin light diffusing acrylic sheet to go over the widened area. I've only done one so far, and thinking on it, it could light up much better with two LED's rather than one. So I'll experiment on the second one and see. Pics tonight...
 
Well thanks, most kind! At least though it's a lager scale that allows for modifications. I'm in the middle of hogging the partition walls that stick out into the main floor of the flight deck. In the show I noticed they are illuminated. It's a crap load of work to thin the pieces and there's only enough room for a 2mm LED. I cut strips of thin light diffusing acrylic sheet to go over the widened area. I've only done one so far, and thinking on it, it could light up much better with two LED's rather than one. So I'll experiment on the second one and see. Pics tonight...

Have you looked at using Filament LEDs? I'm using 67mm for my walls, just a suggestion.

 
Have you looked at using Filament LEDs? I'm using 67mm for my walls, just a suggestion.

Damn, that's pretty freakin' cool. I'll have to look into getting some of those. I'm a lighting freak, if I can't light a model I'm not interested in building it.
Thanks for the tip brother. Although for this one it's too late but I could sure use those in the future. I got a second wall done today, tedious work and time consuming. I went with two 2mm on this one and angled them. much better results, sad thing is I can't pry the first one apart to add another LED without destroying it
 
the last couple of pics are my first attempt with a single LED, not bad but wasn't good enough. the rest are the second try with two, much better. although it doesn't illuminate completely top to bottom and the camera doesn't catch the dark areas, it'll do. though for future projects I'll definitely be looking into the strip LED's that Teslabe pointed out (y)
 

Attachments

  • lis1.jpeg
    lis1.jpeg
    51.2 KB · Views: 268
  • lis2.jpeg
    lis2.jpeg
    44.7 KB · Views: 285
  • lis3.jpeg
    lis3.jpeg
    69.5 KB · Views: 288
  • lis4.jpeg
    lis4.jpeg
    51.9 KB · Views: 272
  • lis5.jpeg
    lis5.jpeg
    54.4 KB · Views: 283
  • lis6.jpeg
    lis6.jpeg
    44.4 KB · Views: 268
  • lis7.jpeg
    lis7.jpeg
    66.5 KB · Views: 267
  • lis8.jpeg
    lis8.jpeg
    60.3 KB · Views: 280
  • lis9.jpeg
    lis9.jpeg
    58.4 KB · Views: 276
  • lis10.jpeg
    lis10.jpeg
    88.5 KB · Views: 279
  • lis11.jpeg
    lis11.jpeg
    84.5 KB · Views: 310
  • lis12.jpeg
    lis12.jpeg
    42.9 KB · Views: 282
  • lis13.jpeg
    lis13.jpeg
    56.9 KB · Views: 280
  • lis14.jpeg
    lis14.jpeg
    38.7 KB · Views: 286
  • lis15.jpeg
    lis15.jpeg
    87.5 KB · Views: 287
  • lis16.jpeg
    lis16.jpeg
    107.3 KB · Views: 299
I've been putting off my J2 for so long waiting on a practical solution to lighting those ribs. This looks great! TFS
 
Great work so far gt350pony66, I'm much like you in that if I can't light a model then it doesn't hold much interest to me.

I've had my Jupiter 2 packed up for about a year now (annoying when other things get in the way of your modelling!) but one of the things I did manage to get done on mine was lighting and extending the beams. I had thought of using normal LEDs like you did, but managed to find a very thin and flexible led strip online so decided to go with that.
I carved away a lot of the stock piece and rebuilt the beams with their extension. Once they are painted they come up quite well, I still have to create the dark brown panel pieces for each of the walls.

Might be some food for thought for any future projects you tackle!

J2 Wall inside.jpgJ2 walls unpainted.jpgJ2 walls painted.jpg
 
Great work so far gt350pony66, I'm much like you in that if I can't light a model then it doesn't hold much interest to me.

I've had my Jupiter 2 packed up for about a year now (annoying when other things get in the way of your modelling!) but one of the things I did manage to get done on mine was lighting and extending the beams. I had thought of using normal LEDs like you did, but managed to find a very thin and flexible led strip online so decided to go with that.
I carved away a lot of the stock piece and rebuilt the beams with their extension. Once they are painted they come up quite well, I still have to create the dark brown panel pieces for each of the walls.

Might be some food for thought for any future projects you tackle!

View attachment 1258451View attachment 1258453View attachment 1258452
Oh hell yes!! That's what I'm talking about! That is excellent!!! I wondered about that approach. what size are those strips? too late for this build but I could use that in the future. I love the beam extensions, absolutely fantastic!!(y)
 
Oh hell yes!! That's what I'm talking about! That is excellent!!! I wondered about that approach. what size are those strips? too late for this build but I could use that in the future. I love the beam extensions, absolutely fantastic!!(y)
I wish I had thought to scratch the beams like you did, would have been much easier that all this Dremel work. but...it's not too late is it. I'm sure glad you posted this here before I went any further(y)
 
Back
Top