Hello everyone,
It's been a bit but I wanted to follow up with how the molding and casting process went down for the biomechanical if anyone was interested.
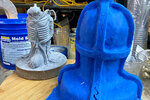
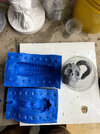
What I ended up doing: Glove mold for the body, box molds for the tail and two smaller heads, and a two-part mold for the main head.
What I used: Mold-Star 30 for silicone, Smooth-cast 305 for resin, and Free-Form Air for the glove mold shell.
This was a lot of work. More than I really understood. But, it was a great learning experience. And I learned a lot. There were mistakes. Very noobish mistakes. I expected things to happen, but there was the unexpected as well. You can watch videos and take notes but you never really know until you are in there, doing it, and that's where the real learning begins.
Box molds could be nicer. They're definitely not sized the greatest and my cuts for extraction were crap, but they work. Glove mold had a number of issues, but it works. Best mold was the two piece mold. Works great with minimal clean up. That was my favorite one to make.
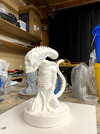
Ultimately it was a success. I am able to reproduce the damn thing and it feels great! Now, how long the mold is going to last...
One thing I tried this weekend was to run a hollow cast with foam. Almost worked, except the resin didn't capture all of the details and it was pock marked. I'm going to go solid cast with some URE-Fil for the reproductions. Presently have one master, one failure, and one fully produced and ready for paint.
I wrote about it in-depth here. This has notes on what I did, what went wrong, and what I will do differently the next time I make a glove mold.
Glove Mold Notes
I also did a speed video. If you're interested in that kind of thing. I'd turn your volume off when watching as I didn't realize a few minutes in there is the sped up sound of whatever music I was listening to:
https://youtu.be/awsf7g-eOC8?si=7avRJKWSwhEMC4C0
Here are some pictures:
- Beginning the print layer
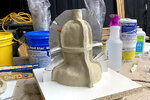
- The clay shroud and shims
- Shell complete and prepping to pour the glove
- Glove in shell (cracked the shell but was able to fix with some super glue)
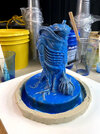
- Body separated from the glove
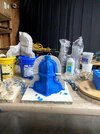
- Tail and smaller head box molds
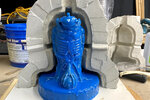
- Main head mold
- First two body pulls. The middle one had some issues.
- First complete pull
That's the gist of it. Thanks for letting me share!