You are using an out of date browser. It may not display this or other websites correctly.
You should upgrade or use an alternative browser.
You should upgrade or use an alternative browser.
Lightsaber builds: V2, V3, Obi Stunt, Vader ROTJ & Technical Manual Saber
- Thread starter Country Paul
- Start date
Re: V2, V3 & ANH Obi Stunt Lightsaber builds
freak'n awesome!! i saw he has a set on ebay, i think im gonna grab them just to have them
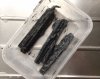
they're 2 pieces so you can have them with or without the washer & the transistor part is threaded on the back")
freak'n awesome!! i saw he has a set on ebay, i think im gonna grab them just to have them
Country Paul
Sr Member
Re: V2, V3 & ANH Obi Stunt Lightsaber builds
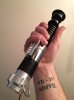
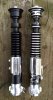
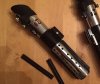
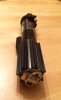
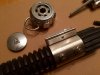
I widened the "mystery chunk" screw hole so that I could fit a wire through,
this is one is really just a placeholder until I find something better/ more vintage looking
i also drilled another set of holes in the clamp spacer for the transistors to give me another position for the clamp
its in the garage now with a quick coat of satin black, I'm still not sold that the V2 ever had the brown/brass neck so at the moment I'm not planning to paint it but I know that at least one Obi stunt definitely did as seen in some of the pics (V3?)
I figure if the neck was painted it was probably over a coat of black & probably brushed on (can't see them masking off to spray it) :lol
Attachments

Country Paul
Sr Member
Re: V2, V3 & ANH Obi Stunt Lightsaber builds
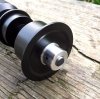
I'm not sure if we really know how many stunts were made for ANH beyond the V2 & V3
it looks like the clamp has slid up on the grenade in those pics as there are only 7/8 rings showing
I've given my Russrep Obi Stunt/V2 a coat of satin black
I'm not planning on doing the brown/bronze neck at the moment as I'm still not convinced the V2 had it
Ive not found a better "red button" yet so for now I'm sticking with the placeholder wooden skewer so given it a quick coat of red paint :lol
View attachment 519667
The rings on the grenade part of this hilt look a lot more rounded than they do in other pictures. Is the another stunt saber?
Sent from my SM-T320 using Tapatalk
I'm not sure if we really know how many stunts were made for ANH beyond the V2 & V3
it looks like the clamp has slid up on the grenade in those pics as there are only 7/8 rings showing
I've given my Russrep Obi Stunt/V2 a coat of satin black
I'm not planning on doing the brown/bronze neck at the moment as I'm still not convinced the V2 had it
Ive not found a better "red button" yet so for now I'm sticking with the placeholder wooden skewer so given it a quick coat of red paint :lol
Attachments

Country Paul
Sr Member
Re: V2, V3 & ANH Obi Stunt Lightsaber builds
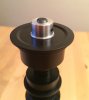
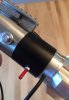
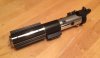
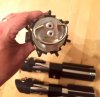
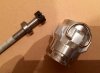
Put the newly painted red button in, its literally just pushed through the cone hole & has a blob of blutack inside the pommel to keep it from falling out,
I could do with moving the clamp round a touch but i snapped the screw I was using to tap the holes for the transistors so need to get another first :lol
im thinking that even though this is basically an AFB it could still use a little weathering
Attachments
Country Paul
Sr Member
Re: V2, V3 & ANH Obi Stunt Lightsaber builds
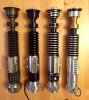
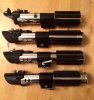
Rather than start a new thread I'll make this my Lightsaber one
After ordering a new MPP shroud from Roy I realised that all of my Vader sabers are in need of some TLC
My ANH (Parks MPP) needs its new Shroud & it currently only has 6 grips, I think it needs 7
My ESB (MR Force FX) this was suffering badly with sticky grips so I rather rashly took them off to clean up with acetone, big mistake they melted :facepalm
My ROTJ (fan made £15 from eBay) ok this is just a rough pipe build but I'm kinda fond of it, gonna try to make some improvements, only has 6 grips, random D-ring on bottom, black parts turning green :lol one day I'll hopefully get parts for a proper build
Attachments
Country Paul
Sr Member
Re: V2, V3 & ANH Obi Stunt Lightsaber builds
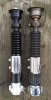
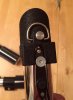
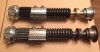
When I ordered the MPP shroud from Roy I thought I'd put my Parks one on my Heiland along with a bulb release part from a Hasbro ultimate FX,
but then I remembed a picture in my old Star Wars Technical manual from the mid 90's
the Vader saber is clearly based on a Heiland right down to the hexagonal end cap :lol
so I figured I'd do a Technical manual saber
could do with some better grips & my Heiland is pretty worn but I like it for now
Attachments
-
 image.jpg528.8 KB · Views: 115
 -
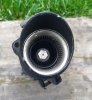 image.jpg287.8 KB · Views: 125
 -
 image.jpg409.4 KB · Views: 130
 -
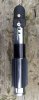 image.jpg523.2 KB · Views: 116
 -
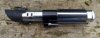 image.jpg503.1 KB · Views: 115
 -
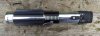 image.jpg534.2 KB · Views: 113
 -
 image.jpg421.5 KB · Views: 109
 -
 image.jpg414.4 KB · Views: 136
 -
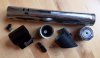 image.jpg411 KB · Views: 105
 -
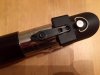 image.jpg589.2 KB · Views: 122
Country Paul
Sr Member
Re: Lightsaber builds: V2, V3, Obi Stunt, Vader Technical Manual Saber
I know that arguably I'm just polishing a turd with this one but I've done some work on my ROTJ Vader,
this is a fan made pipe build that I picked up for about £15 on eBay when I first started collecting, I know it's not accurate but it's got the look close enough for me
I took all of the parts off (turns out they're resin) & replaced the 6 broken grips with 7 other ones that I had spare
I drilled the 3 holes between the grips on the right side (positioning isn't 100% but I'm not worried)
I re-sprayed all of the black parts satin black
I decided to add the little squarish hole at the top/front (drilled with a hand drill I managed to slip & the drill bit went straight through my finger tip & came out of my nail which hurt like hell & was arguably too higher price to pay to improve this
I considered trying to add the Graflex side port holes that can be seen on the original prop but I didn't feel like more drilling
Put it back together today just waiting for my Kobold/D-ring to arrive from Roy now
Attachments
-
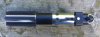 image.jpg436.7 KB · Views: 108
 -
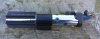 image.jpg406.6 KB · Views: 106
 -
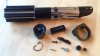 image.jpg348.5 KB · Views: 104
 -
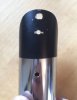 image.jpg208.9 KB · Views: 101
 -
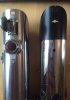 image.jpg443.7 KB · Views: 111
 -
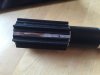 image.jpg522 KB · Views: 100
 -
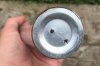 image.jpg272.9 KB · Views: 101
 -
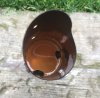 image.jpg187.5 KB · Views: 97
 -
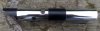 image.jpg390.6 KB · Views: 108
 -
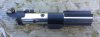 image.jpg502.4 KB · Views: 119
 -
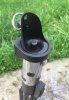 image.jpg444.3 KB · Views: 112
Country Paul
Sr Member
Got my parts from Roy & decided to start on replacing the grips on my MR Force FX Vader ESB that I melted
cut to length & started to notch out the underside, the endcap on the Force FX hilt is a lot thicker than on my Parks MPP so figured I needed to notch it like the ones I took off if they're gonna sit flush
cut to length & started to notch out the underside, the endcap on the Force FX hilt is a lot thicker than on my Parks MPP so figured I needed to notch it like the ones I took off if they're gonna sit flush
Attachments


Country Paul
Sr Member
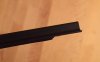
Been doing lots of sawing & filing of grips the last couple of days
realised recently quite how neglected most of my sabers have been
So I've replaced the 6 rubber grips with 7 of Roy's on my ANH Vader & upgraded the shroud to Roy's
replaced the long grips on my ESB vader
added the Kobold D-ring to my ROTJ Vader, this was my first time using a rivet gun & I didn't get it positioned exactly as I'd like but I'll live with it :lol
I'm hopefully getting a more accurate control box & Shroud for this saber soon
Attachments
Country Paul
Sr Member
I saw Roman's D-Ring tutorial thread yesterday & decided to finally man up & add D-rings to my Obi Sabers :lol
it's only taken me about 2 years to do
I also added the D-Ring I got from Roy on to my Starkiller V2 as well as swapping the rubber washers I had on the rod for a shaft collar
I didn't get the obi rings perfect but I'm happy enough
I've always fancied getting one of Russ or Roman's Pommels but I've never been sure if they'd work with my adapter or thread to my booster
Attachments
Country Paul
Sr Member
Great work man! How'd you drill into your sink knob? I....shamefully admit someone is doing mine for me
as I say it's taken me a couple of years to finally add the D-Rings :lol
I didn't do anything clever, I just cut a little bit out of the bottom of the D-Ring & then carefully drilled through the cube of the sink knob with a hand drill
I did a bit more work on my Vader ROTJ, I know it's only ever gonna be a £15 sink tube saber but Hopefully I can get it just a little closer
I replaced the shroud & control box with more accurate ones & im pretty pleased with how they look
slightly messed up the screw hole for the door catch part but I'm not gonna worry too much (for now)
Attachments
3 CELL PO
Active Member
This one is a win. :eek I like it a lot.
I've debated whether or not to post this build thread because I know it's not accurate, but I put a lot of work into this saber & figured it was worth sharing
this was I think the 2nd lightsaber I bought, I got it from eBay for about £10, it started off as a kind of Luke Hero, it had a crude control box glued on when I got it (that I never took a picture of) & a switch next to it (it has a battery pack & bulb inside it?) I think someone probably made it at home :lol
I'd added a Graflex clamp when I first got it & later added the foil coverings to make it more Shared stunt looking
the new V2 information & run reignited my interest in this saber so I decided to use it to try & finally get over my fear of drilling into lightsabers
armed with my trusty hand drill I slowly started adding the 2 holes behind the pommel & the 2 holes in the emmiter/windvane,
I used a hand saw to cut a notch in the neck, & files to remove the "nipple" from the emitter
All of which took me ages by hand & provided me with some lovely blisters
Similar threads
- Replies
- 23
- Views
- 2,238
- Replies
- 32
- Views
- 3,262
- Replies
- 20
- Views
- 2,735
- Replies
- 6
- Views
- 1,018