May 5, 2025
What better way to celebrate May 4th than with a new build thread!
After I finished the Empire AT-ST I needed to take a break. Going from straight from the TIE Bomber into that one left me creatively tapped out. I was incredibly proud of both build but I just needed to recharge my batteries. I knew WonderFest was around the corner and I felt like it be a good time to rest up. Plus, I didn't have any new builds on the radar.
I enjoyed doing nothing with my time, well, not really "nothing" but nothing model related. After a while though the BS from work started moving into the bandwidth freed up by not building models. It took me awhile to figure out what was happening but as soon as I realized what was happening I ran back to the bench.
The escape pod has been a bucket (literally)list/white whale build for me that actually started almost 20 years ago.It's my equivalent of Phil Tippett's "Mad God" movie. Inspired by what other members of the RPF were doing in 2006 and learning the lore of the original model using paper buckets as the foundation, I naively took it upon myself to tackle building my own.
I made my own body sections from paper paint buckets reinforced with foam core and wrapped it in thin styrene. It was solid AF. I made a very meager investment in maybe a dozen available donor kits but very far from what would be needed. Plus I knew zero about casting.
Over time things got busy. My wife at the time and I moved cross country and the escape pod was packed up with the other kits never to be completed but sold on the RPF Junkyard.
All of this was documented but back then we had to use photo hosting sites and the photos no longer exist except for one. (Those little wire cutters are still in use to this day.)

After becoming active again on the RPF the summer of 2021 with a couple of MPC background model X-Wings I joined in on the Masterpiece Models Skyhopper group build. That lit the fire for me to attempt the escape pod again.
I was impressed with the Skyhopper kit and began eyeing the two greeblie packs collaboration with Moffeaton. By the time I was ready to pull the trigger on buying the future of Masterpiece Models was in flux. John was selling the company so they weren't taking orders, then relocating to NC, then taking some orders but not really. In a fit of impatience I did something rash in the spring of '23. I ordered an escape pod kit from Goldenarmor.
I didn't know something had transpired on the RPF or his banned status at the time. I do now although I do now but not the details.
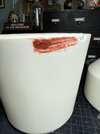
The kit arrived and was sent back the next day. A picture says a thousand words:


Eventually Masterpiece Models got up and running and in the fall I finally ordered my kit. It's arrival was somewhat anti-climatic as I had moved on to doing scratch built studio scale models, ironically out of frustration from the lack of quality I was seeing out of resin kits.
When it arrived I was neck deep in the TIE Bomber so it got put in the closet but not before a quick inspection. The hull looked fine but all the parts had a texture on them. Like so much release spray was used that it resulted in a texture on all the parts.

With a sigh it was boxed up and put in the stash. After reading Vectorzero's great build log of the pre-selling of the company kit I learned that the laser cut styrene panels for the hull are too short and would require modification or remade altogether. Another reason for me to leave it in it's box.
By the time I finished the chicken walker I had amassed a decent stash of kits and entertained the idea seeing how many cast parts I could replace with original ones.
That brings me to today. I had entertained the idea of having a hull 3D printed with a complimenting set of laser cut styrene panels bu at this point I'm tired of throwing money at this crazy thing. It's time to put the rubber to the road once and for all.
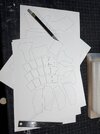
The plan is to use the exiting hull and I'll cut new panels for it while replacing as many parts as possible with original ones. I've already received some donor original parts from some of the great people over at the Nerf Herder's Facebook group.
In the past week I've began going through the stash and snipping parts and gluing greeblies.


Get comfortable, folks. It's time to make a silk purse out of this sow's ear. It's a build 19 years in the making.
What better way to celebrate May 4th than with a new build thread!
After I finished the Empire AT-ST I needed to take a break. Going from straight from the TIE Bomber into that one left me creatively tapped out. I was incredibly proud of both build but I just needed to recharge my batteries. I knew WonderFest was around the corner and I felt like it be a good time to rest up. Plus, I didn't have any new builds on the radar.
I enjoyed doing nothing with my time, well, not really "nothing" but nothing model related. After a while though the BS from work started moving into the bandwidth freed up by not building models. It took me awhile to figure out what was happening but as soon as I realized what was happening I ran back to the bench.
The escape pod has been a bucket (literally)list/white whale build for me that actually started almost 20 years ago.It's my equivalent of Phil Tippett's "Mad God" movie. Inspired by what other members of the RPF were doing in 2006 and learning the lore of the original model using paper buckets as the foundation, I naively took it upon myself to tackle building my own.
I made my own body sections from paper paint buckets reinforced with foam core and wrapped it in thin styrene. It was solid AF. I made a very meager investment in maybe a dozen available donor kits but very far from what would be needed. Plus I knew zero about casting.
Over time things got busy. My wife at the time and I moved cross country and the escape pod was packed up with the other kits never to be completed but sold on the RPF Junkyard.
All of this was documented but back then we had to use photo hosting sites and the photos no longer exist except for one. (Those little wire cutters are still in use to this day.)
After becoming active again on the RPF the summer of 2021 with a couple of MPC background model X-Wings I joined in on the Masterpiece Models Skyhopper group build. That lit the fire for me to attempt the escape pod again.
I was impressed with the Skyhopper kit and began eyeing the two greeblie packs collaboration with Moffeaton. By the time I was ready to pull the trigger on buying the future of Masterpiece Models was in flux. John was selling the company so they weren't taking orders, then relocating to NC, then taking some orders but not really. In a fit of impatience I did something rash in the spring of '23. I ordered an escape pod kit from Goldenarmor.
I didn't know something had transpired on the RPF or his banned status at the time. I do now although I do now but not the details.
The kit arrived and was sent back the next day. A picture says a thousand words:
Eventually Masterpiece Models got up and running and in the fall I finally ordered my kit. It's arrival was somewhat anti-climatic as I had moved on to doing scratch built studio scale models, ironically out of frustration from the lack of quality I was seeing out of resin kits.
When it arrived I was neck deep in the TIE Bomber so it got put in the closet but not before a quick inspection. The hull looked fine but all the parts had a texture on them. Like so much release spray was used that it resulted in a texture on all the parts.
With a sigh it was boxed up and put in the stash. After reading Vectorzero's great build log of the pre-selling of the company kit I learned that the laser cut styrene panels for the hull are too short and would require modification or remade altogether. Another reason for me to leave it in it's box.
By the time I finished the chicken walker I had amassed a decent stash of kits and entertained the idea seeing how many cast parts I could replace with original ones.
That brings me to today. I had entertained the idea of having a hull 3D printed with a complimenting set of laser cut styrene panels bu at this point I'm tired of throwing money at this crazy thing. It's time to put the rubber to the road once and for all.
The plan is to use the exiting hull and I'll cut new panels for it while replacing as many parts as possible with original ones. I've already received some donor original parts from some of the great people over at the Nerf Herder's Facebook group.
In the past week I've began going through the stash and snipping parts and gluing greeblies.
Get comfortable, folks. It's time to make a silk purse out of this sow's ear. It's a build 19 years in the making.
Attachments

Last edited:
 ...will follow your build for sure