Funnily enough, not in my thread. I added something to ECLs the other day as there were a couple of posts about it. Now, I do want to flag that I am nowhere near an expert in fleeces. I'm just a very opinionated dude

For the one v2 puppet that I made, I used the Frog Fuzzelle again but after using F3 for my v3, I'm not the biggest Fuzzelle fan anymore. The color was close but not close enough but even dying my own I'd still prefer the F3. The fuzzelle is very dull and has a knit backing that is just a bit too loose. If you sew too close to the edge, you run the risk of unraveling the fabric a bit. Fuzzelle is still a great option though!
The F3 has a much tighter knit that I really love. The pile is also denser than Fuzzelle and it dyes beautifully. It has a shine that is similar to the Malden Mills fabric that has been used for Kermit since the late 70s until it runs/ran out since it hasn't been made in a while.
Nylafleece is just ok. I didn't jump in to the game until way too late to get some OG Antron fleece or the first couple of variations of Nylafleece but from what I've heard, the quality now is nothing near what it used to be. It used to be much more similar to the original true Antron fleece which was slightly fluffy and had a mix of normal and shiny fibers (was probably the same fiber it just caught light in a more complex way). It's also so thin. I also think this has it's purposes as it does things that neither F3 or Fuzzelle can do, like the pilling that you see in early Kermits. It's just that Georgia Stage has not put in the work or the money to get a supplier that can make it like the guy they bought the rights from. They say that "the fiber isn't made anymore". Well, then make it?! so Nylafleece is now just a step above polar fleece in terms of appearance to me, personally.
That being said, they all have their roles!! I loved using nylafleece when I made Beakers nose. It stretches beautifully and I like the duller look for his specific nose, even though I used F3 for his head. Sometimes the F3 is a bit too shiny so I would use fuzzelle when I need the look of the F3 but want it to be dull. Nylafleece would be used when making an older Kermit or something because that is the only one that can pill, or when I need something SUPER stretchy to wrap around a complex shape without having to make a complex pattern.
Here's my post that I put in ECL's thread to keep a record of it here as well:
Just to jump in regarding the F3 fleece, I love it!! It's my favorite of the 3 and very similar to the Malden Mills fleece used on Kermit from the late 70s until the supply ran out (though Kermit's current makers, Puppet Heap might have stock that they are still able to use). It's slightly shinier than the Malden Mills fleece, but much better than the very matte/dull Fuzzelle. It also has a tighter knit on the back of it than the Fuzzelle, making it much easier to sew with as you can get much closer to the edge than you can with Fuzzelle. It can be purchased by the yard from Dharma Trading, but it does only come in white and needs to be dyed yourself. That being said, the owner recently suggested that he's looking for additional distribution partners and hopes to eventually offer some additional colors. I was using Fuzzelle originally but after using F3, I'm never going back. And it's MUCH more affordable!!
Here's a post in my thread comparing a piece of an actual 80s/90s Kermit, with the Fisher Price Kermit hand puppet from the late 70s that used the same Malden Mills fleece, and factory dyed Fuzzelle: MM vs FP vs Fuz.
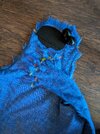
I just found out that I never posted about this in my build thread (I could have swore I did), but I also tried dying F3 and comparing it to the piece of Kermit that I have and here is what they look like in 3 lighting conditions. The F3 is the larger piece.
View attachment 1896586View attachment 1896587View attachment 1896588