You are using an out of date browser. It may not display this or other websites correctly.
You should upgrade or use an alternative browser.
You should upgrade or use an alternative browser.
Jupiter 2 in 1/72
- Thread starter gt350pony66
- Start date
gt350pony66
Master Member
Thanks GedSome really cool mods & scratch going on there mate, and your lighting/plans are looking sweet too !
most appreciated! How's things down there with all this corona business?gedmac66
Sr Member
Federal , State & local governments are doing what they can here in Aus - coulda/shoulda started earlier with some solid programs - especially after seeing what’s happened OS imho.
So far, the rate of ‘spread’ is being contained as much as possible. The numbers aren’t as severe as in those of other countries - thankfully ...., but we’ll also be coming into the winter season here soon , so with the ‘everyday & normal’ needs of an ED dept & Doctor surgeries + flu season + Covid19..... !?
Well we’re just keeping our collective fingers crossed and hopefully doing the ‘right’ things my friend.
Please keep you and yours, as safe & well as possible too Ross
gt350pony66
Master Member
Well I'm glad you are well my friend, it looks as though things are taking a good turn here.Federal , State & local governments are doing what they can here in Aus - coulda/shoulda started earlier with some solid programs - especially after seeing what’s happened OS imho.
So far, the rate of ‘spread’ is being contained as much as possible. The numbers aren’t as severe as in those of other countries - thankfully ...., but we’ll also be coming into the winter season here soon , so with the ‘everyday & normal’ needs of an ED dept & Doctor surgeries + flu season + Covid19..... !?
Well we’re just keeping our collective fingers crossed and hopefully doing the ‘right’ things my friend.
Please keep you and yours, as safe & well as possible too Ross
gt350pony66
Master Member
Thanks, I'm trying to. It's a good thing I built the big one first so I know what to try to add to this one. There's a lot of detail that was excluded on this smaller one, but in some ways this one may actually turn out better. I spend like 3 hours soldering stuff yesterday. Those modded walls with the lights, I would test, and test before I glued them down. Sure enough one of those bastards didn't light after I got all the connections done. Sooo, I had to do some delicate surgery to remove it and fix it, but I was successful. I should have the interior all back together today. I don't know why but everytime I try to post a video on here it won't goWow, it looks like you are getting all the details from the larger kit into this one somehow!
Analyzer
Master Member
Thanks, I'm trying to. It's a good thing I built the big one first so I know what to try to add to this one. There's a lot of detail that was excluded on this smaller one, but in some ways this one may actually turn out better. I spend like 3 hours soldering stuff yesterday. Those modded walls with the lights, I would test, and test before I glued them down. Sure enough one of those bastards didn't light after I got all the connections done. Sooo, I had to do some delicate surgery to remove it and fix it, but I was successful. I should have the interior all back together today. I don't know why but everytime I try to post a video on here it won't go
At least you got it fixed
As far as the video, are you uploading it directly, or linking to YouTube or some other service? If uploading directly, it might either not be a supported format, or too large a file size? I have never tried video myself, but I have no problems adding a you tube link and having the video embed here just by copying the YouTube URL
like so
don't know why I find this video so funny, but..
gt350pony66
Master Member
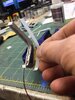
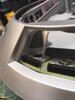
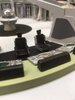
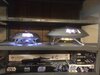
Ok, dead wall repaired and reinstalled. spent a few hours soldering and replaced another LED that crapped out. The fusion core thing I bought at a swap meet is having issues. came with a remote but the functions work intermittently I got the guys business card so i'm going to email him about it. Anyway, the interior lighting is done, just have to rig up switches. I've found that the strip SMD's pull so much juice that a single 9V won't run everything, just like the 18 incher. so I had to mod the space outside the inner wall to make room for a second battery. No biggie. But, here is everything so far. I almost thought I'd made a mistake going with the gray colors but after the lights went up it looks ok. What I was going for was more of a feel for the first season in black and white, which are my favs anyway
I got the guys business card so i'm going to email him about it. Anyway, the interior lighting is done, just have to rig up switches. I've found that the strip SMD's pull so much juice that a single 9V won't run everything, just like the 18 incher. so I had to mod the space outside the inner wall to make room for a second battery. No biggie. But, here is everything so far. I almost thought I'd made a mistake going with the gray colors but after the lights went up it looks ok. What I was going for was more of a feel for the first season in black and white, which are my favs anywayAttachments


gt350pony66
Master Member
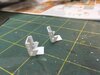
...I still need to scratch up the seats though
Millenniumf
Sr Member
This is some fantastic work! Are you planning on cutting out and fixing the stairs on the landing legs? Those have always been the biggest things that bugged me about the original kit.
gedmac66
Sr Member
That interior is looking fantastic Ross !
Had similar problems with strip LEDs on my Deago MF build - it’s a matter of compensating what they normally draw ( 6-12volts ) compared to other led sources with resistors attached.
Your lighting and scratch work is incredible to follow from project to project !
Cheers Ged
Had similar problems with strip LEDs on my Deago MF build - it’s a matter of compensating what they normally draw ( 6-12volts ) compared to other led sources with resistors attached.
Your lighting and scratch work is incredible to follow from project to project !
Cheers Ged
gt350pony66
Master Member
Absolutely, check out the first page of the thread. I agree with you on that point. That's the first thing I didThis is some fantastic work! Are you planning on cutting out and fixing the stairs on the landing legs? Those have always been the biggest things that bugged me about the original kit.
gt350pony66
Master Member
So, maybe going forward I should add a resistor to these anyway? I haven't tried that yet because I understood these strips had built in resistors. I left this one unglued because I'll need to change the 4 AA batteries that the fusion core runs off of. I tried a 9V but it didn't seem to cooperate well with the extra 3 volts and I didn't want to burn it up. I could still flip the main floor and add resistors. I'll experiment with that. Thanks Ged!That interior is looking fantastic Ross !
Had similar problems with strip LEDs on my Deago MF build - it’s a matter of compensating what they normally draw ( 6-12volts ) compared to other led sources with resistors attached.
Your lighting and scratch work is incredible to follow from project to project !
Cheers Ged
gt350pony66
Master Member
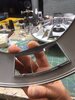
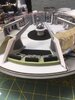
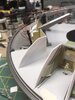
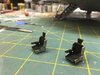
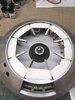
ok, well this build is done. I was a bit disappointed to find that I needed to scratch filler panels for each side of the front window to block view of the inner structure and in doing so I had to shave the window on both sides to allow room for said fillers. I would have thought this kit would not have had those ugly gaps particularly there. I also cut out the window beside the main door, so I had to scratch fillers for that as well. I spent more time on the seats than I thought I would but they look pretty good. I went off of the illustrations in the 18" kit instructions. Han and Chewy stopped by for an inspection as well
The last pic is ultra thin Evergreen I cut and taped to the top to hide the outer edge because this kit has a lift off top so you can see the interior but there's a gap around the outer edge that exposes all the wiring and FO. I haven't decided whether or not to finish it off that way or not, opinions welcome. I would also need to cut 5mm wide strips to cover the tops of the extended walls I scratched. Anyway, there it is
The last pic is ultra thin Evergreen I cut and taped to the top to hide the outer edge because this kit has a lift off top so you can see the interior but there's a gap around the outer edge that exposes all the wiring and FO. I haven't decided whether or not to finish it off that way or not, opinions welcome. I would also need to cut 5mm wide strips to cover the tops of the extended walls I scratched. Anyway, there it is
Attachments

gt350pony66
Master Member
Well that's a great idea, but I think even the casual observer would pick up on it. You're right...cover it upI say cover the wiring and stuff, unless you could possibly add more greeblies and structure type stuff along with it so it actually looks like real cables and wiring for the ship. i.e. it looks like a cutway engine style with behind the walls type of detailing
gt350pony66
Master Member
I was looking through the BIG Lost in Space B9 robot kit and the lighting kit for it, not sure my heart is in it right now. I found an AMT NCC-1701 in my stash, still in the shrink wrap. I have an assembled one I did a couple centuries ago and thought to myself, I could really do this up nice....good GOD! these kits really are a POS! I spent several hours just form sanding the nacelles, saucer and main hull. But I'm in it now. I think there are a few things for this on Shapeways. However, the decal sheet in this thing is past it's freshness date...WAY past. So after dinner I'm gonna look on Ebay. And no, I'm not going to post that build...who would want to see that or give a crap
gt350pony66
Master Member
Ehh...all the shapeways stuff is for refit models. I was afraid of that
gedmac66
Sr Member
Those scratched seats look brilliant , and Han & Chewie poking around - they were there for quality control !..., as far as posting the AMT Enterprise build ? - that’s totally up to you mate , but by misquoting a popular line from a favourite film “ if you build it , they will come “ .... I offer my thought & support for it !
..., as far as posting the AMT Enterprise build ? - that’s totally up to you mate , but by misquoting a popular line from a favourite film “ if you build it , they will come “ .... I offer my thought & support for it !Similar threads
- Replies
- 0
- Views
- 551
- Replies
- 3
- Views
- 1,000