You are using an out of date browser. It may not display this or other websites correctly.
You should upgrade or use an alternative browser.
You should upgrade or use an alternative browser.
JFcustom's FOAM files
- Thread starter JFcustom
- Start date
crimsondante
New Member
It already has been.
cavx
Master Member
Probably a dumb question but has anyone used the hot melt glue sticks (that some use to join the foam) to seal foam?
Yesterday I heated a heap of hot glue sticks in a small pot and had fun casting with it in some silicone molds I had made. Of course it does not stick to silicone, but it was neat to see the way it self levels and can be reshaped with a heat gun. Once cool, it makes fairly hard, but flexible plastic parts. I am thinking it might be cool create a shell over the foam?
Yesterday I heated a heap of hot glue sticks in a small pot and had fun casting with it in some silicone molds I had made. Of course it does not stick to silicone, but it was neat to see the way it self levels and can be reshaped with a heat gun. Once cool, it makes fairly hard, but flexible plastic parts. I am thinking it might be cool create a shell over the foam?
cavx
Master Member
Sometimes when you need to know, you just need to have a go yourself. So I did and whilst the results are not perfect, I can say that (with some practice), it does work. A while back I made my first foam Pred Bio and used ABS sludge to seal it. ABS sludge is simply melting ABS in acetone and when the acetone evaporates, it leaves a skin of ABS over what ever was coated in it. It worked, but the sludge seemed to set paper thin in places and now that bio is cracking. I wanted to do something different that would provide a stronger (and yet still remain fairly light weight) coating to my 2nd Bio.
The hot glue works very differently because if adheres to the foam (temp pending) really well. If not hot enough, it will peel. It also melts into itself so you can make a complete plastic case over your part. I found a good way to apply the stuff was to use a fresh glue stick that I dipped the end of into the pot. Of course it melts as you go, but it allows you to work the hot glue into cracks and seams.
The finish however is not as good as I had hoped and it varies from awesome to, well yeah maybe that was not the best idea. Could be my technique, or could also be the fact that I had previously coated this 2nd Bio in Plasti-dip a few months back and the with very hot, hot glue, the rubber skin on the foam was actually melting causing some bubbles. Those that have used hot glue to join their parts know all about the "spider webs" and the cools thing about this is that a quick run over the project with a heat gun will melt them into the surface and you can end up with a nice clean finish.
So in some parts where the hot glue is thick enough, the result is a very smooth, hard plastic skin. Not so nice where the hot glue is thin as the texture of the foam can be seen and even felt where there is no glue. The beauty of the hot glue is that it can be built up and is useful for filling cracks in seams. You can also coat a part, let it set, apply a little heat from the heat gun and bend it into a new shape. When it cools, it can hold that new shape. Tonight I was able to curve the back of the rim on the Bio upwards using this technique which previously I had not been able to do.
I also used it to fill and shape the contours of the cheeks. I ran out before I could totally finish the mask. At around $2 a pack, this is certainly an affordable way to coat your foam parts. I am just using a stainless steel pot on a single element portable stove to melt the glue. Worth a go, but probably not recommended on your Iron Man build.
iDReamer
Member
Where can I find it?It already has been.
The Prop Lord
Well-Known Member
Is anyone else experiencing difficulty downloading the files? I keep getting a code, instead of either a link or straight download. I tried downloading Starlord's helmet.
ep82
Well-Known Member
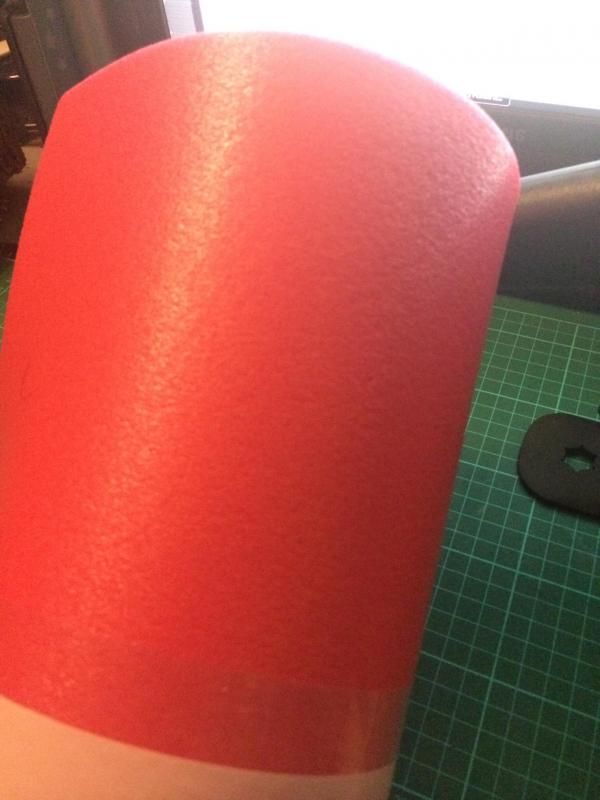
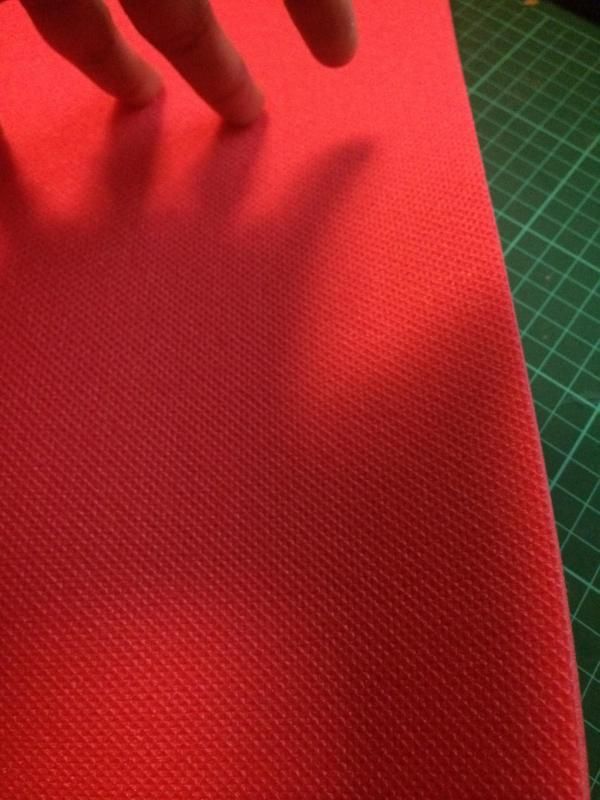
am i being stupid, mine has a smooth side and a rough side, or do you not class this as smooth ?
Smooth :
http://i3.photobucket.com/albums/y81/dante786/IMG_1930_zps2875320d.jpg
Rough:
http://i3.photobucket.com/albums/y81/dante786/IMG_1933_zpscf7de813.jpg
http://i3.photobucket.com/albums/y81/dante786/IMG_1932_zps47545b67.jpg
Do you not noticed the 'smooth' side is ever so slightly bumpy/textured?
sorry for rubbish phone pictures
bumpy surface

plastazote smooth surface

crimsondante
New Member
Cool
can you help me out on my thread please having difficulties
http://www.therpf.com/f78/pepper-potts-rescue-armor-foam-edit-jfcustom-214487/
can you help me out on my thread please having difficulties
http://www.therpf.com/f78/pepper-potts-rescue-armor-foam-edit-jfcustom-214487/
mikebradley
New Member
hi just a quick question on the sharkhead iron man helmet there seems to be only one side of the helmet. do I just use the one side to make two and also on the print outs the are red lines do I cut along the line thanks mike
ghostwarrior
New Member
So i decided to do this as opposed to fiberglassing and trying to bondo everything. However the problem i ran into is that the project looks off, i was wondering what i did wrong. I used
6mm foam and cut the pattern directly to the foam.

And as you can see below this is the end result, its seems ok but its off for some reason, an the second pic is the parper version. Should i just glass and bondo the first one or retry the foam. It seems easier to foam cut and glue.


6mm foam and cut the pattern directly to the foam.

And as you can see below this is the end result, its seems ok but its off for some reason, an the second pic is the parper version. Should i just glass and bondo the first one or retry the foam. It seems easier to foam cut and glue.


Durkness
Well-Known Member
ghostwarrior - I would make sure you look at the model when you are assembling the helmet. It has some overlaps of the model that you have to trim off the foam because it can't go through the other pieces. Here is mine with JFcustom's foam template.
Attachments
ghostwarrior
New Member
ghostwarrior - I would make sure you look at the model when you are assembling the helmet. It has some overlaps of the model that you have to trim off the foam because it can't go through the other pieces. Here is mine with JFcustom's foam template.
I printed out the files from JF and followed the template and was looking at my first model and the one on the viewer. I understand about not needing come of the overlaps, but what overlaps would not be needed . And would using 2mm foam help with making the entire helmet fit together better ?
prostheticsoul
Member
Guys I Cant save some files they wont open :/ Once I click they just open a new window with a lot of scribbles. I tried others And they open and save fine.
Guys I Cant save some files they wont open :/ Once I click they just open a new window with a lot of scribbles. I tried others And they open and save fine.
Right-click on the link, select 'save link as', and save. It will show up as a .PDO in the save location.
prostheticsoul
Member
Right-click on the link, select 'save link as', and save. It will show up as a .PDO in the save location.
Awesome , It Worked. Thanks
Similar threads
- Replies
- 13
- Views
- 1,781
- Replies
- 2
- Views
- 1,800


