You are using an out of date browser. It may not display this or other websites correctly.
You should upgrade or use an alternative browser.
You should upgrade or use an alternative browser.
Jedi General Rahm Kota
- Thread starter Koda Vonnor
- Start date
Koda Vonnor
Well-Known Member
Thanks Mog.
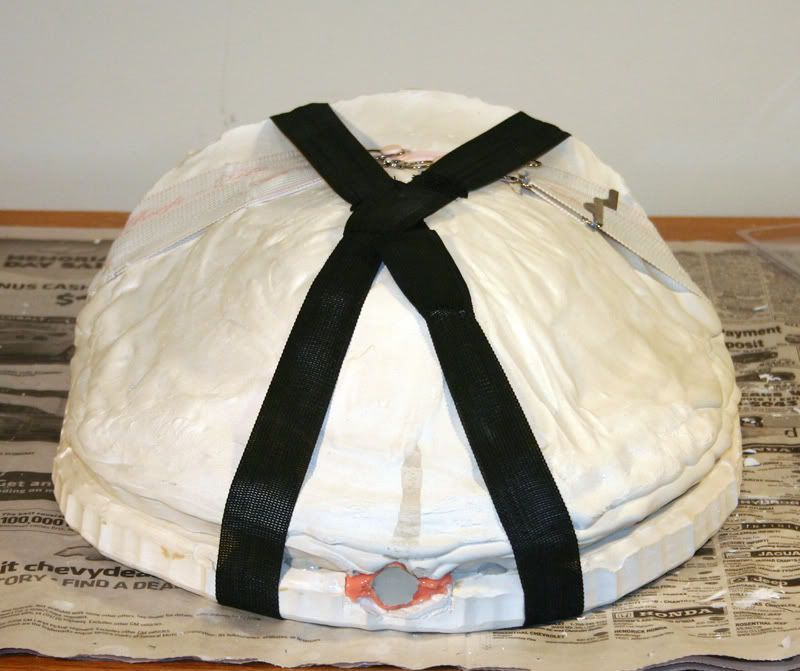
Well, I finally figured out how to fix the leaky shell mold.
http://www.loctiteproducts.com/products/detail.asp?catID=14&subID=166&plID=178
Ran a bead of that gunk all 'round the rim where the two rubber halves meet. Waited overnight and filled the mold with water. Not a leak in sight. Only one small problem, when I took the shell apart to dry it out and prep it for the plastic pour, the blue gasket stuck partly to one side of the rubber and partly to the other side. In trying to get it apart cleanly I tore the gasket. I was able to pick off the residue and clean up the lining, then I applied mold release and another gasket bead. I will do the first pour tomorrow. Hopefully I put on enough release to keep the gasket from sticking. We'll see.
I do expect to have about a 64th thick flashing along the edge to remove, due to the gasket.
Pix to follow after the resin cures.
~ Vonnor
Well, I finally figured out how to fix the leaky shell mold.
http://www.loctiteproducts.com/products/detail.asp?catID=14&subID=166&plID=178
Ran a bead of that gunk all 'round the rim where the two rubber halves meet. Waited overnight and filled the mold with water. Not a leak in sight.
Only one small problem, when I took the shell apart to dry it out and prep it for the plastic pour, the blue gasket stuck partly to one side of the rubber and partly to the other side. In trying to get it apart cleanly I tore the gasket. I was able to pick off the residue and clean up the lining, then I applied mold release and another gasket bead. I will do the first pour tomorrow. Hopefully I put on enough release to keep the gasket from sticking. We'll see.I do expect to have about a 64th thick flashing along the edge to remove, due to the gasket.
Pix to follow after the resin cures.
~ Vonnor
Koda Vonnor
Well-Known Member
Thanks B9!
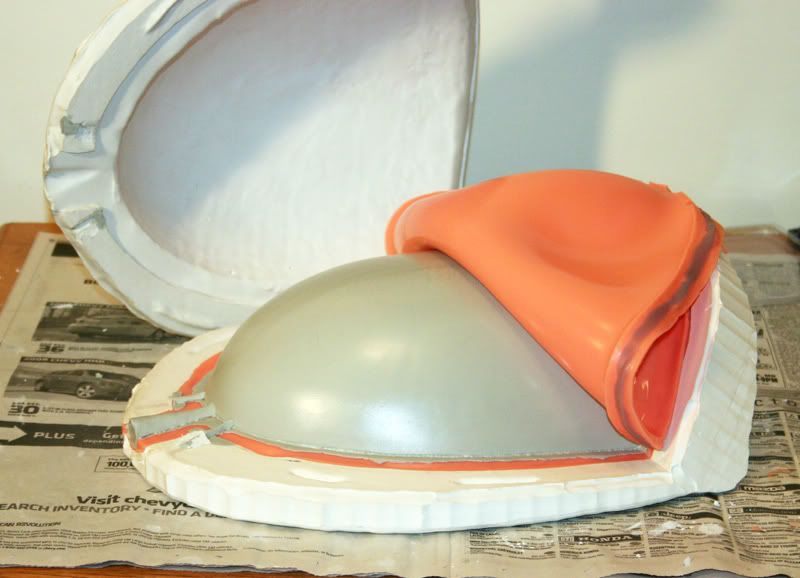
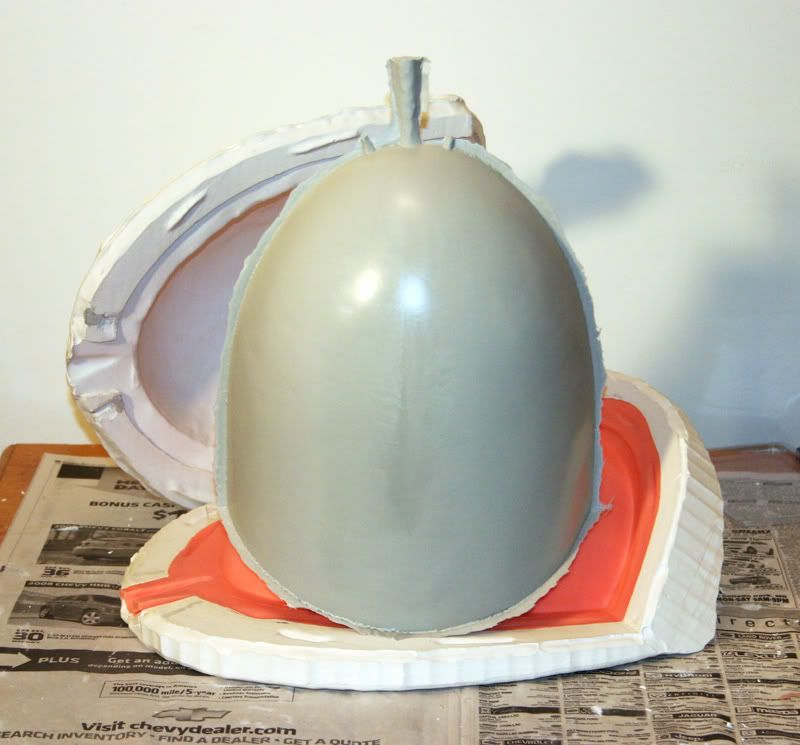
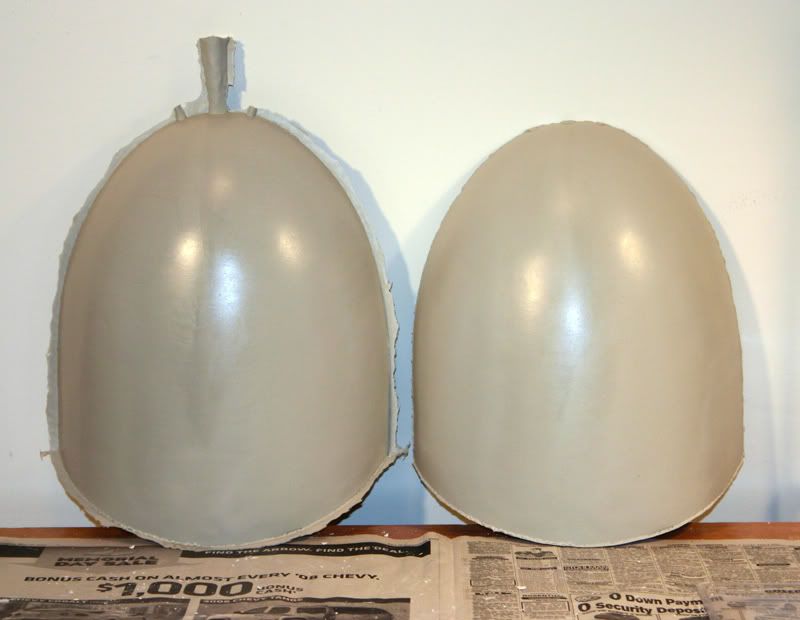
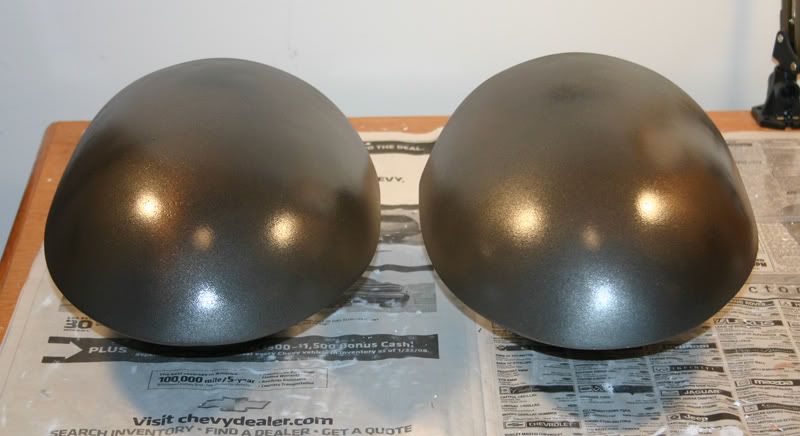
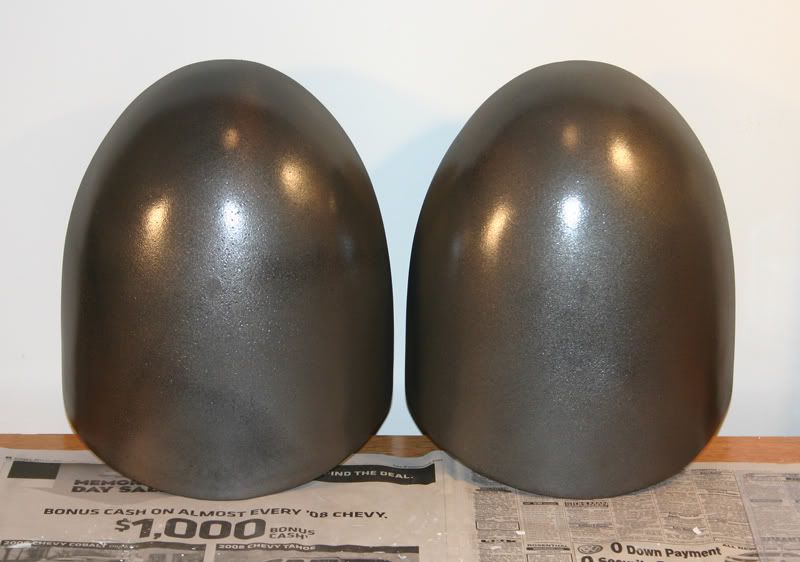
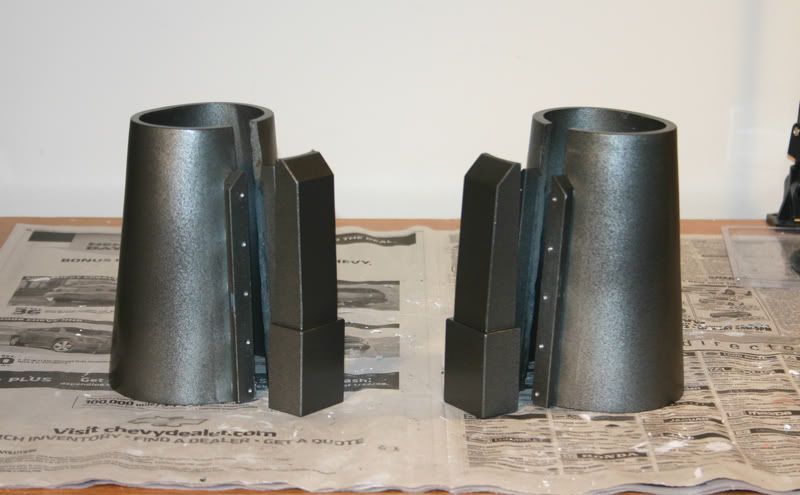
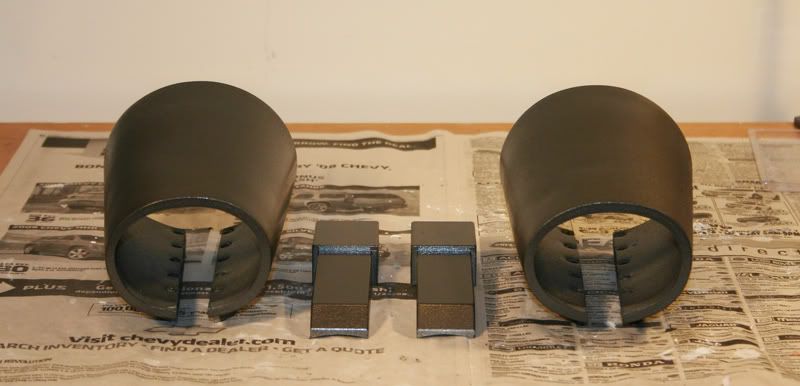
I cast the production shoulder bells today. They came out all shiny and spiffy right out of the mold.
These pix are from the 2nd bell cast. I forgot to paint vasoline around the air holes on this one and demolding it took a couple of plaster divots. I think it should still be usable though as the hard shell backing the rubber seal is still sound. Note the blue RTV silicone gasket bead around the rim. This worked like a champ and only required a couple of elastic straps to hold the shell together.
I used a teaspoon of gray color tint (3 white / 1 blk) in exactly 30oz of resin per bell. This is FeatherLight™ resin from Smooth-On. It can best be described as liquid sintra. I really like the results. It is heavily filled with some kind of plastic powder and the finished pieces are lighter than water. It pours with the viscosity of maple syrup and is easy to control. Each bell weighs just under a pound and is 5/8" thick in the center tapering to 1/2".
Tomorrow I beat these up and make them look like the handguards. :cool

~ Vonnor
I cast the production shoulder bells today. They came out all shiny and spiffy right out of the mold.
These pix are from the 2nd bell cast. I forgot to paint vasoline around the air holes on this one and demolding it took a couple of plaster divots. I think it should still be usable though as the hard shell backing the rubber seal is still sound. Note the blue RTV silicone gasket bead around the rim. This worked like a champ and only required a couple of elastic straps to hold the shell together.
I used a teaspoon of gray color tint (3 white / 1 blk) in exactly 30oz of resin per bell. This is FeatherLight™ resin from Smooth-On. It can best be described as liquid sintra. I really like the results. It is heavily filled with some kind of plastic powder and the finished pieces are lighter than water. It pours with the viscosity of maple syrup and is easy to control. Each bell weighs just under a pound and is 5/8" thick in the center tapering to 1/2".
Tomorrow I beat these up and make them look like the handguards. :cool
~ Vonnor
Koda Vonnor
Well-Known Member
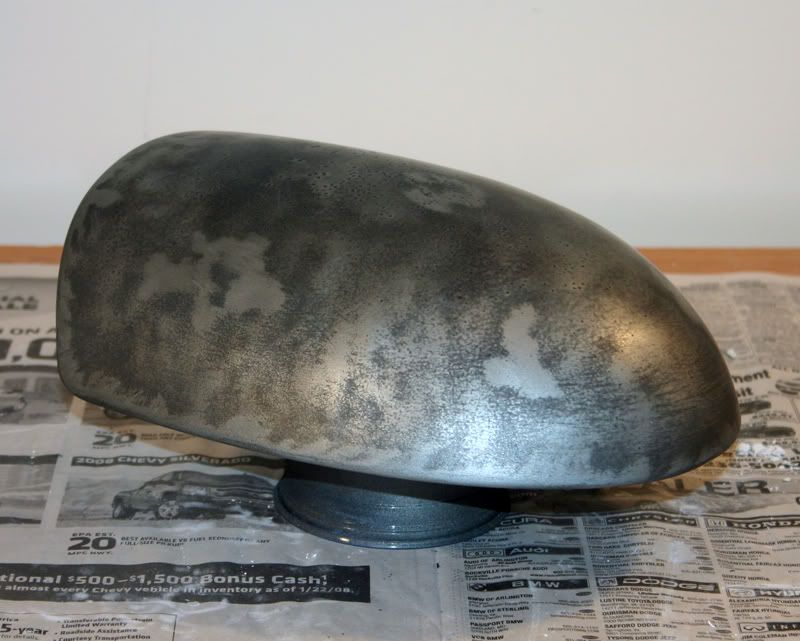
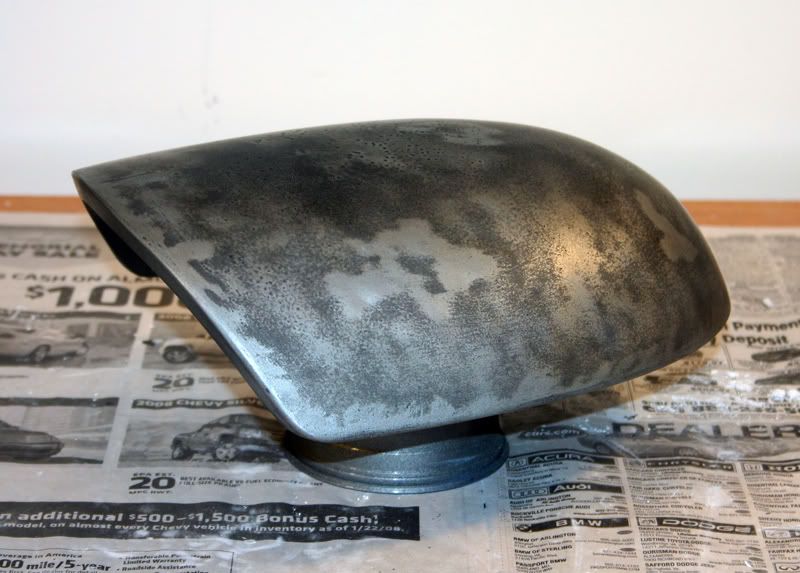
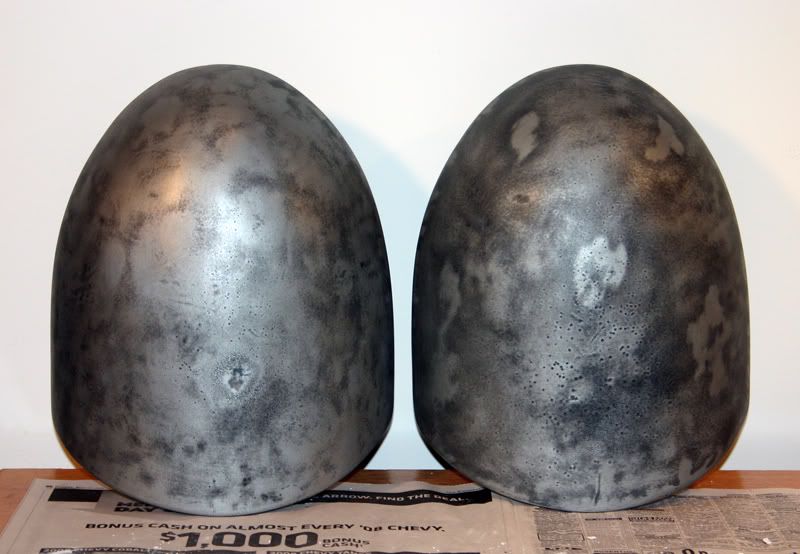
What you see here is one thin coat of dark gray with a couple spot-spritzes of copper and black, all on top of a boatload of silver. I had to rush this morning to get these painted before the rain storms arrived, so I wound up making each coat of silver WAY too thick. :eek
Consequently, I'll have to give them a lot of time to dry before I scratch 'em up with the sandpaper.
...more pix later ... (yeah, what a surprise)
~ Koda
Consequently, I'll have to give them a lot of time to dry before I scratch 'em up with the sandpaper.
...more pix later ... (yeah, what a surprise)
~ Koda
Koda Vonnor
Well-Known Member
The saber was made by Don Close (Do-Clo Custom Sabers) from blueprints I sent him. He has rights to make more of them. I did the tsuka-ito (handle wrapping). I cannot quote you a price for the metal saber, but I charge $80.00US for the wrapping ($40 for the leather cost and $40 for labor).Looking great. Did you make the belt? that is a beautiful piece of work too. I have to ask you if you will ever consider selling copies of that saber. I love the links to a Samurai sword. I want one!
The Clone Emperor
Well-Known Member
dueling partner
Greetings,
Thank you for sharing your progress on this project. The solution you've adopted for your gauntlet closure is both very effective and handsome. It is inspiring really.
I very much like the research, craftsmanship, and tyme that you are applying to this character. It is good work.
One thought I would add is to favour the 3-D model over the Hasbro action figure for the details of the armour and dress. Also, ¿have you given thought to how you will recreate this Jedi's grey top knot and goatee?
Kudos to you,
Thomas
Koda Vonnor
Well-Known Member
Thanks Thomas.
The plan is to use my own hair and beard, with some gel/pomade and spray color for the hair and Ben Nye for the beard. The hair is really the pace-setter for the project. :lol
~ Vonnor
The plan is to use my own hair and beard, with some gel/pomade and spray color for the hair and Ben Nye for the beard. The hair is really the pace-setter for the project. :lol
~ Vonnor
Koda Vonnor
Well-Known Member
*bump*
Koda Vonnor
Well-Known Member
... just kidding ... :lol
Actually it's a weekend update!
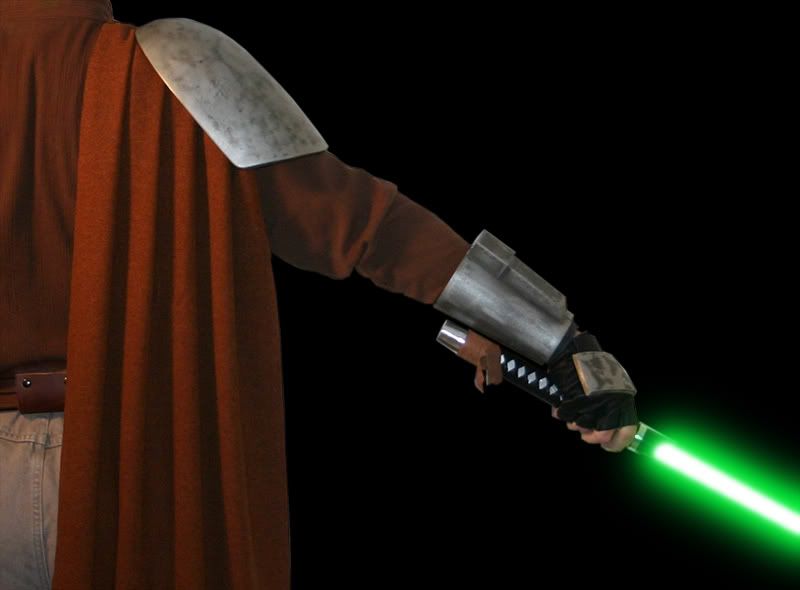
I scratch-weathered the shoulders, and formed/re-formed and shaped the vambraces. I painted them up for weathering but need to wait a couple days before I start scratching them (damn mid-Atlantic humidity). Note the bracers have an elliptical cross-section at the wrist. This, in conjunction with the planned neoprene wrist-seals will lock them in place radially. They will rotate as my wrist rotates. It will also lend the illusion of the stepped-down edge seen in the reference pix, as well as hold the sleeves and glove closures in place.
I'm moderately happy with the right shoulder bell. The left one I will eventually re-spritz with the darker tones and scratch again. They both came out a bit too mottled for my taste, but the right one is good enough for long shots.
See ya's next week.
~ Vonnor
Actually it's a weekend update!
I scratch-weathered the shoulders, and formed/re-formed and shaped the vambraces. I painted them up for weathering but need to wait a couple days before I start scratching them (damn mid-Atlantic humidity). Note the bracers have an elliptical cross-section at the wrist. This, in conjunction with the planned neoprene wrist-seals will lock them in place radially. They will rotate as my wrist rotates. It will also lend the illusion of the stepped-down edge seen in the reference pix, as well as hold the sleeves and glove closures in place.
I'm moderately happy with the right shoulder bell. The left one I will eventually re-spritz with the darker tones and scratch again. They both came out a bit too mottled for my taste, but the right one is good enough for long shots.
See ya's next week.
~ Vonnor
Harmonic_Distortion
Well-Known Member
Looks great man! I really don't think you need to re-do the left shoulder bell. IMHO, you dont want them too samey-samey. They look "related" and too much more could be overboard. But that's just one man's opinion. Great work man.
jediscout72
Well-Known Member
Me too! wish i had you on my team.Beautiful work! I'm really looking forward to seeing the final product.
Stinky Dragon
Well-Known Member
Looking great! Can't wait to see you start on the breastplate!
Zombie_61
Master Member
I agree. Uneven/unidentical weathering would look much more natural and realistic.Looks great man! I really don't think you need to re-do the left shoulder bell. IMHO, you dont want them too samey-samey. They look "related" and too much more could be overboard. But that's just one man's opinion. Great work man.
Koda Vonnor
Well-Known Member
...a little sump'n sump'n...
:cool
:cool
Similar threads
- Replies
- 4
- Views
- 446
- Replies
- 15
- Views
- 2,438
- Replies
- 10
- Views
- 1,358
- Replies
- 3
- Views
- 1,630