-IronMan Mark 42 HD paper Pepakura build-( including dissasembling hinges-scene)

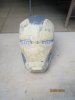
Hi Ironman4life. Another SA builder here. I usually use Luxor flexible body filler for my "bondo-ing". How does the U-pol work for you so far? Will also continue on my helmet this December...SA weather just messing me around lately. Looking forward to seeing your build progress.

Thanks....I haven't used the body filler yet will try it next week.... It was recommended to me, other than the 3M I wanted or planned on using as apparently it's easier to sand....but yeah do you have a tread on your helmet would love to see some pics!!!!!
 
I see you found it already, hehe. I will hopefully be finalizing the pre-painting part of the helmet this weekend seeing as it's a long weekend. Will post pics afterwards.
 
I see you found it already, hehe. I will hopefully be finalizing the pre-painting part of the helmet this weekend seeing as it's a long weekend. Will post pics afterwards.

Cool man...(Q: do you speak Afrikaans ?) I saw the Luxor body filler (blue-ish container, right?) ...I'm actually using Luxor fiberglass and fiberglass resin:thumbsup
 
I do speak afrikaans. I will take a pic of the filler I use tomorrow and post it. I buy it at builders warehouse. Costs like R90 for 2Kg. I also use the Luxor fibreglass resin, but the fibreglass sheets are a real let down. They aren't good for small detail corners inside the helmet and the fibers come loose really easily.
 
I do speak afrikaans. I will take a pic of the filler I use tomorrow and post it. I buy it at builders warehouse. Costs like R90 for 2Kg. I also use the Luxor fibreglass resin, but the fibreglass sheets are a real let down. They aren't good for small detail corners inside the helmet and the fibers come loose really easily.

I agree I now mostly just go over the edges and then cut them off with my rotary tool...woah that's really cheap i paid R250 for 3 kg....
But did you use cardstock or just normal A4 printing paper like me?
 
Grimlock did you mean this?? It's also R90 for 1.5 kgs.
image.jpg
Picked up these body filler spreaders for just R33
image.jpg
 
I used 240gm cardstock paper. Works very nicely....the cutting just gets the best of me...hand cramps galore. The filler you posted is exactly right. It uses a bottle of hardener that looks the same as the one used with their fibreglass resin...it's not a cream. Use a tablespoon filler with about 3-4 drops of the hardener. It sets quick though so you gotta work fast.
 
I used 240gm cardstock paper. Works very nicely....the cutting just gets the best of me...hand cramps galore. The filler you posted is exactly right. It uses a bottle of hardener that looks the same as the one used with their fibreglass resin...it's not a cream. Use a tablespoon filler with about 3-4 drops of the hardener. It sets quick though so you gotta work fast.

Whoa then that's really cheap compared to my filler so depending on how the U-Pol holds up , I might switch to that ...(although it looks on your pics the filler crumbles off a little bit?
Where did you buy the cardstock???? Waltons?
 
The crumbling you see was from the Luxor standard body filler and my learning experience with the cream hardener that comes with it. That's why I switched to the flexible one...much easier to work with.

As for the paper, we have a local supplier here in Bloem that sells paper bulk. I think I paid something like R150 for 100 A4 sheets. Try finding a place that sells straight from the factory. Waltons is gonna cost you a lot more I think.
 
Update :

Backs coming along nice ....
Chest is almost fully fiberglassed ....
Started with the body filler on my helmet and its looking awesome !! The U-POL is working like a bomb !!

Pics 2morrow !!! :D
 
Looking good so far. I see the U-pol does a bit of crumbling as well. I just painted my ear pieces and the faceplate.
The Rust-oleum gold I used seems to lack the yellow tone needed.
I found something horrible with my main helmet while filing it...a lower layer of filler didn't harden correctly....so now I have to redo some parts of it. Sigh.
Updates on my build page


I had a similar problem with it not drying because I didn't mix it we'll enough becomes like a dry-ish clay.... But luckily no more!!! Pics tomorrow

One issue that I'm working on to figure on with the Upol is the fact that I'm wasting ALOT because it dries VERY fast!! The crumbling is just me working a bit overtime....whilst it was already sorta dry and so it crumbles... It also looses its dampness, wetness sort of that nice shiny gloss after a while that it's been on your spreader....
 
Try to reduce the amount of filler/hardener you use at a time. Maybe half the ratios...you should be able to not waste as much. I also wasted a lot in the beginning, but then I started using smaller amounts at a time. It's more time consuming, but not as wasteful.
 
Try to reduce the amount of filler/hardener you use at a time. Maybe half the ratios...you should be able to not waste as much. I also wasted a lot in the beginning, but then I started using smaller amounts at a time. It's more time consuming, but not as wasteful.

Yeahs noticed and applied....:D
 
Sorry for the lack of updates... I did a lot of work on the helmet and started spraying some RUST-OLEUM Grey Primer...( with that said I forgot to thank a very impotant person ... boochieboy THANKS SO MUCH... I would not have done half the stuff or as knowledged as I did without your tutorials!!!!!!) Here's a helmet picture...IMG_4140.JPG
 
BIG update the back is almost done ... and so is the helmet....!! wanting to make a mold ASAP...here's some of the things I've been working on...rpf work difrences.jpg
GREEN- I cut in that indentation at the top
ORANGE- I made the side piece a bit higher 'cause it wasn't level with the red part
YELLOW- I spent a lot of time trying to get that "corner" line on each side of the helmet
BLUE- Added that lower lip piece

* and (I forgot to add on the photo but I made the left side of the forehead a bit higher because it was a lot lower than the right side
and then of course a lot of smoothing... (still need to do a lot)

any way.. here's some pics:

IMG_4146.JPG
IMG_4148.JPG
IMG_4150.JPG
 

Attachments

  • IMG_4148.JPG
    IMG_4148.JPG
    1.6 MB · Views: 139
Back
Top