Ironhand's RANDOM GUN THEATRE!

Ironhand

New Member
Hey all,

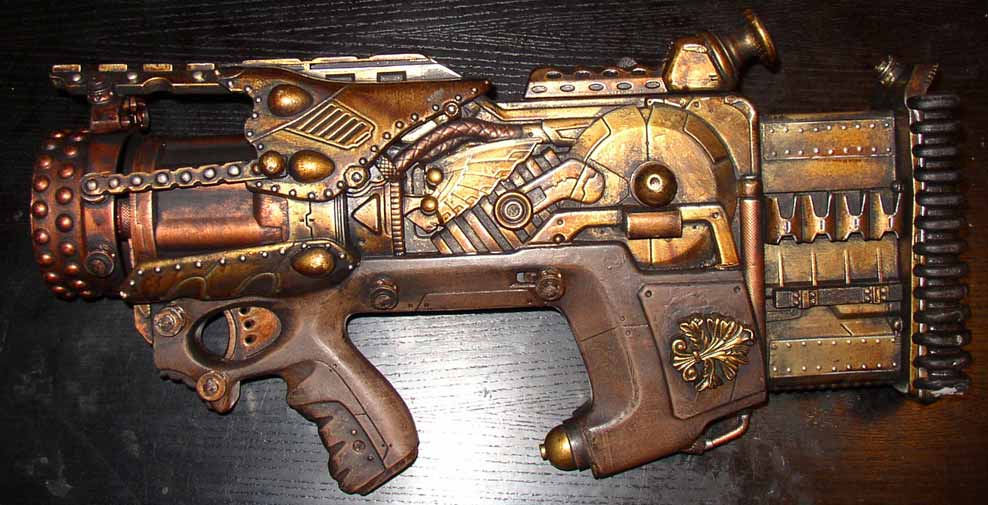
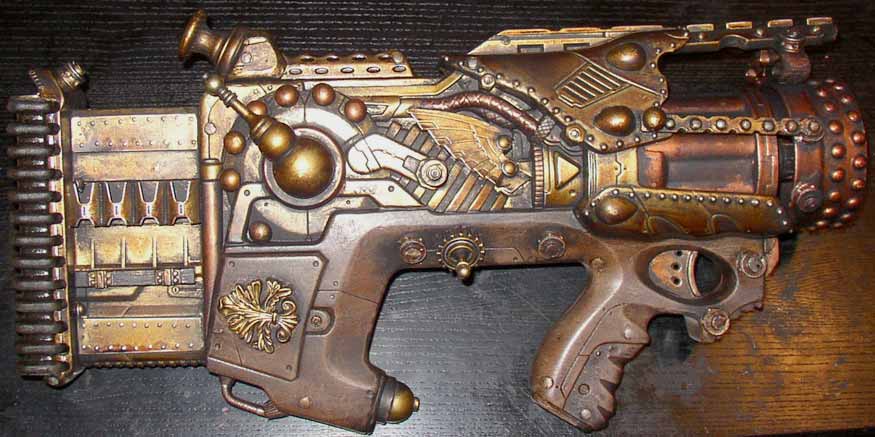
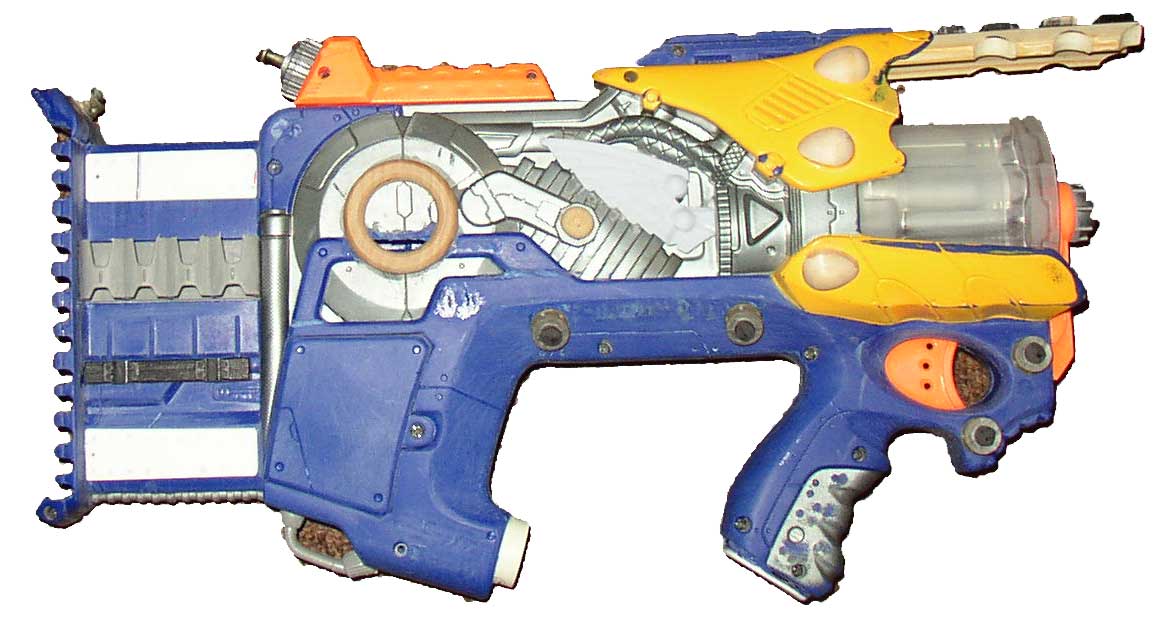
It has been forever since I've worked on any original props (maintaining my Desert Trooper costume doesn't really count), so I decided to try my hand at STEAMPUNK weapons. And.... I failed. :confused

So to get my confidence back up, I'm slamming together whatever style of gun strikes my fancy, and that's working out better.

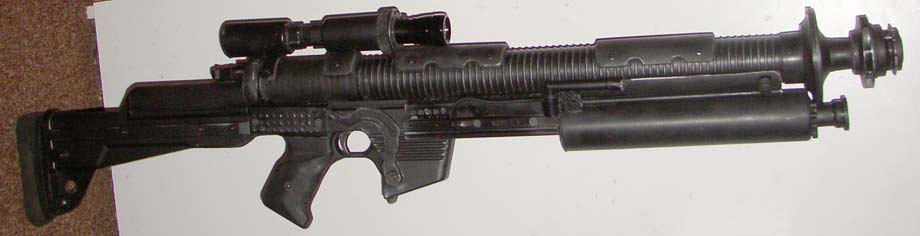
First, an old airsoft that has a long history. This was the Daisy version of the old Maruzen airsoft Remington Wingmaster. Those of you who are like 40 years old might remember it :rolleyes. They actually had a working tube magazine that fed plastic cartridges with Super-Realistic-Pump-Action! Of course, the bbs didn't stay in their cartridges too well, and you could only load 1 bb per cartridge, but as a working prop, it was great.

rem870.jpeg


Anyway, enough nostalgia. The ABS stock on these airsoft guns were NOTORIOUSLY fragile and wobbly. So in a fit of prop rage, I ripped the old stock off, ground out the inside of a nylon 870 pistol grip, and glued it onto the gun with Bondo. Messy, yes. Permanent, yes- or so I thought...

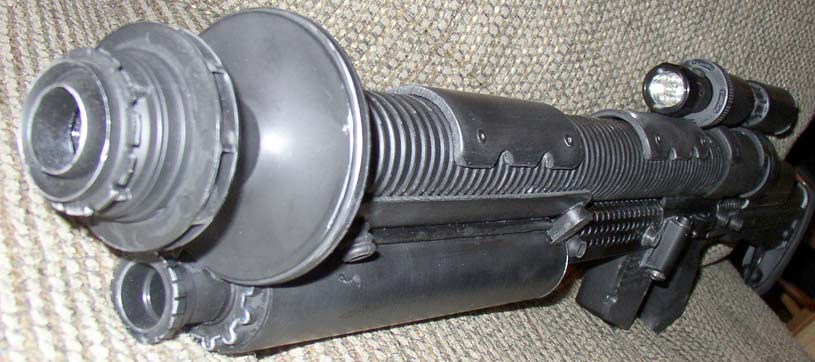
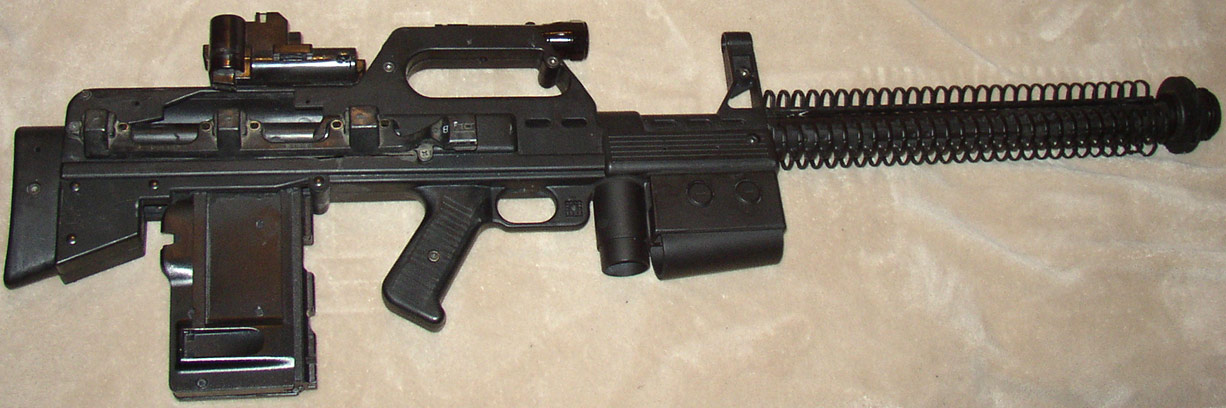
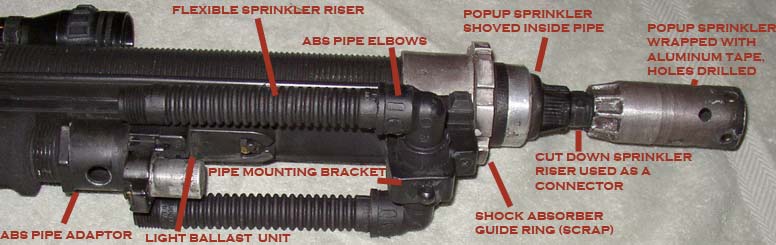
I made further mods to bulk the gun up, including adding tubing to both the barrel (for girth) and the magazine (for length). This made for a cool looking front end (pictured inset), but lacked the full-stock awesomeness that I wanted (especially after seeing HARD BOILED). Soo....

abigail.jpg


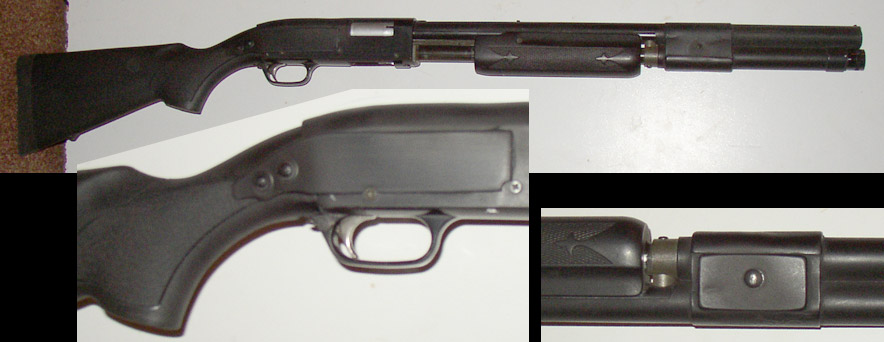
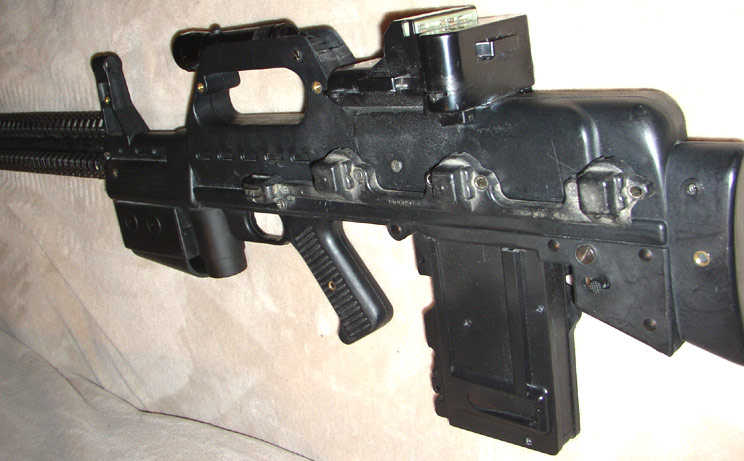
I just last week cracked out this 15+ year old project and decided to add a proper nylon stock, since I had some floating around. I dremeled / pryed / smashed the pistol grip off and decided to take the back of the gun down to fit the stock, rather than vise versa. Fortunately the cover could be slid off, so I knew how much overlap I'd have to work with. Because the Airsoft action comes so far back in the gun, I decided I'd have to mount the stock with side plates instead of the standard bolt-through-the-back.

So I made some custom side plates out of ABS, superglued them to the frame, then ran wood screws through the plates into the nylon stock, plus one more screw through the back of the trigger guard for good measure. The end result isn't super realistic, but I added enough shape to the plates to make it come out nice looking anyway, IMO.

The end result: the full size shotgun I always wanted, and it still fires airsoft pellets as well as it ever did! I call her Abigail.

=I=

http://www.ironhands.com
 
Last edited:
Okay, one more project I've got cooking.

This is an old *koff* Tootsietoy *AHEM* cap gun. Back when toy guns were $%king cool. It's solid ABS, and the pump action rotates the barrels and primes a strip feed cap gun system that fed from a top magazine. It was like the junior version of their battery operated MINIGUN capgun toy (http://images.google.com/imgres?imgurl=http://i1.ytimg.com/vi/TAzCry1G5NQ/default.jpg&imgrefurl=http://www.youtube.com/watch%3Fv%3DTAzCry1G5NQ&usg=__qlPyODeiqRSLJeyFcJXSfRb_QJo=&h=90&w=120&sz=4&hl=en&start=1&itbs=1&tbnid=eW4DaiR6FSdKWM:&tbnh=66&tbnw=88&prev=/images%3Fq%3Dtootsietoy%2Bgatling%26hl%3Den%26rls%3D%257Bmoz:distributionID%257D:%257Bmoz:locale%257D:%257Bmoz:eek:fficial%257D%26tbs%3Disch:1).

Anyway, I'm not finished with this thing yet, but I did a couple simple mods to make me more happy with it.

One, I filed the grip's hand-gougingly sharp angles down to a more comfortable, finger grooved format (and primed it black for good measure).

Two, I added a new front end. It's an ABS pipe coupler, with a strip of RUBBER FLOOR MATTING superglued / pop-rivetted around it!
frap.jpg


I got lucky and found a bunch of floor matting that someone was giving away in their front yard (woo, thanks!). The floor mat had beveled-down edges on it (to keep ya from tripping on it), and a cool rectangle-grid pattern on the bottom, so I just cut one of the edges off, turned it upside down, and wrapped it around the pipe coupler for some instant ribbed detail. Rubber superglues really well btw, so between that and poprivetting the ends, it's on there pretty good. I used an extra strip of rubber and superglue to close up the gap at the bottom. Two more small strips of floor matting embellish the sides of the gun, the "fins" clipped down to an interesting angle with scissors. Yes, this stuff is easy to work with!

I'll undoubtedly be wrapping more inverted floor matting around other props in the future, like probably some Star Wars heavy blaster type deals. You know, like this one:

bounty2.jpg


=I=

http://www.ironhands.com
 
Last edited:
Some background on my DT blaster (pictured a bit more clearly below):

merr-sonn01.jpg

This blaster (affectionately dubbed the Merr-Sonn Mk II) seems to get lots of attention when I'm trooping, even though it is not canon (no pun intended).

So I thought I'd take a moment to share how it all came together. Originally it was my "tunnel gun", a Larami battery powered AR-15 squirt-gun-turned-prop I'd carry with me whenever we explored storm drains or launched bottle rockets (ah, our misguided youth!). Back then it just had a standard front end and a cobbled together grenade launcher (some bits of which are still on the gun). When I started making a blaster prop, I had a heavy barrel and muzzle worked out, but needed a reciever... so I sacrificed my beloved "tunnel gun". Fortunately it worked out just fine.

Here's a pictorial breakdown of all the parts.
merrb4.jpg

I extended the stock by gluing together some little cake decoration step pieces, and shoe-gooing on some foam rubber pads. To help disguise the AR-15, I cut down an old ink ribbon cartridge from a printer (maybe a typewriter?) because it had a cool shape and some nice vent holes. This went on top of the receiver. I pulled the magazine and stuffed some kind of rubber thing in there that I found at the auto junkyard. I also scored some nice scrap aluminum parts from a metal scrapyard that helped 'Star-Wars-Ize' the magazine port area.

merrb5.jpg

The barrel itself is key to the whole construction. I used thick wall ABS pipe (3" I believe) and wrapped it with Vinyl Floor Matting! Ths gave it a nice ribbed look. It was pretty easy to just superglue the floor mat on- just keep running a line of glue on the mat and roll the pipe over it until it sticks.

Because the ABS is so thick, I could attach all manner of accessories to the top and bottom (scope mount, bottom detail, etc) using ordinary wood screws.

HOLY CRAP, I forgot to label something! The detail around the barrel below the scope mount are... PLASTIC CLOTHES PIN HALVES! I just pop them apart, throw the spring away, and glue them on lengthwise for instant cool technical venty detail.

merrb6.jpg

The front end has some of my favorite details. The muzzle brake is a popup sprinkler with the top removed, some holes drilled, then wrapped with aluminum tape (metal tape can usually be found in the hardware store with air ducts, as it is used to repair ducts more permanently than duct tape). If you sand the metal tape lightly around the circumference and give it a dark brown wash, it looks pretty convincing. I found the notched aluminum ring (supposedly a shock absorber guide ring) at that metal scrapyard again. Need to visit another one of those some day...

The Bipod is made from two threaded PVC pipe elbows, connected together with a threaded coupler. The coupler is clamped into a plastic Pipe Bracket, designed for mounting pipe to wall studs I believe. Flexible sprinkler riser pipes come out of the elbows, forming the "legs' of the bipod. It isn't really a practical bipod, but it adds a lot to the front ends appearance.

So with all this in mind, I am setting out to recreate the magic as best I can. I've already got a new muzzle in the works that is looking pretty sweet, and I found some floor mat with larger, more widely spaced ribs on it that will make a convincing barrel. Look for pics in a few days. Until then, good hunting!

=I=
 
Last edited:
Sooo..... That aforementioned Steampunk gun failure?

Turns out, it wasn't all that bad- I just needed to finish it off with some antiquing!

rev88b.jpg


rev88a.jpg


So this is a converted Nerf Rev-8 Firefly. It still shoots darts, but unfortunately the strobe got destroyed during the retrofit, so no more glowing darts. BUT hey, the fact it looks this Steampunky yet still can shoot is worth something, yeah?

For paint (which is really what this is all about), I used spray metallics (gold and copper, mainly), then applied wood stain to get some color depth, and highlighted with a silver sharpie. But that ended up looking pretty crappy- too evenly glossy, like plastic.

So it sat on the shelf for months before I finally broke down and figured I'd try antiquing it. I simply glommed on some black and brown acrylic paint, then rubbed it down with a slightly damp sock to take the black off the high points. It makes a HUGE difference- the contrast makes the shiny parts look a lot shinier. Plus, some things just need to look grungy in order to be believable.

Here's an in-process shot during construction- basically just gluing on lots of wood shapes, model parts, and the odd chess piece here and there.

rev8.jpg


Hooray!

I still have another blaster in the works though- more of a "dieselpunk" flavor going into that one. We'll see what comes of it...

=I=
 
For your viewing pleasure, Ironhand Industries presents: The Matson-Dyer Z 20 Assault Weapon System!
matson-dyer20Za.jpg


This started as an old Zap-20 Airsoft gun. It is probably a priceless relic, except that I had already modded it years ago so I could put a scope on it. Anyway, the receiver and stock are all that's left of the original gun.


The barrel is plastic pipe wrapped with vinyl floor mat. The muzzle is a mix of parts, including a drip line filter (the flange thing), a cylinder fan (from a humidifier or some such), and a special piece I found at a surplus store (you'll see more of those later, I'm sure).

matson-dyer20Zb.jpg

The Barrel is attached to the receiver with metal brackets that I made by cutting down some perf metal server doors. The pipe is thick-wall, so I can just run wood screws into it! I covered some of the screws with rubber bushings. To attach the scope and the gas cylinder to the barrel, I first made brackets by cutting some pipe in half long-ways, pop-riveting through the underside of the bracket to attach the item, then pop-riveting the bracket onto the barrel. Easy! I'll be using this technique a lot more from now on, I suspect.

The scope is made out of two pop-up sprinklers screwed back to back with a cut down sprinkler riser- very economical. I stuck a flashlight in the front of the scope for effect. The receiver was decorated with some levers taken from an old printer.

The Grip on the original airsoft was uncomfortable, so I ground it down a bit- it still could use some cleanup. I added a rubber buttplate to the back of the stock, taken from a Remington nylon stock. The Zap-20 stock was then ground down to match the shape of the buttplate. I drilled a hole in the stock frame to give it more character.

Get yours today! Except- er, I guess this one's a one-of-a-kind. Next project: something I can mass-produce!

Yours in Arms,

=I=
 
ROBOTS! aAAAAHAAGGGHaaGHGH!!!

Okay, These aren't guns, but the heck if I'm starting a whole new thread for one project.

W O R K I N P R O G R E S S

The boys wanted to be Robots for Halloween. When I was a kid, mine was a cardboard box.


robohead1.jpg

I've been holding onto those cheap welding goggles for about 20 years, it's about time they get used for something.

The lower jaw is a separate piece, just strapped in back, sothe kids can use their chin to make the mouths move. It's hilarious.

More on the construction later. Here's the bodies so far...

robobody1.jpg


robobody2.jpg


I weathered the guns too (you may remember that minigun from my first post). I'm trying to work voice changers in there too, so they can have the robot voice thing.

Arms are nearly done, but I'm still working out the legs. More pics soon.

=I=
 
Re: ROBOTS! aAAAAHAAGGGHaaGHGH!!!

Okay, These aren't guns, but the heck if I'm starting a whole new thread for one project.

W O R K I N P R O G R E S S

The boys wanted to be Robots for Halloween. When I was a kid, mine was a cardboard box.


robohead1.jpg

I've been holding onto those cheap welding goggles for about 20 years, it's about time they get used for something.

The lower jaw is a separate piece, just strapped in back, sothe kids can use their chin to make the mouths move. It's hilarious.

More on the construction later. Here's the bodies so far...

robobody1.jpg


robobody2.jpg


I weathered the guns too (you may remember that minigun from my first post). I'm trying to work voice changers in there too, so they can have the robot voice thing.

Arms are nearly done, but I'm still working out the legs. More pics soon.

=I=

What did you use for the helmets? You could display them as steampunk pumpkins. What an awesome job.

TazMan2000
 
Re: ROBOTS! aAAAAHAAGGGHaaGHGH!!!

Thanks everyone for your feedback!

TazMan: The heads are plastic hanging flowerpots, minus the hanging bits.

Division 6: Yep, it's me.

Zaxmon: Okay, basically:

1. Spray paint with a metallic color. Any metallic will work. (in this case, Graphite Krylon Fusion for Plastic).

2. Stipple black acrylic paint all over, especially the low areas and crevices. (I use craft paint, like Apple Barrel or Folk Art). You can thin it a bit with water to make the job easier. If it beads up, put a tiny drop of dish soap in to break the surface tension.

3. BEFORE the black completely dries, wipe the high areas down with a paper towel. You can stipple with paper towel to get some nice grain patterns too if you like.

4. Repeat this process more sparingly with a rust colored acrylic (Burnt Sienna, or whatever you kids call reddish brown these days).

Done!


Oh, and an update: Legs in process!

robolegs1.jpg


The thing hanging from a belt are the hip plates (not lined up right in this shot obviously). It's expensive rubber floor mat cut into small rectangles, with some rust paint (see above) and silver sharpie for highlights.

The upper legs are perforated plastic for landscaping- I think it's used for tree wrap or what have you, I found it on the side of the road.

The lower legs are more ribbed drain pipe of course, slit in back so they can be clamped around the leg.

Still to come: Foot covers (probably 2 liter bottles), and probably some hand backs if I can find some black elastic lying around to attach them with.

Yours in sleep deprivation,

=I=
 
Last edited:
Re: ROBOTS! aAAAAHAAGGGHaaGHGH!!!

Zaxmon: Okay, basically:

1. Spray paint with a metallic color. Any metallic will work. (in this case, Graphite Krylon Fusion for Plastic).

2. Stipple black acrylic paint all over, especially the low areas and crevices. (I use craft paint, like Apple Barrel or Folk Art). You can thin it a bit with water to make the job easier. If it beads up, put a tiny drop of dish soap in to break the surface tension.

3. BEFORE the black completely dries, wipe the high areas down with a paper towel. You can stipple with paper towel to get some nice grain patterns too if you like.

4. Repeat this process more sparingly with a rust colored acrylic (Burnt Sienna, or whatever you kids call reddish brown these days).

Done!

=I=
Sweet, I'll try that! Thanks.
 
"Phased Plasma Rifle in the 40 Watt Range."

'Bout time I made another gun, I figure.

I'm still adding the finishing touches to this baby (like a trigger), but here's where it stands right now:

ppr40a.jpg


ppr40b.jpg


Details and breakdown coming soon.

You're welcome to guess at the bits, and an extra prize goes to whoever can guess why I had a Muzzlelite shell lying around in my garage!

=I=
 
Nope- good guesses though! I did make use of it for a Starship Troopers costume, but that's not what it was originally acquired for... (hint- something older).
 
This thread is more than 11 years old.

Your message may be considered spam for the following reasons:

  1. This thread hasn't been active in some time. A new post in this thread might not contribute constructively to this discussion after so long.
If you wish to reply despite these issues, check the box below before replying.
Be aware that malicious compliance may result in more severe penalties.
Back
Top