DragonStar
Member
I'm working on an interactive photo backdrop that will replicate blast doors from The Phantom Menace.
When someone inserts a lightsaber into the blast doors, it will light up to simulate molten metal. This could be recreated following the tutorial here:
http://www.instructables.com/id/Goldies-Bubbling-Halloween-Cauldron/
The person will be surprised/awed/aghast and at that moment a picture will be taken.
=========================
WHAT HAS BEEN DONE SO FAR
=========================
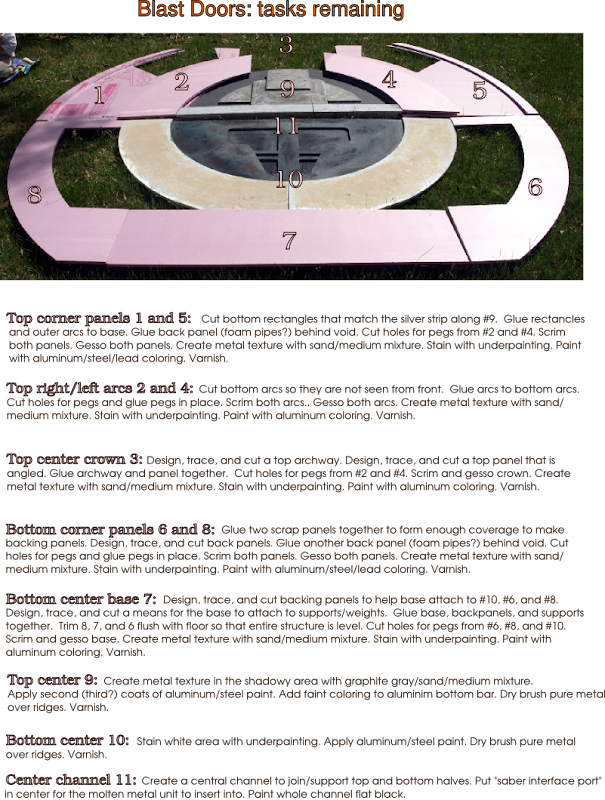
Step one: decide on materials
`````````````````````````````
The first step was to design the blast doors. Taking into consideration weight, portability, cost, strength, ease of assembly, and look, I decided on the following recipe, from back to front:
That is the recipe I'm working through now. I will test the whole recipe on a scrap of foam when the metallic paint arrives.
Step two: design the prop
`````````````````````````
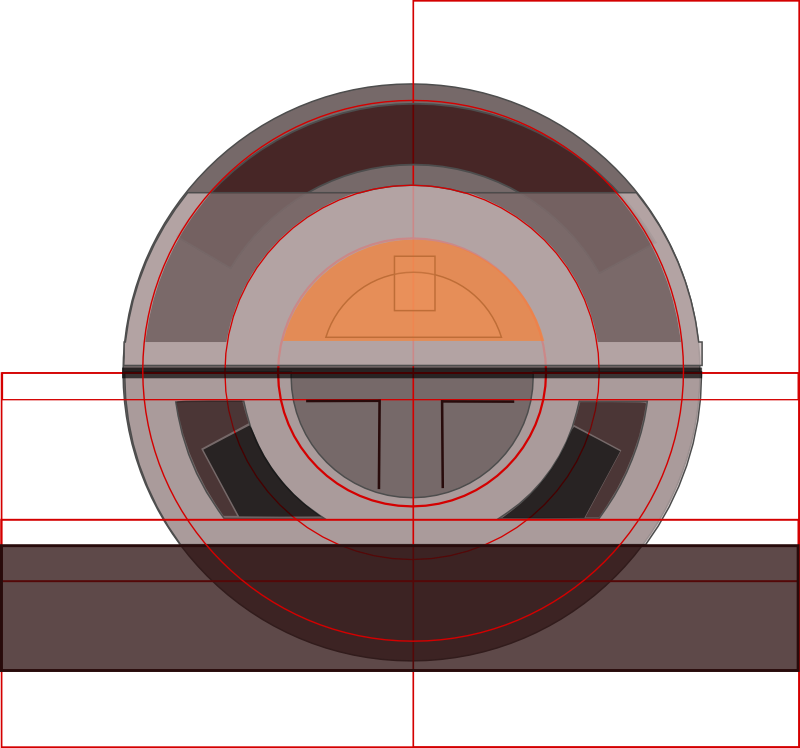
I spent a couple evenings going frame by frame through the blast door scene. This mockup was based on synthesizing many of the screenshots together:
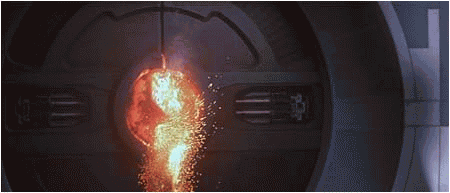
However, this turned out to be inconsistent from frame to frame depending on angle, lighting, etc. Clearly something was wrong with my design. The a-ha! moment came at the 7:11 mark when one of the destroyer droids shoots the top corner of the blast doors. There is a shower of sparks and for one frame, the entire set is illuminated:

Finally, I could clearly discern the shape and location of each element! That gave rise to the design you'll see in the upcoming build images. For that reason I am going to code name this project "the 7-11 project." Lucky omen, indeed!
Step Three: Design the dimensions/assembly/transportation/setup
```````````````````````````````````````````````````````````````
This is still in flux, but there are practical limitations:
1) Parts have to fit in the back of my car so that there's at least one way to transport it.
2) the prop cannot be more that 8 feet tall because of standard ceiling light limitations.
3) Therefore the backdrop must be done in parts and assembled on site.
4) There must be a support framework that is light enought to transport but sturdy enough to ensure the structure remains upright.
Regarding #4, my basic plan at the moment is to use collabsible aluminum poles and plastic jugs. The jugs could be filled with water on site to add weight and stability.
#3 is a bit of a puzzler. I need to be able to assemble the backdrop but not bump into the ceiling during assembly. Perhaps I could use snap brackets so that the parts can be put on from the front... needs thought and testing.
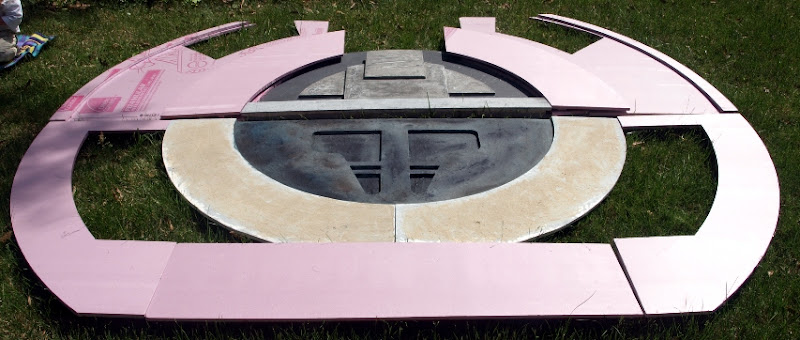
Step 4: cut out the pieces
``````````````````````````
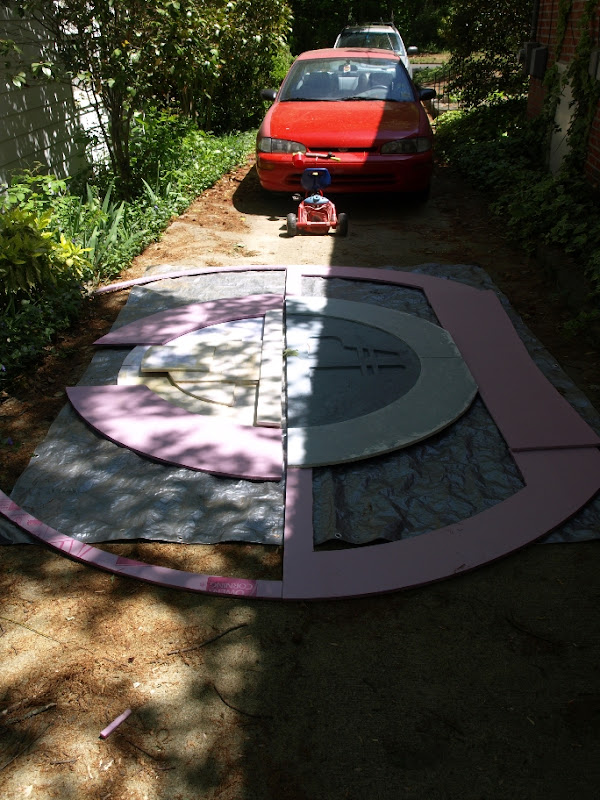
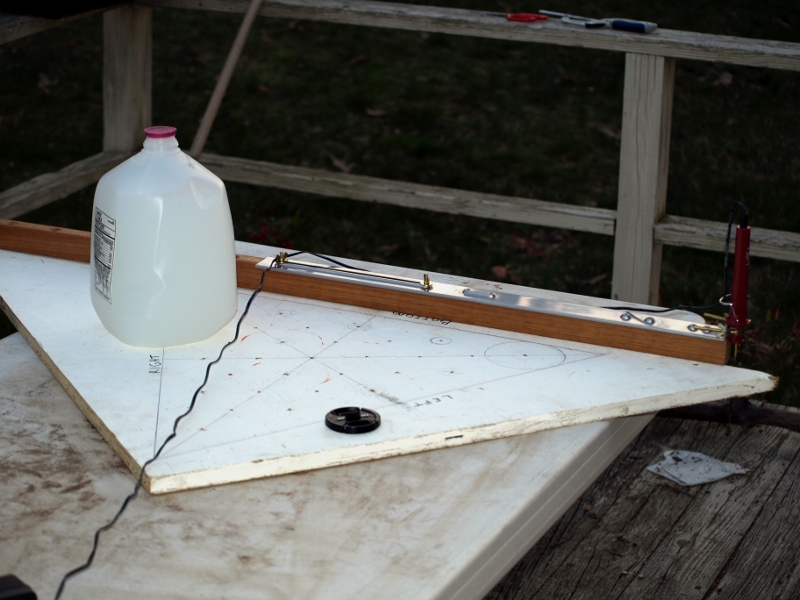
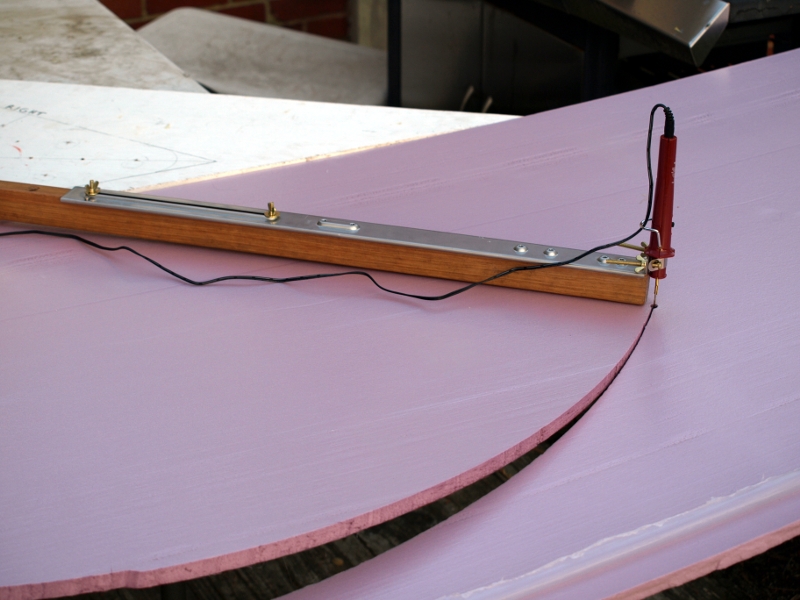
I made a jig to cut out the circular pieces and used a straight edge for the straight pieces. Fortunately the blast doors don't seem to have bevels. The jig is a large base of plywood (with a plastic rod in it as a pivot point) combined with a long arm with many holes. The foam cutter lives at the end. One of the holes is placed on the pivot point and a circle or arc can be cut from it. This is slow going because I skimped on the foam cutter and bought an underpowered "foam cutting needle" from JoAnn's. So each piece took about 30 minutes to cut.
1) The whole setup, with table, pivot/edge board, milk jug weight, hot knife, jig, and of course the all-important lens cap:
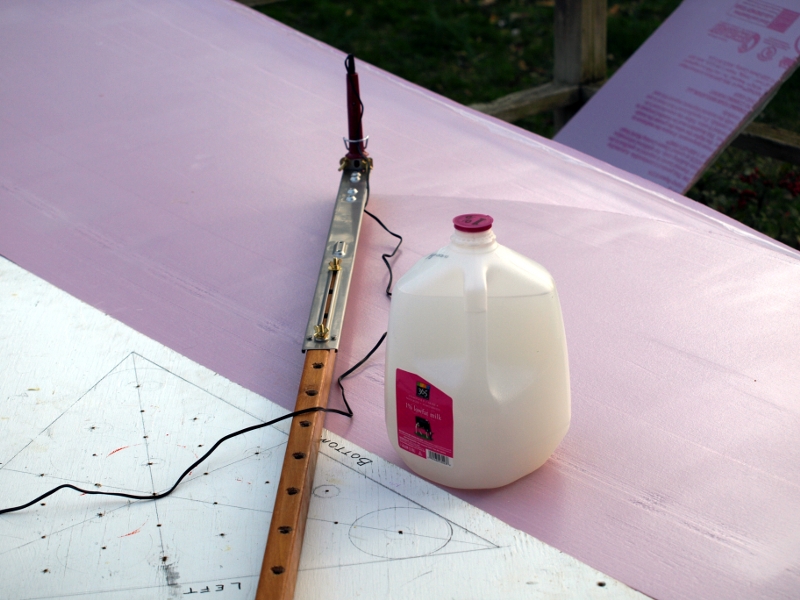
2) Cutting the arc:
3) Reverse angle shows a wavy (from where I moved the foam), a nice clean arc, then a divot while I take the picture:
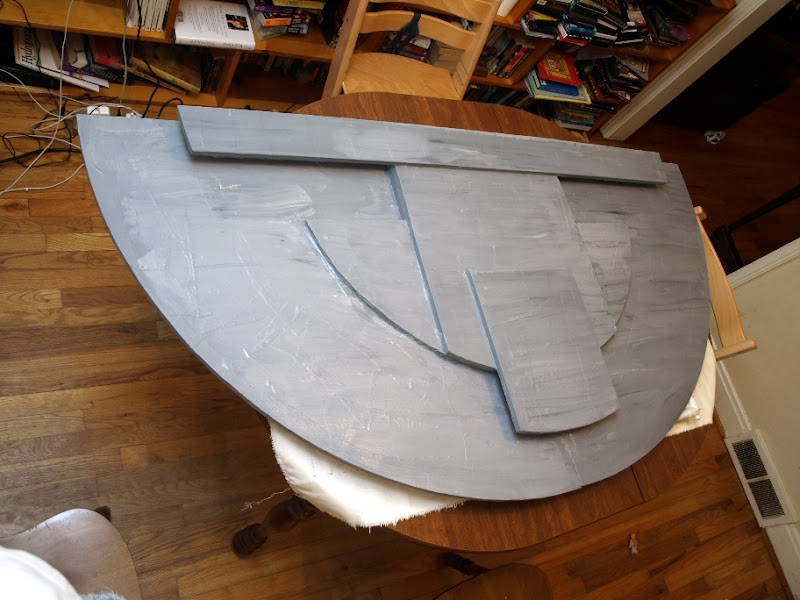
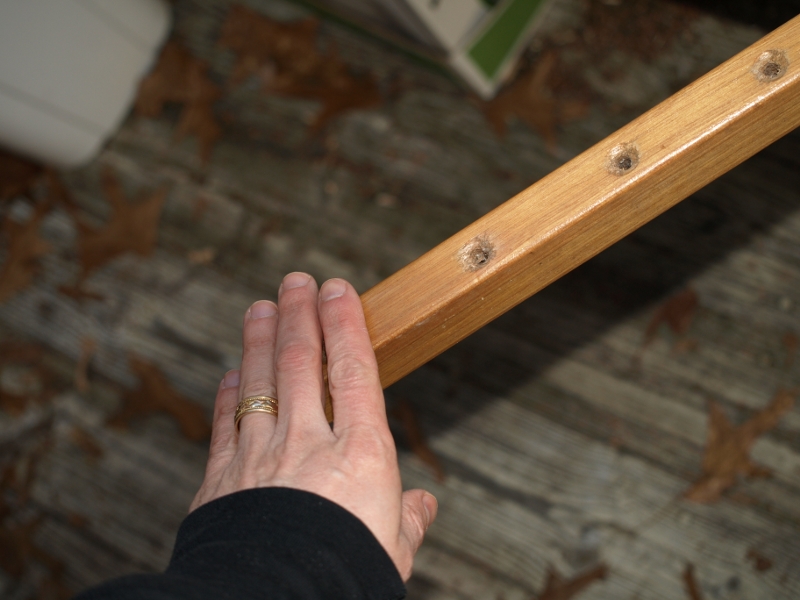
4) Steady as she goes! For the "rudder" I'm using the headboard from a hammock. Predrilled holes, baby!
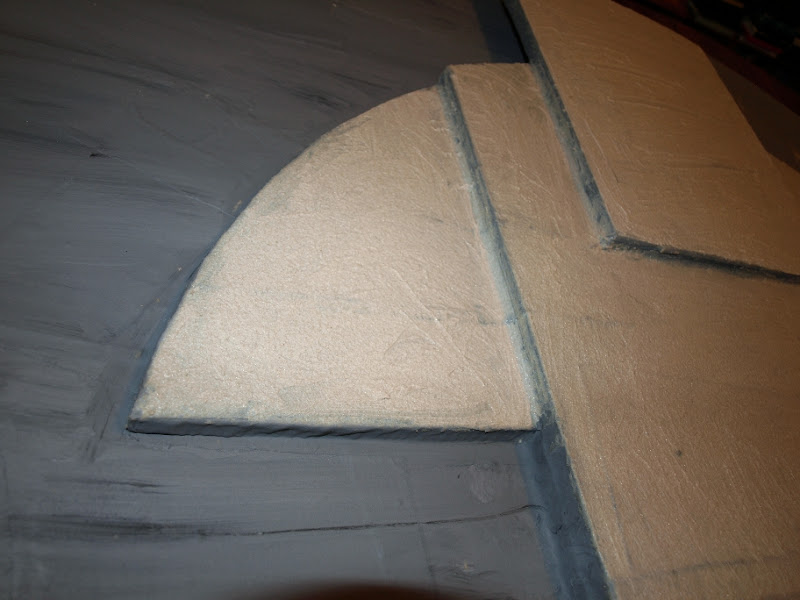
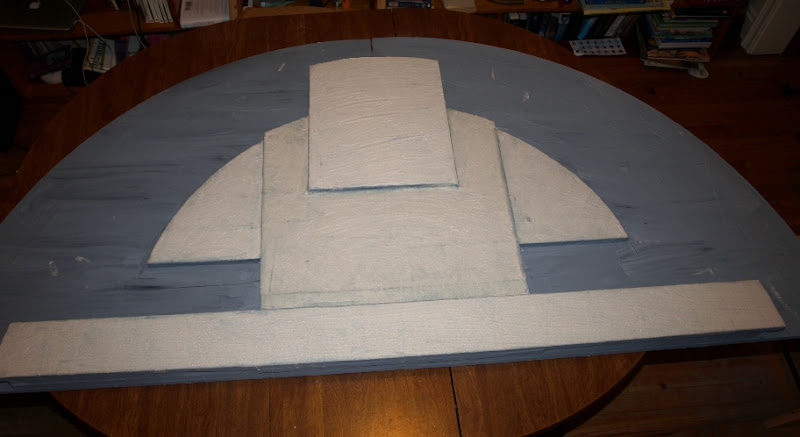
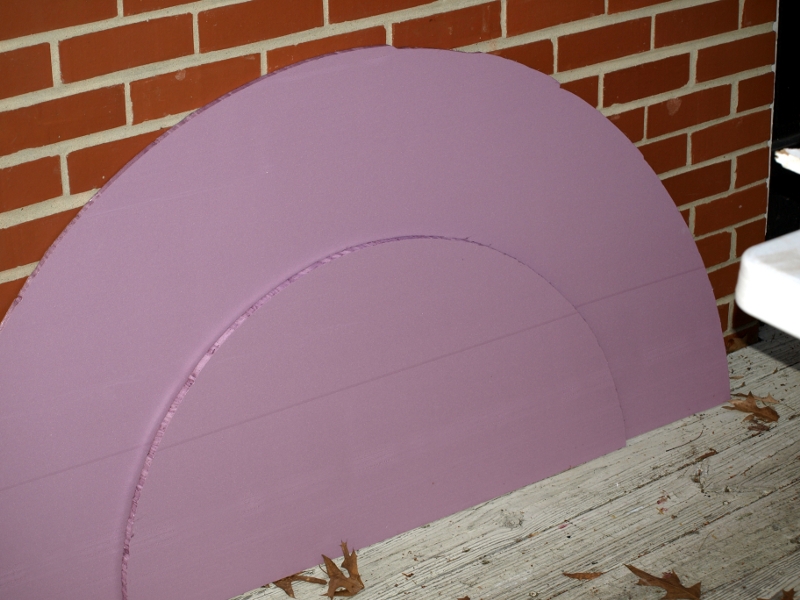
5) The first stage is complete.
Step 5: glue the pieces together
````````````````````````````````
Liquid nails foam paneling adhesive glues the sections together, and books /paperweights/skillets were used as weights.
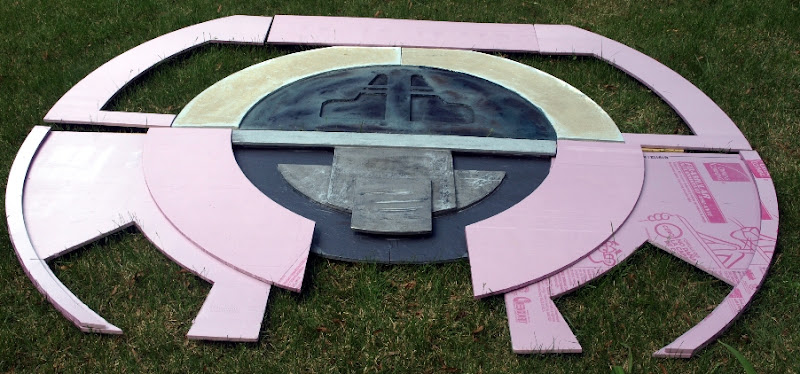
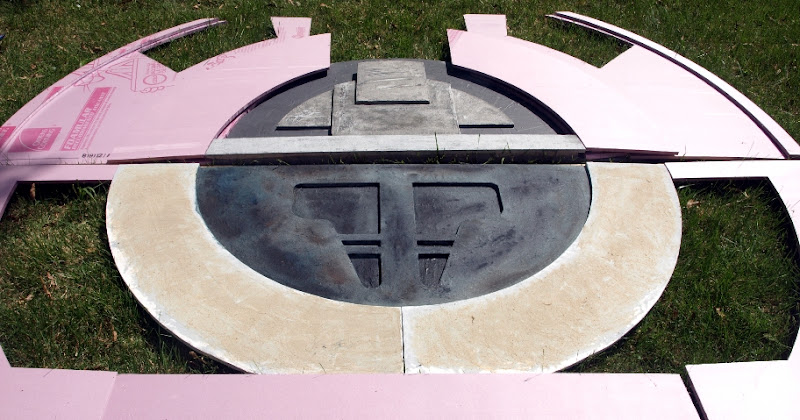
Step 6: strengthen the panels with scrim
````````````````````````````````````````
The "cloth mache" process took about 12 hours. A third is left to be done still.
Step 7: prime, texture, and paint
`````````````````````````````````
I have primed and textured half of the parts and have ordered some metallic paint (Lascaux Studio Bronze acrylics in aluminum and stainless steel) to get the metal look. Unlike most metallic paints which are silica based, these paints are actually made of metal suspended in emulsion.
To do:
Buy one more foam sheet to get a solid background for the top half. Cut those last few pieces out (top left panel, top right panel, and top center cap), glue them, scrim/prime/paint them. Design the support structure. Assemble the whole deal and make sure it works. Then the blast doors will be done.
=======================
PHASE TWO: Molten Metal
=======================
Then the real work can begin, which is to make the prop interactive. Here is the basic gist:
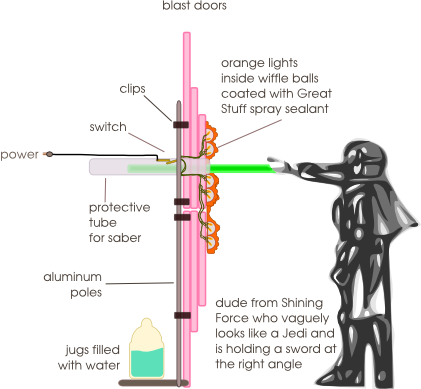
I'm hoping to make the "molten metal unit" self contained so that the blast doors could be independently set up, then insert the molten metal unit through from the front. This would increase the ease of setup and transport, make the unit more flexible of a backdrop, and also allow the unit to be serviced without having to work with the blast doors in the way.
To make this work I'm going to have two nested tubes. One will be as wide as the largest section of a Hasbro toy saber for those kids who bring their own sabers. The larger tube will contain the wires for the orange Halloween lights. This will keep all wires neat and contained. The switch will be inside the inner tube. I will probably have to make it. I want a hinged contact that will touch the other contact when the saber is inserted. My current plan is to disassemble a standard power strip, remove the switch from it, and splice in wires to my home built switch. That way, anything we want to turn on when the saber is inserted will simply need to be plugged into the power strip.
==============================
PHASE THREE: Finishing Details
==============================
If everything listed above works, then the next item of business is to make this battle station operational. In other words, make it easy to use in the field. Some ideas:
You can view the photo gallery here:
http://picasaweb.google.com/robsspamtrapper/BlastDoors?feat=directlink
When someone inserts a lightsaber into the blast doors, it will light up to simulate molten metal. This could be recreated following the tutorial here:
http://www.instructables.com/id/Goldies-Bubbling-Halloween-Cauldron/
The person will be surprised/awed/aghast and at that moment a picture will be taken.
=========================
WHAT HAS BEEN DONE SO FAR
=========================
Step one: decide on materials
`````````````````````````````
The first step was to design the blast doors. Taking into consideration weight, portability, cost, strength, ease of assembly, and look, I decided on the following recipe, from back to front:
- Rigid foam insulation panels >
Glazed with diltued wood glue (aka scrim) >
Covered in strips of cotton fabric, which are then coated again in scrim >
1 coat of gesso >
1 coat of gray paint (primer, if you will) >
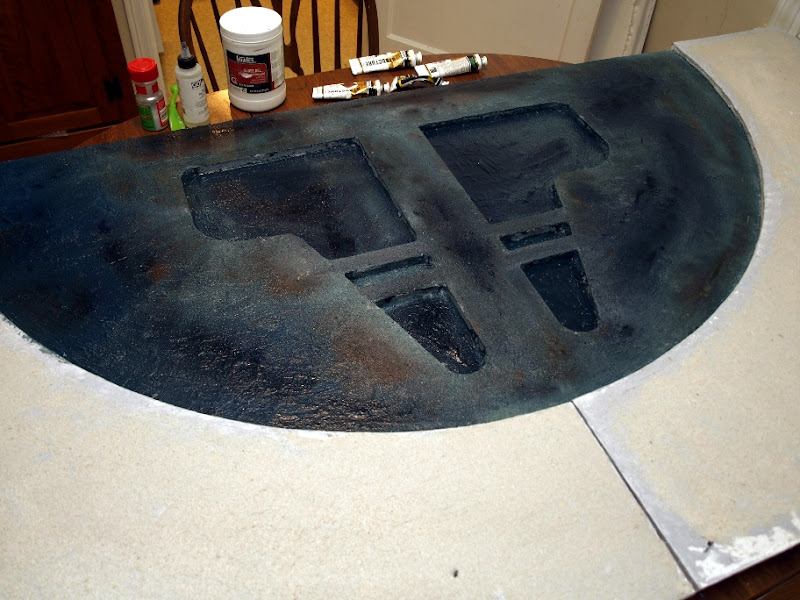
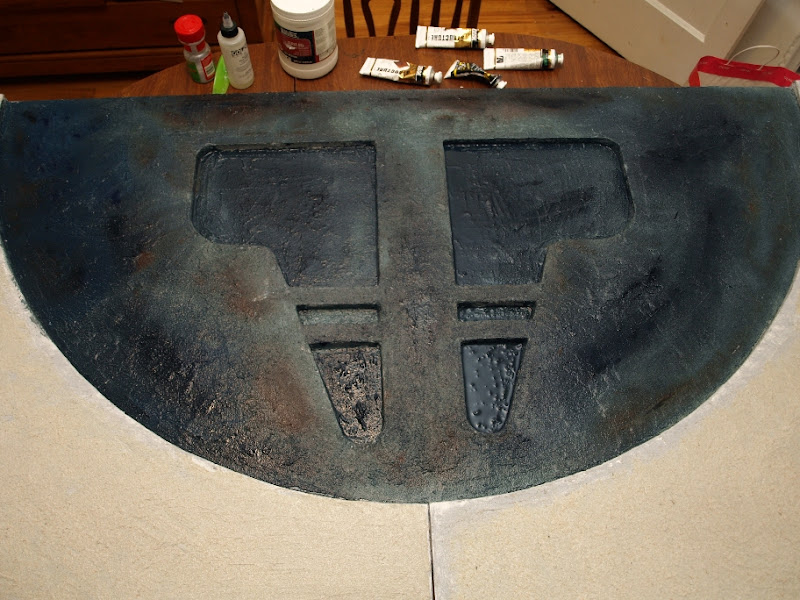
A thick layer of pumice medium and/or acrylic gel medium mixed with fine sand. This layer hides the cloth edge marks and creates a rough-hewn "drop forged" texture (thanks Chris!) to give the faux metal some depth. >
A transluscent wash of black paint to pool in the pits, crevases, etc. This will be wiped off when semi-dry to leave the ridges intact. >
A layer of metallic acrylic paint applied with a sponge >
Another wash of burnt umber/cobalt which will be wiped off much more quickly, leaving a hint of color behind >
A protective coat of satin varnish
That is the recipe I'm working through now. I will test the whole recipe on a scrap of foam when the metallic paint arrives.
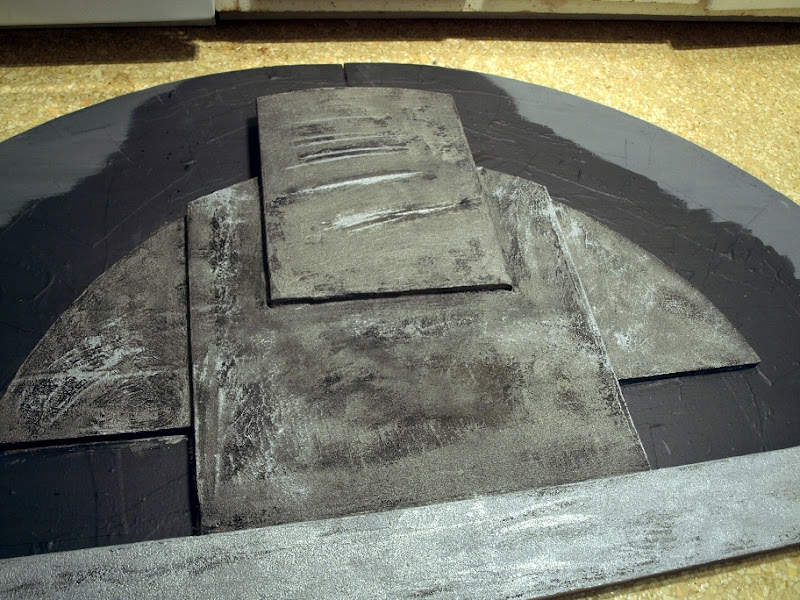
Step two: design the prop
`````````````````````````
I spent a couple evenings going frame by frame through the blast door scene. This mockup was based on synthesizing many of the screenshots together:
However, this turned out to be inconsistent from frame to frame depending on angle, lighting, etc. Clearly something was wrong with my design. The a-ha! moment came at the 7:11 mark when one of the destroyer droids shoots the top corner of the blast doors. There is a shower of sparks and for one frame, the entire set is illuminated:
Finally, I could clearly discern the shape and location of each element! That gave rise to the design you'll see in the upcoming build images. For that reason I am going to code name this project "the 7-11 project." Lucky omen, indeed!
Step Three: Design the dimensions/assembly/transportation/setup
```````````````````````````````````````````````````````````````
This is still in flux, but there are practical limitations:
1) Parts have to fit in the back of my car so that there's at least one way to transport it.
2) the prop cannot be more that 8 feet tall because of standard ceiling light limitations.
3) Therefore the backdrop must be done in parts and assembled on site.
4) There must be a support framework that is light enought to transport but sturdy enough to ensure the structure remains upright.
Regarding #4, my basic plan at the moment is to use collabsible aluminum poles and plastic jugs. The jugs could be filled with water on site to add weight and stability.
#3 is a bit of a puzzler. I need to be able to assemble the backdrop but not bump into the ceiling during assembly. Perhaps I could use snap brackets so that the parts can be put on from the front... needs thought and testing.
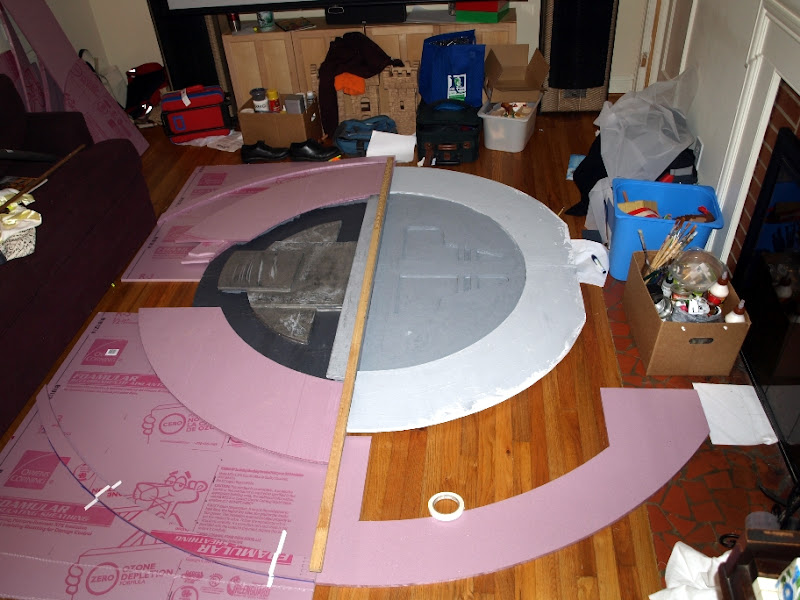
Step 4: cut out the pieces
``````````````````````````
I made a jig to cut out the circular pieces and used a straight edge for the straight pieces. Fortunately the blast doors don't seem to have bevels. The jig is a large base of plywood (with a plastic rod in it as a pivot point) combined with a long arm with many holes. The foam cutter lives at the end. One of the holes is placed on the pivot point and a circle or arc can be cut from it. This is slow going because I skimped on the foam cutter and bought an underpowered "foam cutting needle" from JoAnn's. So each piece took about 30 minutes to cut.
1) The whole setup, with table, pivot/edge board, milk jug weight, hot knife, jig, and of course the all-important lens cap:
2) Cutting the arc:
3) Reverse angle shows a wavy (from where I moved the foam), a nice clean arc, then a divot while I take the picture:
4) Steady as she goes! For the "rudder" I'm using the headboard from a hammock. Predrilled holes, baby!
5) The first stage is complete.
Step 5: glue the pieces together
````````````````````````````````
Liquid nails foam paneling adhesive glues the sections together, and books /paperweights/skillets were used as weights.
Step 6: strengthen the panels with scrim
````````````````````````````````````````
The "cloth mache" process took about 12 hours. A third is left to be done still.
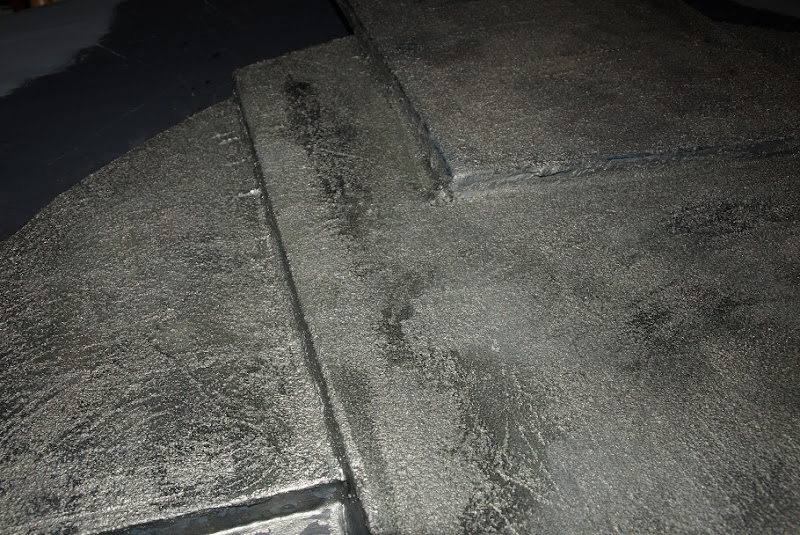
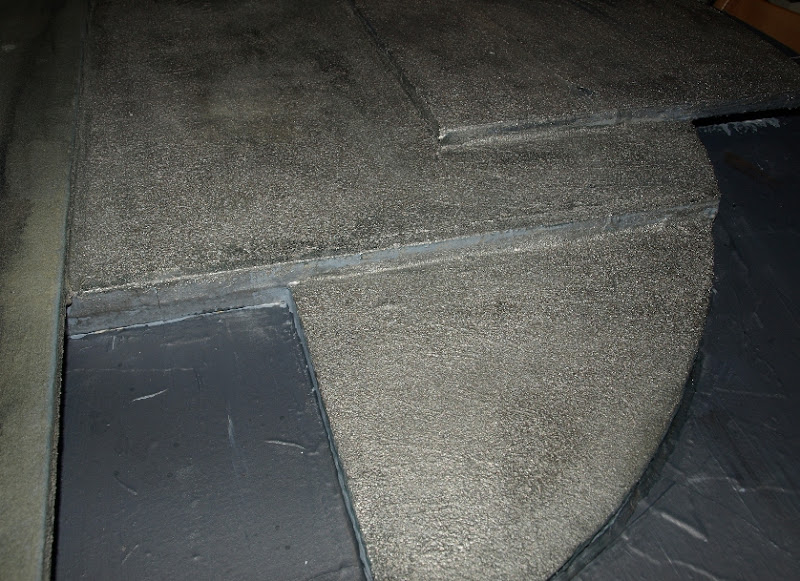
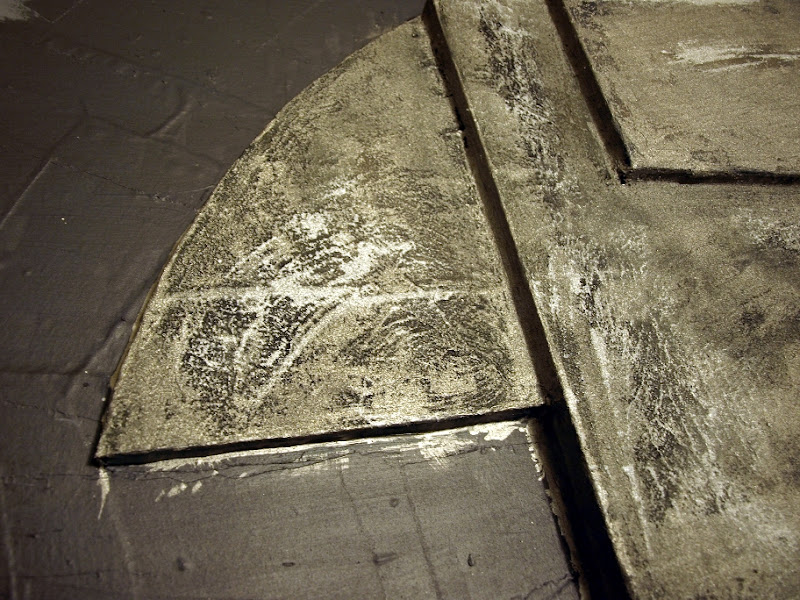
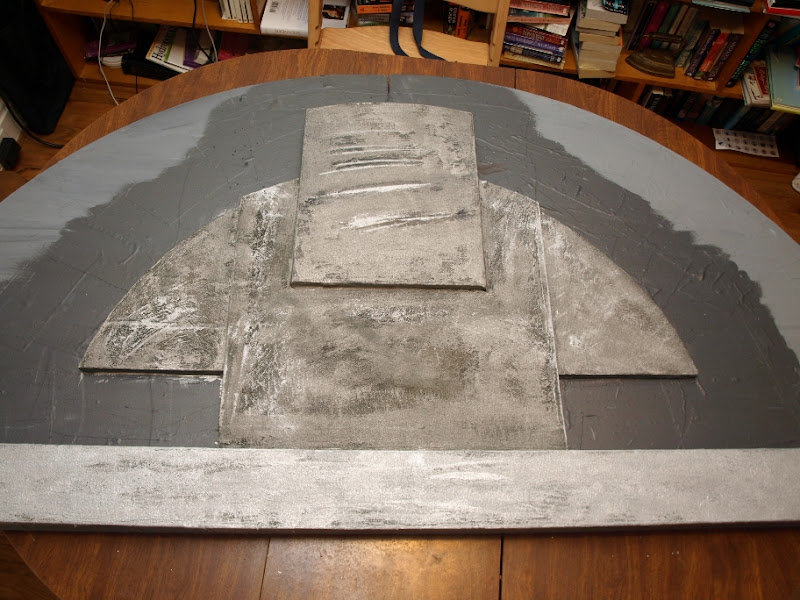
Step 7: prime, texture, and paint
`````````````````````````````````
I have primed and textured half of the parts and have ordered some metallic paint (Lascaux Studio Bronze acrylics in aluminum and stainless steel) to get the metal look. Unlike most metallic paints which are silica based, these paints are actually made of metal suspended in emulsion.
To do:
Buy one more foam sheet to get a solid background for the top half. Cut those last few pieces out (top left panel, top right panel, and top center cap), glue them, scrim/prime/paint them. Design the support structure. Assemble the whole deal and make sure it works. Then the blast doors will be done.
=======================
PHASE TWO: Molten Metal
=======================
Then the real work can begin, which is to make the prop interactive. Here is the basic gist:
I'm hoping to make the "molten metal unit" self contained so that the blast doors could be independently set up, then insert the molten metal unit through from the front. This would increase the ease of setup and transport, make the unit more flexible of a backdrop, and also allow the unit to be serviced without having to work with the blast doors in the way.
To make this work I'm going to have two nested tubes. One will be as wide as the largest section of a Hasbro toy saber for those kids who bring their own sabers. The larger tube will contain the wires for the orange Halloween lights. This will keep all wires neat and contained. The switch will be inside the inner tube. I will probably have to make it. I want a hinged contact that will touch the other contact when the saber is inserted. My current plan is to disassemble a standard power strip, remove the switch from it, and splice in wires to my home built switch. That way, anything we want to turn on when the saber is inserted will simply need to be plugged into the power strip.
==============================
PHASE THREE: Finishing Details
==============================
If everything listed above works, then the next item of business is to make this battle station operational. In other words, make it easy to use in the field. Some ideas:
- Create a custom packing crate for it (probably out of coroplast corrugated plastic) so that it could be carried into cons, shipped via UPS/FedEx, etc.
Create soft boxes to add diffused light around the photo subject to get a good portrait.
Add a lit floor and lit "ceiling" to enhance the effect as seen in the movies.
Create an instruction manual and a "field repair kit" with paint/tape/glue so that people can repair it on site. It is made out of foam after all.
You can view the photo gallery here:
http://picasaweb.google.com/robsspamtrapper/BlastDoors?feat=directlink
")