HOW to make a mold for this?

SuperheroDIY

Well-Known Member
Please let me know if I'm in the wrong section.

So I was able to create a pretty good 3D model of what I feel a canister for a Begins / TDK utility belt would look like. I added areas for these little hinges I like and a place for little magnets on the lid and in the back, so it will stick to the belt.

Shapeways was able to print it and they did a good job!

photo%2525201.JPG
photo%2525202.JPG


photo%2525203.JPG
photo%2525204.JPG


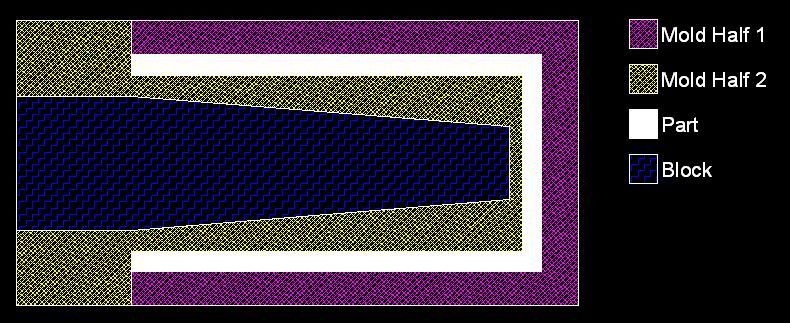
BUT: I have no idea how I would make a mold for this thing and cast it. The problem isn't making a mold, I know how to do that.

The problem is that there is a pretty good sized recess in this thing that I'm not sure I'd be able to get the mold out of, and I'm not sure how future casts would work with it. I have a feeling that I won't be able to pull this off of the mold if I just try it without knowing how first.

I know there are a couple of members who have made canisters before but I'm just not sure how to do this one. I do want to maintain the functionality of having a canister that I can actually put something in.

Any tips/tricks would be very helpful.

Thanks!
 
Two piece mold and you'll have to pressure cast that to get good results IMO. It shouldn't be that hard at all just a box. ;)
Oh forgot if you are going to pressure cast (I would recommend it) you must (IMO) pressure mold it as well.
 
can you seperate the back plate from it? Maybe mold it in two pieces that way you can just glue it together after its cast
 
Two piece mold and you'll have to pressure cast that to get good results IMO. It shouldn't be that hard at all just a box. ;)
Oh forgot if you are going to pressure cast (I would recommend it) you must (IMO) pressure mold it as well.

See what I mean? I don't really know what I'm doing.:confused I just looked up what pressure casting is and it seems hard! And wouldn't you need a pretty good sized "pressure container" for much of anything?
 
can you seperate the back plate from it? Maybe mold it in two pieces that way you can just glue it together after its cast

Yeah I was thinking that I should have submitted it as two separate pieces. That way I could just glue it like you said.

I don't think I can separate this one though without damaging it -- I'd have to order another one from Shapeways that was already that way. Shucks.
 
Perhaps you could have a second version printed up that is made in three parts instead of two. The lid, the back of the canister, and the front of the canister. It would make is so much easier to mold that way, you'd just have three two part molds.
 
Where do you want to have the pour-spot?
If you´d like to go with the back plate as the "open/ pouring" area of the mold, you could do a two piece mold with an "insert" for the canisters cavity...know what I mean?

Markus
 
Where do you want to have the pour-spot?
If you´d like to go with the back plate as the "open/ pouring" area of the mold, you could do a two piece mold with an "insert" for the canisters cavity...know what I mean?

Markus

Yeah, I was thinking the back would be a good place for the pour spot.

I kinda get what you're saying. Just basically a block or something to prevent the resin from filling that area.
 
Save your self all the trouble and hassle, cut the back plate off and either reshape the bottom plate or fabricate a new one out of sheet styrene and mold each piece as a separate open mold. Some JB Weld or similar epoxy will lock them together for a finished part.

I also should add its a little silly isnt it to have such a small part with such a small inner cavity to be hollowed? If it HAS to have a cavity inside, I would clay it up to within an inch of the top. If there is trouble releasing it from the mold just slice the area since it wont show being the underside of the final pull.
 
Now let me preface this by saying I've only made one mold, and it was an open mold at that, so this might not mean anything. But...

You could try using a block that's undersized for the cavity. Make it taper quite a bit so it can remove from the mold easily. Now fill the cavity part way with your rubber, then stick the block in. Now mold the thing as if it were solid. Here's a pic that might make more sense.

Mold.jpg


Maybe?
 
Cut off the cylindrical parts, and fabricate them separately. After that, cast the first part of the two piece mold with the open end upwards. Try to eliminate or reduce the number of undercuts.

TazMan2000
 
This thread is more than 12 years old.

Your message may be considered spam for the following reasons:

  1. This thread hasn't been active in some time. A new post in this thread might not contribute constructively to this discussion after so long.
If you wish to reply despite these issues, check the box below before replying.
Be aware that malicious compliance may result in more severe penalties.
Back
Top