How do I make paper look old?

Here are some pictures of aged papers of mine. I used Walnut Ink and Distress Ink - Tea Dye.

ChachapoyanMapAged.jpg


http://i270.photobucket.com/albums/jj87/dbcooper2/Demonstration Photos/ChachapoyanMapAgedCloseUp.jpg
http://i270.photobucket.com/albums/...tration Photos/ChachapoyanMapAgedCloseUp2.jpg
http://i270.photobucket.com/albums/...tration Photos/ChachapoyanMapAgedCloseUp3.jpg

http://i270.photobucket.com/albums/jj87/dbcooper2/Demonstration Photos/LightlyAgedLetter.jpg
http://i270.photobucket.com/albums/jj87/dbcooper2/Demonstration Photos/LightlyAgedLetterCloseUp.jpg
http://i270.photobucket.com/albums/jj87/dbcooper2/Demonstration Photos/HeavelyAgedLetter.jpg

http://i270.photobucket.com/albums/jj87/dbcooper2/Demonstration Photos/BandelierAgedNotes.jpg
http://i270.photobucket.com/albums/jj87/dbcooper2/Demonstration Photos/BandelierAgedNotes2.jpg

I use the Distress Ink first because it is lighter. I dab it on the edges and corners. I then follow it with the darker Walnut Ink. I some times burn some of the edges to mimic mildew.

Hope this helps.

Best,
DBCooper
 
I would use a tea bath and when it still very wet I would from a good height maybe a few feet sprinkle a very little bit of instant coffee on it. The few grains that land will disolve and bleed out giving what I think are nice age spots. Do a test run first as too much coffee just doesn't look right. There are lots of great ideas here, trail and error are the best means for you to find what works best for the finish you want.
 
Instant coffee and tea will also give the paper a bit of a musty old smell as it dries -to my nose, at least. Adds to the 'feel'.
 
Remember too that older paper did not come in the standard sizes and ratios we have today. Trimming your pages so they are not 8.5 by 11 inches will help sell the idea of age.
 
Just an update, but I'm trying to age some 32" X 36" LotR Middle Earth maps, and I ran into a bit of a problem.

The longest thing I have that I can soak the map in, while rolled, is a 30" flower box. I can't find anything else at the moment. The first map came out okay, but I had to sort of re-invent how I did things.

1. roll the map and rasp the ends, both ways.
2. Tea bath (1st one got mini tears here and there, which I was okay with, however, the 2nd map just tore with the softest handling). I used too few tea bags the first time.
3. While wet, I tore the edging. I prefer to do this wet, for a more natural look.
4. Two heavy rounds of blotting the map with coffee.
5. Ironing under paper to flatten it back out.

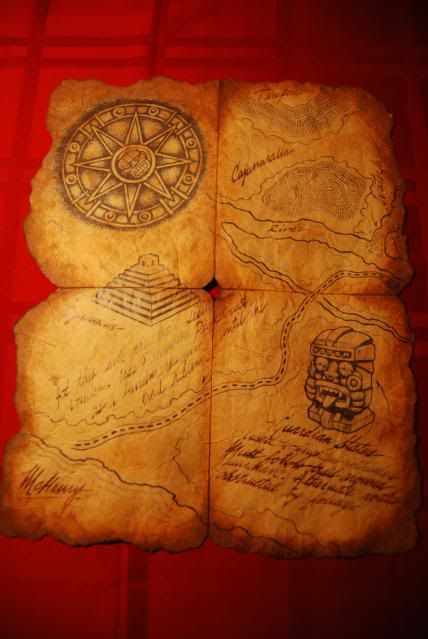
Here's the final result. It's okay, but I want it darker next time, and will lighten within the creases. I did a small map for practice with a longer tea set, which came out a better shade I think.

DSC_0001-26.jpg


Cheers,

Guy
 
dye in tea and rub the corners with coffee powder while it is still wet.
let it dry and brush of the coffee, now go around the edges with a open flame ( do not burn just scortch).
tear the edges edges, crumble up and iron after that.
btw
use a wet teabag to dye, don't make a teabath it will tear up your paper.
if you have an other collor then black and white printed, dye it by dripping coffee on it, do not stroke with the teabag like your using a brush. that will ruin all the collor. with black and white it's okey
 
Last edited:
I have used coffee, tea, watercolors, and even soy sauce (but you gotta rinse that one). you an brew different strengths of coffee to give lighter or darker aging, depending on paper. On one document I was experimenting on, I used one of those freeze dried blocks that someone gave me (raspberry cream - made the kitchen smell funky for several hours lol), and I used the whole block with about half the recommended water amount. Came out a deep caramel color, and I was very pleased with the results.
DBCooper - terrific, I love your stuff
ElliotStone - great idea, I'll have to try that
 
Anyone have any ideas how to age a lot of paper all at once. And I mean a lot of paper, about five inches worth. I am aging it one sheet at a time and it is taking awhile. It turns out good in the tea bath but I would like it to go a little faster.
 
I like to use a nice sludge of instant coffee to age my papers and quick dry in the oven,and actual wet coffee grounds create a nice grainy look in the paper if done right.

Propnomicon has a rather nice amount of paper aging tutorials.

I've been playing around with sitting the paper in milk for 2 minutes and then cooking it in the oven(watch it closely for desired look) Here's an example of how it can look: elder sigil prototype by ~slayer-barosh on deviantART It even gives it a nice musty old paper smell,hehe.perfect for a Necronomicon or some other evil tome that's been around some nasty stuff.
 
Hello all, first time poster here :)
I'm in a similar situation like timelordjedi777. I'm working on my first self-bound Grail Diary (I've made a handwritten one using a Moleskin notebook before) and need some advice. when is the best time to age all those pages?
- Before cutting as single sheets?
- After the cutting but before sewing the signatures together?
- After the book is bound?
I'm not looking for a fast way to do this, but the (probably) most practical one. any help is appreciated. :)
 
Back
Top