Hellboy ( comic book version ) costume. WIP.

I took a break from the Hand to focus on making a couple modifications on the eyes and finishing gluing the hair. I also had a little extra time so I gave a shot at one of the hoofs. I'll just cover the calves part with sewn faux leather.
 

Attachments

  • EYES-MOD-COMPARISON.jpg
    EYES-MOD-COMPARISON.jpg
    545.6 KB · Views: 243
  • Head-mod-tweak-comparison.jpg
    Head-mod-tweak-comparison.jpg
    287.1 KB · Views: 271
  • Hellboy-head-with-eyes-mod.jpg
    Hellboy-head-with-eyes-mod.jpg
    211.3 KB · Views: 267
  • Hoof-test.jpg
    Hoof-test.jpg
    166.9 KB · Views: 219
  • Rosary-and-cross.jpg
    Rosary-and-cross.jpg
    266.9 KB · Views: 165
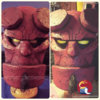
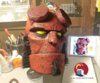
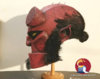
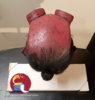
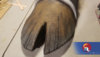
Last night I finally manage to glue the remainder of the hair. I cut a hi density styrofoam decorative ball - about 1/5. Just enough to have a flat surface to screw it to the back of the head - sprayed it black. Let it dry and sprayed it with 3M Super 77 glue. I then applied the cut out hair from a cheap bald cap bought on line. I wanted to make sure I didn't have a super clean edge of receding hair. Never liked the sumo pampered look in the Del Toro movies ( aside from that and the cat fetish, those are great!!! )
Then I glued it to the back of the hair with contact cement AND screzed it to the foam for good measure. It's not going anywhere!
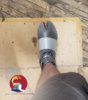
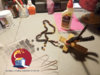
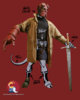
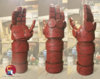
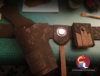
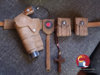
Tonight I finished the Right Hand Of Doom! and I managed to put together a quick check list of what's left. I'll add a chest piece after all these are done, as I can always use a black tee shirt in the meantime...
 

Attachments

  • close-up-head-left-prof.jpg
    close-up-head-left-prof.jpg
    208.1 KB · Views: 327
  • Hellboy-WIP-check-list.jpg
    Hellboy-WIP-check-list.jpg
    143.9 KB · Views: 233
  • Top-Skull-redec-hair.jpg
    Top-Skull-redec-hair.jpg
    117.8 KB · Views: 195
  • TAD-RHOD.jpg
    TAD-RHOD.jpg
    252.5 KB · Views: 216
It's been a while since I posted anything here. I was able to do some work on the belt. haven't made any progress on the second hoof or legs. But I will try to make time to show more next time. the U.S cavalry buckle comes from a belt. Pretty cheap online but I actually put it there just to check. It's from an actual belt I use. I might just make a quick mold of it and recast one in plastic for the purpose of this costume.

The buttons from the pouches come from stuff I always save from appliances or their packing boxes, just in case. I had two of those so it works just fine for now. If I was to make another pouch - which will probably be the case down the line - I'd be screwed as I don't have a third one to spare.

the one holding the lid down on the holster is just a cap from a cosmetic jar and two magnets.
 

Attachments

  • Belt-WIP-05.jpg
    Belt-WIP-05.jpg
    198.3 KB · Views: 127
  • Belt-WIP-03.jpg
    Belt-WIP-03.jpg
    139.9 KB · Views: 104
  • Belt-WIP-02.jpg
    Belt-WIP-02.jpg
    205.1 KB · Views: 135
  • Belt final 00.jpg
    Belt final 00.jpg
    793.9 KB · Views: 120
Last edited:
Just found this thread and it's AMAZING! The textures and color treatment on the head is brilliant. This is going to be a work of art. Well done you!
 
This thread is more than 4 years old.

Your message may be considered spam for the following reasons:

  1. This thread hasn't been active in some time. A new post in this thread might not contribute constructively to this discussion after so long.
If you wish to reply despite these issues, check the box below before replying.
Be aware that malicious compliance may result in more severe penalties.
Back
Top