Hasbro Vintage Slave 1. Lower surface detail upgrade kit.

So another day on this idea.
Ive poured the first section of the saucer silicone, second pour tomorrow.
SAM_4252.JPG

Invisible yogurt moulding !
Ive de-moulded the master patterns, and poured the first load of bits to check for air entrapment and where to concentrate my working as i pour the resin. This lot is pretty good to be honest, only some small bubbles here and there
SAM_4229.JPG

SAM_4230.JPG

SAM_4232.JPG

SAM_4233.JPG

SAM_4234.JPG

SAM_4240.JPG

So first pull done and checked over, notes taken.
Second pour done with more time taken in the areas i spotted from the first lot.
SAM_4242.JPG


SAM_4246.JPG


SAM_4249.JPG

So thats it for the kit parts today. More work on the dish mould tomorrow then hopefully some pulls from that.
 

Attachments

  • SAM_4243.JPG
    SAM_4243.JPG
    435.6 KB · Views: 85
These castings look very nice!,..if the dish turns out this good i will be a happy camper using them on the Slave 1
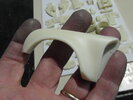
I hope it comes out like these as well. Im very happy with the finish so far. Fingers crossed :)

Ive done more today. Poured the second half of the dish mould. Now the waiting.
SAM_4264.JPG


I cleaned up the castings from the second pour. It took no time at all removing the flashing with my belt sander. On the smaller parts i used 200 grit on a flat surface. All the parts (except for the dish) are just pour cast, so clean up is very easy using a flat plane and some sandpaper.
SAM_4275.JPG

SAM_4278.JPG

SAM_4279.JPG

SAM_4281.JPG

I decided to cut a couple of holes in the baseplate and add some greeblies under the rest. Its not something i will include in the kit, but you can obviously do the same if you wish.
SAM_4284.JPG

Then started adding the parts for a final size check.
SAM_4286.JPG

SAM_4288.JPG

SAM_4290.JPG

SAM_4293.JPG

SAM_4294.JPG

SAM_4298.JPG

SAM_4302.JPG


So heres the final assembly before painting and sticking down. Just the small greeblies to make once its assembled.
SAM_4300.JPG
 
So more done today.
I poured the first hit of the dish and it came out spot on.
SAM_4312.JPG

SAM_4313.JPG

SAM_4314.JPG

The black flecks are a bit of dirt which got into the mould. No bubbles. all cool
Flashing is all on the rear and wafer thin, super easy to remove.
SAM_4315.JPG


I prepainted all the parts with their first layer of colour and placed them back on the model for a quick visual check.
SAM_4322.JPG

Many more weathering, pin washes and airbrushing to go before its done. I use this as a sketch to follow as the layers build up.
Hope you like it.
 
HAHA, cheers voodocaster.

More done.
Im just working out the next set of small greeblies.
Ive worked it so the only kit you will need extra is this
SAM_4344.JPG

Theres just no way i can cast the guns as well as an injection moulded kit, so i think this is the best way to get some nice detail in there.
There are a few parts from this kit which work and i will go through them once the kit is ready to go.

So i have arranged the parts on the base and stuck everything down apart from the engines (im planning to do something extra to mine) and im happy to say it went well without issue, all parts fit nicely. You can see the guns in grey which come from the kit. The lower two stubbs of the guns will be cast in the kit, but you will need the 4 guns (one each side and two in the dish) from the kit to complete it.
SAM_4335.JPG


The dish is the first pull painted up with the guns in place. There are some other small greeblies to go into the small voids in the centre
So heres what it looks like now.
Incidentally, the resin i use needs no preparation for painting. No washing or degreasing etc. I use no release agent in my moulds so it makes prep super simple. Just thought you should know :)
More soon.
SAM_4346.JPG
 
Heres where we are now.
this will be the completed kit once the final small greeblies are cast and fitted for a check.

The engines will not come with the internals as shown here, They will have the textured coin detail seen in the first few posts.
I have also formed a panel which sits underneath the lozenge engine with a raised key area to allow you to place silver tape or paint the bottom of the engine.
another pass with the airbrush and some subtle sanding, and here i have my "almost "completed lower surface.
final kit parts and greeblies will appear here tonight for your delectation.

I will be completing the paint job on the lower surface once i have the upper done to this stage, in order i can get the final weathering to match across the whole thing.

Hope you guy's like it. Im very happy with it so far.

Almost ready to make a few kits once i worked out the resin costs and time etc.
Thanks for sticking with this thread everyone.
SAM_4350.JPG

SAM_4352.JPG

SAM_4351.JPG
 

Your message may be considered spam for the following reasons:

If you wish to reply despite these issues, check the box below before replying.
Be aware that malicious compliance may result in more severe penalties.
Back
Top