Hand stitched Kermit the Frog puppet replica!! (Early builds/old patterns)

Cardboard would not make the body look as smooth and round. I have seen some papercraft pieces that look really smooth. But cardboard has ridges and when you bend it, it remembers that bend and you can't undo mistakes.

As mentioned earlier in this build, Joann's has a polyfoam that would work pretty well. But it is only worth it if you get a 40% or more off coupon. Which come out pretty regularly online and in their ads. As far as I know the professional puppet builders use an open cell foam, also known as dryfast foam. Its possible to order this from a place called "FoamOnline.com" If you do choose to purchase from them, the foam you are looking for is going to be Rectangular, Foam Type: Dry Fast (2.15 lb), Firmness: Medium, Length: 24 inches, Width: 48 inches, Height: 1/2 inch.

Also Ecl has a newer build post on the RPF of what he does now when he makes his Kermits, also look there for informational pictures and guidance from the all knowing ECL. ecl's Kermit the Frog Puppet Replica (using my newest patterns)

Since I'm guessing you're new to puppet building, look at YouTube for some tutorials. Adam Kreutinger is a great channel for puppet building. He explains well to novices getting into puppet building, and his videos are entertaining at times. Adam Kreutinger

I know Adam, I did an attempt of a puppet. Some are too small, some are not really great. At the end of this month, I will make the 13 pointed collar (Sesame Street) Kermit puppet. Same materials, but not really the same. Also you can ask me if you want the custom made 13 pointed template (Png file)
 
Day 1: Head
I went to the city today. Got dark green felt, yellow felt, pink felt, red felt and black felt. I live in Ireland, and I am pretty sure they don't sell dyed felt. I still used what I can. The eyes, tongue, Uvula and Pharynx where hot glued onto the felt. Head was all hand stitched.
Tell me what you think about them.
 

Attachments

  • WIN_20190303_22_08_12_Pro.jpg
    WIN_20190303_22_08_12_Pro.jpg
    331 KB · Views: 681
  • WIN_20190303_22_08_14_Pro.jpg
    WIN_20190303_22_08_14_Pro.jpg
    326.8 KB · Views: 669
  • WIN_20190303_22_08_17_Pro.jpg
    WIN_20190303_22_08_17_Pro.jpg
    324.2 KB · Views: 727
  • WIN_20190303_22_08_19_Pro.jpg
    WIN_20190303_22_08_19_Pro.jpg
    321.6 KB · Views: 652
  • WIN_20190303_22_08_25_Pro.jpg
    WIN_20190303_22_08_25_Pro.jpg
    294.3 KB · Views: 638
  • WIN_20190303_22_08_28_Pro.jpg
    WIN_20190303_22_08_28_Pro.jpg
    338.9 KB · Views: 565
Hey there! This thread has been like a second home for the past month but this’ll be my first post!

Your Kermit pattern was my first sewing/prop project ever, and although I didn’t do a perfect job I’m still pretty happy with how he turned out!

Thought you’d like to know that I took him to see Steve Whitmire at DragonCon this past weekend. Steve even tried him on!

Everyone was super impressed and said the pattern was very on model! Thanks so much for all the info you’ve provided!
 

Attachments

  • 4B34F9C3-B849-4224-926F-A6CB54E6509E.jpeg
    4B34F9C3-B849-4224-926F-A6CB54E6509E.jpeg
    1.7 MB · Views: 965
  • 1378AE1F-F9FF-4B7F-8748-3C21047DDA71.jpeg
    1378AE1F-F9FF-4B7F-8748-3C21047DDA71.jpeg
    759.2 KB · Views: 944
Hey there! This thread has been like a second home for the past month but this’ll be my first post!

Your Kermit pattern was my first sewing/prop project ever, and although I didn’t do a perfect job I’m still pretty happy with how he turned out!

Thought you’d like to know that I took him to see Steve Whitmire at DragonCon this past weekend. Steve even tried him on!

Everyone was super impressed and said the pattern was very on model! Thanks so much for all the info you’ve provided!


Wow that is SUPER cool! Thanks for sharing the experience, and great job with your build! It looks well made, especially being your first build. A big part of the fun with this Kermit project has been sharing the knowledge and experience along the way with other Kermit/Henson fans. It must have been a really amazing moment to experience having Whitmire try Kermit out! Definitely something unforgettable.
 
After 3 failed attempts, I think I finally came up with a pattern that I am satisfied with. I didn’t want him to look exactly like Kermit, so I used 45mm ping pong balls and used dots as his pupils. I just wish I made his neck a little longer and I wish I could’ve made him a bit skinnier, but I am very happy with how he turned out!
F2A94E8F-ED34-440C-8B75-34273FB6AEF1.jpeg
 
After quite some time experimenting and practicing, I went ahead and made a puppet replica of Kermit the Frog; something that I've wanted to do for years, but wasn't sure if I would be able to do.

Materials: Dyed "Antron" type fleece from Etsy, dyed felt, Ultrasuede, armature wire (for the fingers), ping pong ball spraypainted white and halved for the eyes, black "velvet" adhesive for the pupils, contact cement for gluing parts for the hands, feet, and mouth plate, foam for the body, and stuffing for the limbs.

Patterns: The pattern for the head was a slightly modified version of one that was discussed in a thread here on RPF years ago. It seemed like a pretty good pattern to start with. The patterns for the arms,legs, and feet were slightly modified from the Master Replicas photo puppet. Hands were made separately and then attached to the arms for maximum articulation.


First thing was to practice the "Henson" stitch, which turned out surprisingly easy to pick up, even though I have minimal experience with sewing. I simply found on YouTube several great tutorials. The fleece is also very forgiving and stretchy, so the seams can be hidden quite well with a little bit of fluffing with the needleafterward.


View attachment 895674

View attachment 895675

View attachment 895676


Next was building up the body. Here's a pic of it in its early rough shape. (sitting over my MR replica :p). For some reason it looks huge in this pic. It's mostly camera distortion. The puppet is indeed larger than the MR photo puppet, but not THAT much larger.

View attachment 895677


Next was getting the fabric to fit over the body, which took a lot of stretching, trimming, sewing in the seams, to get it to look right.

View attachment 895678


The hands are simply made from small pieces of thin cardstock with wires epoxied onto it. The paper you see underneath is a pattern I drew up to use as a sizing guide. The palm was partially sewn on, and bit of stuffing added. Finger fabric was glued with contact cement. One thing of note is that all of the "joints" in his arms and legs have been left without stuffing, to ensure maximum pose-ability. It's something that occurs on the original puppets that i wanted to replicate.


View attachment 895679

View attachment 895680

View attachment 895681


Working on a leg and foot

View attachment 895682


"Game of Muppets"

View attachment 895683


Messing around with limbs:

View attachment 895684


I ended up dyeing the felt slightly darker as the stock I found was too light

View attachment 895685


"Who am I?!" Here's a pic of the head already stitched onto the body, but the arms pinned in place. It was very important to utilize the pins during sewing to keep things from shifting around:

View attachment 895686

In progress but getting there!

View attachment 895687


And below is pretty much the almost finished piece. Just need to stitch on the collar and attach the eyes, which I'll probably do via velcro so that I can easily remove them. Keep in mind this is a puppet, so the head is not filled with anything. I've added some stuffing for the pictures, as well as a tall cup that is holding his head up. I'll be building some sort of armature inside for display purposes since I don't really plan on using it as a puppet anyway. I have yet to add the holes in the hands for the hand rods but will do that at a later date.

View attachment 895688


View attachment 895689

View attachment 895690

View attachment 895691


Kermit has always been a favorite of mine, so this was one amazing experience! Probably the most fun prop building project I've ever attempted. Took just a little over a month on this piece, not counting the week or so spent experimenting and practice stitching.


Version 3 Kermit; the final one I made. Inspired by the earlier Kermit look:


View attachment 895692
What was the mouth plate made of and where could I find the material. If you can contact me here kamau1024@gmail.com
 
Re: Custom Kermit the Frog puppet replica!!

Thanks again for the comments!


UPDATE:


Sorry about the late update, been busy as of late. But I did pretty much finish up the second Kermit! I made a few small modifications to this one. The torso is slightly taller and the shoulder areas more flat like as seen on the originals. Also made the feet just slightly bigger. I preferred the head from the first one so I transplanted it onto the new one, because the new head I had made turned out to have a slightly thinner neck. The new collar is also a slightly different color (more greenish yellow)


Below are pics of the two side by side. They are nearly identical with only small differences.


View attachment 895714

View attachment 895715

View attachment 895716


I'll repeat and add a few things here:


Materials
:


-"Muppet" antron fleece. I purchased my fabric from a seller on etsy (Dewey Street) that I think worked out well enough. I has that nice sparkly look under certain light like the antron fleece. They have a "Frog" color, but apparently they sell out of it often but will dye more.


-Ultrasuede. Red for the mouth and pink/magenta for the tongue. I painted the line on his tongue with artists acrylics.


-"velvet" adhesive. Black colored, for the throat and pupils.


-Ping pong balls for the eyes. I cut one in half and painted it with gloss white spray paint. I think the paint makes it look a lot better.


-light yellow/green felt: for the bottoms of the feet and the collar. Ebay has a bunch of 12x12 inch sheets which are a good size.


Patterns:


These were originally from an older thread on the RPF (Kermit research thread), which I felt was a great starting point. Hopefully, it's okay for me to have made the modifications and to repost them here, but they were originally made public for the members in that thread. I made changes to them (mainly sizing) to make them look a bit closer to what I could see in the photo references, as some of the patterns were derived from the MR photo puppet replica. The head pattern takes some fidgeting, as even though I had cut it out using the pattern below, I still had to do some considerable trimming and tweaking around the mouth to get the fit to look right to me, but it's a great starting point. You'll find making the slightly changes to the pattern can really affect the overall look. Personally, I think as the pattern currently is, looks somewhat too loose around the mouth, which is why I ended up doing some trimming. I'd redraw, but I made the changes directly to the fabric so am not really sure how to edit the paper pattern to reflect that. Just play around with it and see what works.


Just keep in mind that none of these are set in stone, as we don't have access to the actual patterns used on the originals. Even the real Kermit/s over the years vary quite a lot!
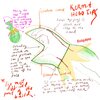

Head:


Arm


Leg (can be used for both the left and right legs, just flip the pattern while tracing)


Feet (The red is for the cardboard feet bottoms sandwiched between the bottom felt and fleece parts.


Mouth, Tongue, and Throat:


Hand: (Mostly used as a size guide. Hand is composed of metal armature wiring epoxied to the piece of cardboard which then is covered with the fleece. At least that's the technique I used. See pics in first post.)


Collar (same as from the other thread):


Eyes:


Some bits of info:


Body: Kermit's body is typically a "teardrop" shape, thinner at the top, getting wider closer to the bottom. His fullness though varies thoughout the years, so the measurements I came up with are approximate. The body seems to be around 7.5" tall from what I could extrapolate from references. I didn't use patterns for the body as it was made from gluing foam together and then involved a lot of trimming.


I'll update with some approximate measurements later! Although the patterns should be already sized to print.
Do you have any images of your reworked head pattern? Also what material should I use for his mouth plate and how should I go about attaching it? Thank you for your time.
 
Re: Custom Kermit the Frog puppet replica!!

I went ahead and compiled the "notes" I've drawn up so far into a PDF file. Should be easier to look through this way. It's not a comprehensive build tutorial, but helps to illustrate some parts of the build. I'll add to it if I happen to draw up more pages.

PDF can be accessed here (on my google drive). Just download it from here: https://drive.google.com/file/d/1YHMnhu2aQEbUqg92xkbbHC3yyk0jOF9G/view?usp=sharing
The drive says that it does not exist anymore, do you have a version of it that will work?
 
I have been doing a lot of research lately on the muppets and more specifically, kermit, your notes and such have been a big help, I'm about to start on my replica in a few days(soon as my foam gets here). I'm using half inch thick foam for the head. Question, I've seen your newer, more accurate, and basically perfect ones. How short is the neck pattern on those? one thing i've noticed about kermit is he has virtually no neck(in the older ones, my favorite muppet era is the 80s great muppet caper), and i've noticed that is a really important detail. also, do you have any tips on getting the fabric to bunch up a little on the sides of his mouth, because i think his illusion of "lips" is another important detail
 
I have been doing a lot of research lately on the muppets and more specifically, kermit, your notes and such have been a big help, I'm about to start on my replica in a few days(soon as my foam gets here). I'm using half inch thick foam for the head. Question, I've seen your newer, more accurate, and basically perfect ones. How short is the neck pattern on those? one thing i've noticed about kermit is he has virtually no neck(in the older ones, my favorite muppet era is the 80s great muppet caper), and i've noticed that is a really important detail. also, do you have any tips on getting the fabric to bunch up a little on the sides of his mouth, because i think his illusion of "lips" is another important detail


I like your screen name :D I happen to be working on a Gonzo puppet at the moment too.

The neck on my newer patterns is shorter than on the old one (the old pattern usually resulting in a longer neck). But’s a fairly simple thing to modify by just trimming off the area around the bottom of the neck on the pattern, if you prefer a shorter neck length. As for the way the fabric bunches up on the sides of the mouth, that usually is the result of having enough room on the head pattern where the mouth part is attached to the mouthplate. If it’s too tight, the ‘lips’ disappear and he looks too ’tight’, but if you have a little bit extra room there, the lips naturally form. This depends on the pattern; you can add a little bit to the pattern around the mouth to get a little more to work with. It’s a whole lot of trial and error, so it’s good to experiment with the pattern with scrap fabric, etc. I’ve seen very different results from the same pattern, so that’s why I think it’s important for builders to experiment and modify the patterns to suit their own needs.

Here’s an old set of notes that I quickly did a while back during the process of trying to figure out the head pattern; it might help.

F04C9AA1-10F7-45FE-B42B-530AB71DD344.jpeg
 

Attachments

  • B14CB428-0686-4117-AAF3-627645BE0672.jpeg
    B14CB428-0686-4117-AAF3-627645BE0672.jpeg
    845.9 KB · Views: 438
After quite some time experimenting and practicing, I went ahead and made a puppet replica of Kermit the Frog; something that I've wanted to do for years, but wasn't sure if I would be able to do.

Materials: Dyed "Antron" type fleece from Etsy, dyed felt, Ultrasuede, armature wire (for the fingers), ping pong ball spraypainted white and halved for the eyes, black "velvet" adhesive for the pupils, contact cement for gluing parts for the hands, feet, and mouth plate, foam for the body, and stuffing for the limbs.

Patterns: The pattern for the head was a slightly modified version of one that was discussed in a thread here on RPF years ago. It seemed like a pretty good pattern to start with. The patterns for the arms,legs, and feet were slightly modified from the Master Replicas photo puppet. Hands were made separately and then attached to the arms for maximum articulation.


First thing was to practice the "Henson" stitch, which turned out surprisingly easy to pick up, even though I have minimal experience with sewing. I simply found on YouTube several great tutorials. The fleece is also very forgiving and stretchy, so the seams can be hidden quite well with a little bit of fluffing with the needleafterward.


View attachment 895674

View attachment 895675

View attachment 895676


Next was building up the body. Here's a pic of it in its early rough shape. (sitting over my MR replica :p). For some reason it looks huge in this pic. It's mostly camera distortion. The puppet is indeed larger than the MR photo puppet, but not THAT much larger.

View attachment 895677


Next was getting the fabric to fit over the body, which took a lot of stretching, trimming, sewing in the seams, to get it to look right.

View attachment 895678


The hands are simply made from small pieces of thin cardstock with wires epoxied onto it. The paper you see underneath is a pattern I drew up to use as a sizing guide. The palm was partially sewn on, and bit of stuffing added. Finger fabric was glued with contact cement. One thing of note is that all of the "joints" in his arms and legs have been left without stuffing, to ensure maximum pose-ability. It's something that occurs on the original puppets that i wanted to replicate.


View attachment 895679

View attachment 895680

View attachment 895681


Working on a leg and foot

View attachment 895682


"Game of Muppets"

View attachment 895683


Messing around with limbs:

View attachment 895684


I ended up dyeing the felt slightly darker as the stock I found was too light

View attachment 895685


"Who am I?!" Here's a pic of the head already stitched onto the body, but the arms pinned in place. It was very important to utilize the pins during sewing to keep things from shifting around:

View attachment 895686

In progress but getting there!

View attachment 895687


And below is pretty much the almost finished piece. Just need to stitch on the collar and attach the eyes, which I'll probably do via velcro so that I can easily remove them. Keep in mind this is a puppet, so the head is not filled with anything. I've added some stuffing for the pictures, as well as a tall cup that is holding his head up. I'll be building some sort of armature inside for display purposes since I don't really plan on using it as a puppet anyway. I have yet to add the holes in the hands for the hand rods but will do that at a later date.

View attachment 895688


View attachment 895689

View attachment 895690

View attachment 895691


Kermit has always been a favorite of mine, so this was one amazing experience! Probably the most fun prop building project I've ever attempted. Took just a little over a month on this piece, not counting the week or so spent experimenting and practice stitching.


Version 3 Kermit; the final one I made. Inspired by the earlier Kermit look:


View attachment 895692

Freaking awesome! A skill that I never have! Well done!
 
I like your screen name :D I happen to be working on a Gonzo puppet at the moment too.

The neck on my newer patterns is shorter than on the old one (the old pattern usually resulting in a longer neck). But’s a fairly simple thing to modify by just trimming off the area around the bottom of the neck on the pattern, if you prefer a shorter neck length. As for the way the fabric bunches up on the sides of the mouth, that usually is the result of having enough room on the head pattern where the mouth part is attached to the mouthplate. If it’s too tight, the ‘lips’ disappear and he looks too ’tight’, but if you have a little bit extra room there, the lips naturally form. This depends on the pattern; you can add a little bit to the pattern around the mouth to get a little more to work with. It’s a whole lot of trial and error, so it’s good to experiment with the pattern with scrap fabric, etc. I’ve seen very different results from the same pattern, so that’s why I think it’s important for builders to experiment and modify the patterns to suit their own needs.

Here’s an old set of notes that I quickly did a while back during the process of trying to figure out the head pattern; it might help.

View attachment 1325776
Thanks so much, this helps a ton! for such a simple design, replicating him is hard.
one more question, Did you made the head straight out of fabric, or make it out of foam and then made a fleece head covering to go over, because i cant tell, I want him to be able to hold his resting face because i actually am planning on using him to preform. I usually use 1/2 inch thick foam for the heads of my builds, and was planning on doing it with kermit, but i thought i'd ask the master
 
Last edited:
Sorry, I just looked back and saw that that question had been answered already,
I do have one more question though. Every puppet I've made has a foam head, and the mouthplate is attached to that. With there being no foam head, how do I attach the mouthplate? Do I use contact cement?
 
Sorry, I just looked back and saw that that question had been answered already,
I do have one more question though. Every puppet I've made has a foam head, and the mouthplate is attached to that. With there being no foam head, how do I attach the mouthplate? Do I use contact cement?

no worries; the thread has been growing a bit. I can't even remember what I posted before haha. The ones in this thread are my very early builds, but the techniques used are essentially the same. For Kermit, I made the heads foamless, so the shape is generally the hand when in use. The removable foam inserts I cut for them are for when on display only.

You're correct, I attach the mouth plates to the head using contact cement; a part of the pattern folds over onto the mouth-plate, as seen below. The notes were from very early on when my pattern was not as refined, so I had to do some test fitting and trimming. The photos below are of my later pattern, which I was able to get to fit without trimming, but the method of attachment is more easily seen here. I know some people have also tried sewing the fabric to the mouth plate and then gluing the rubber parts in later from behind, although based on the kermit I saw in an exhibition, it appeared to be glued (edge of the fabric was visible). But either works. :

IMG_3259.JPG
 

Your message may be considered spam for the following reasons:

If you wish to reply despite these issues, check the box below before replying.
Be aware that malicious compliance may result in more severe penalties.
Back
Top