Halo 3 Master Chief WIP UPDATE: 20APRIL2011 Helmet is 99.9% Done

Re: Halo 3 Master Chief WIP update:8/10 Helmet WIP

Thanks!

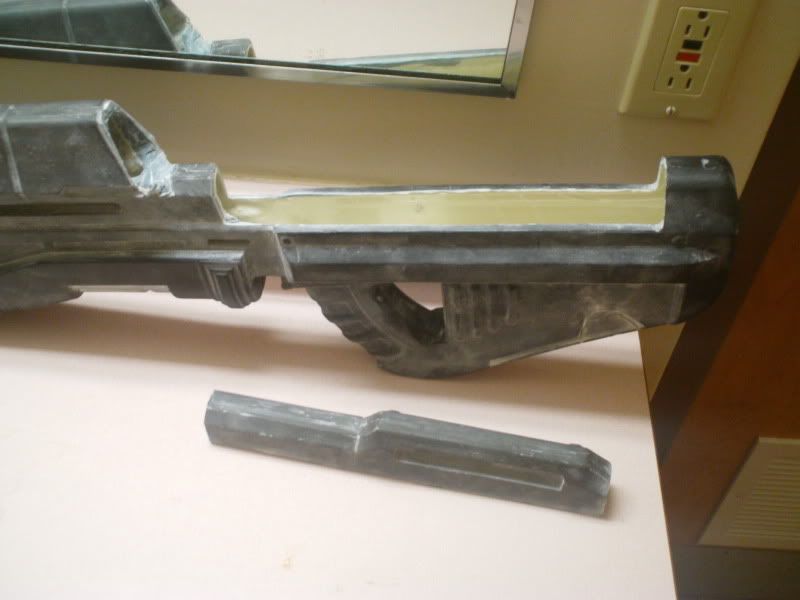
So more of just a thought of my next plans, Im going to go ahead and hack up my AR and do a bit more work on it. Not going to really be able to install the barrel like I should/has been suggested to me, but Im gonna go ahead with some electronics. Mainly the ammo counter. There is a member over on the 405th that is putting out some really nice counter kits, and I'm going to be able to get that hooked in pretty well.

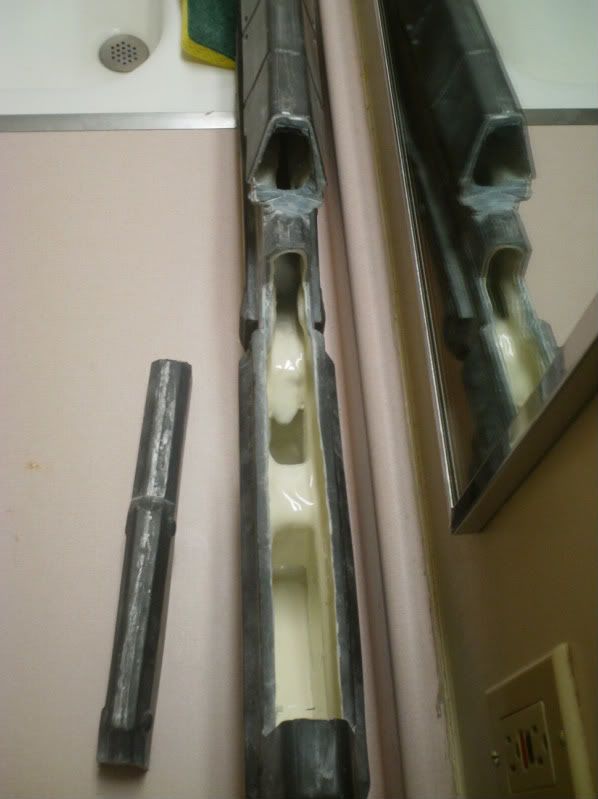
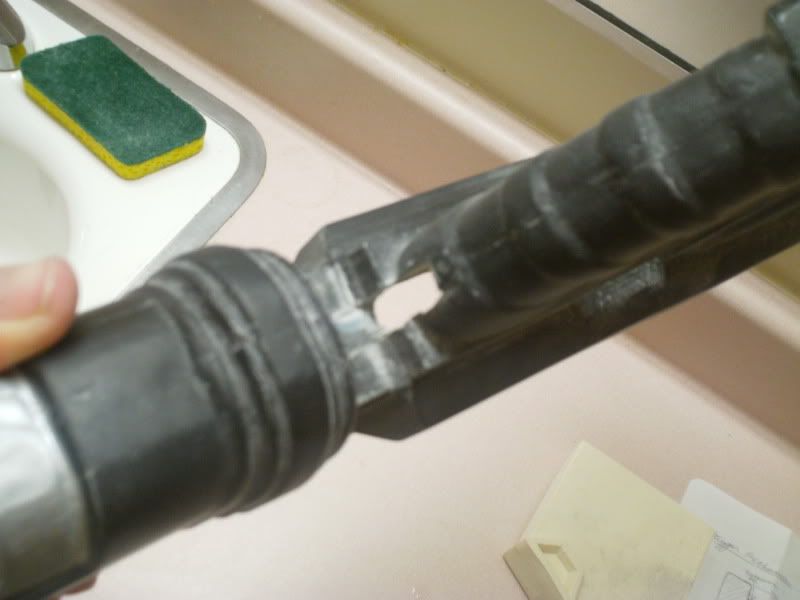
In the mean time, I'm going to have to cut off the "screen" portion of the rifle. Going to cut it out, and then I'm going to build an accurate edge line as accurate to the game as I can get. I'm not entriely too sure as to how I want to install it, but I'm definatly going to make the main screen portion removable and I've been throwing the idea of making the entire set up sort of "sit" on a small platform that I can slide into the rifle and take out if needed. It will also include the lights on the side as well.

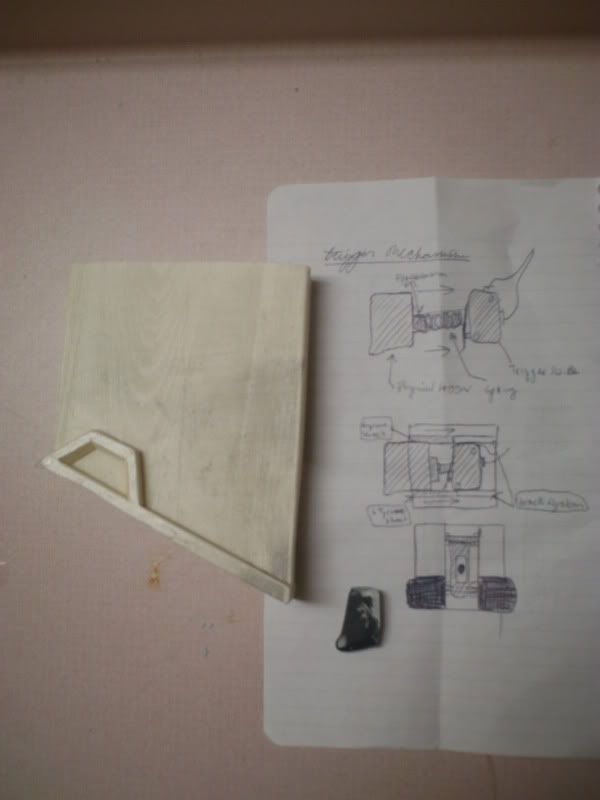
On top of that, I'll be getting at least one AR magazine from a member. May have a faux round/semi functional clip, but not sure on that yet!

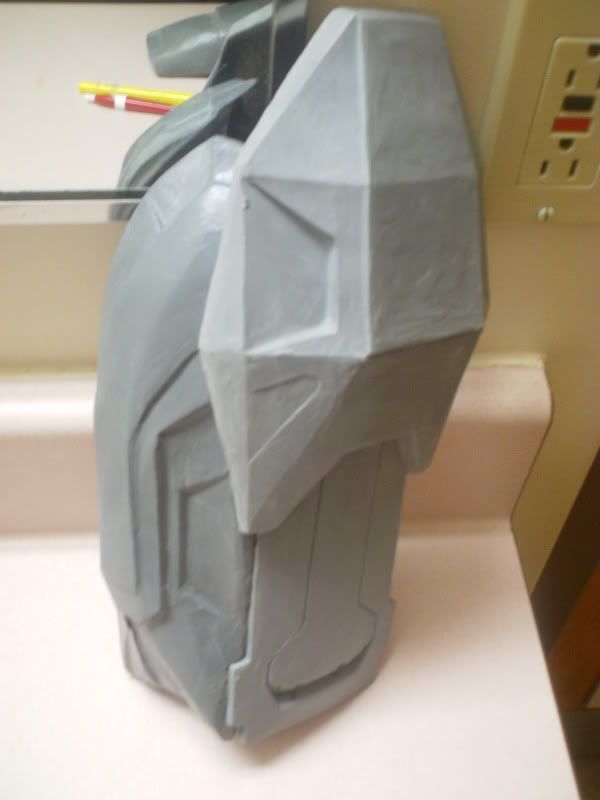
I was able to aquire some more filler, bought more then last time so I hopefully dont run out. I can start work again on the helmet!

-TC
 
Re: Halo 3 Master Chief WIP update:8/10 Helmet WIP

Alright, well Ive sorta changed my mind on this..yet again, but for good reason. Since I'm going to be stuck here alot longer than anticipated, I'm going to get what I can done here. I can't say I can get the whole suit assembled, but I imagine that I can get the majority of it ready and painted.

The only thing is the thigh armor. I cannot have resin/fiberglass materials in the barracks, just too toxic and I'm already pushing it by them allowing me to have paint here. If anyone is willing to, I can ship the thighs out to someone who can extend them for me, using fibgerglass, I might consider that as an option.

The electronics kit should arrive this week, and I've got some clamps, two part expoxy and some other pieces I'm going to experiement with for making the ammo counter screen removable. I'm going to focuse more on the bicep pieces as well as the lower legs at the moment..and of course, the helmet!

-TC
 
Re: Halo 3 Master Chief WIP Still Ago..sort of!

Ok then, finally, my first technical assembly since I got the kit rofl I sanded down the upper arm pieces today, got one set ready and cleaned up the way I like it, but just need to get the material to make the strap which will hold the bicep piece.

001-4.jpg


I used (in the wrong order unfortunatly) two part epoxy and then metal reinforced epoxy putty for added strength

002-4.jpg


Was actually quite a pain in the butt, but it's holding really well. I'm more than likely gonna put a bit more re-inforcement since I know that trooping can cause alot of wear and stress on parts. Hmm..as for the bicep strap, I'm thinking how I can go about making it adjustable, but I think that velcro (strong velcro) might be the answer. There is a backing that needs to go just behind the bicep piece as well for accuracy. It's hard to see against the suit, but it's there.

Other than this, I just applied some spot putty on areas of the helmet that needed filling.

-TC
 
Re: Halo 3 Master Chief WIP Still Ago..sort of!

There should've been some strips of foam PVC sheet in the kit. You can heat them up and bend them to the shape you need and then when they cool down, they'll hold that shape. That's what I used for my bicep armor and it holds up pretty well.

In my case I pop rivetted the sintra to the urethane castings and then epoxied everything together just to be sure. Pop rivets and the gun that you need for them are pretty inexpensive.

Hmm..I didn't see any PVC sheets, but I'll look again. As for the pop rivets, I remember you mentioning you using them, but how did you go about actually applying them? I used them for my snowtrooper armor, but did you just drill holes straight through the pieces?

I actually did buy some thin plastic, but I was going to be using it for part of my assult rifle. Not too sure how well it will work for this though. I'll see what it can do, but I imagine that using the foam would feel more comfortable in the long run.
 
Re: Halo 3 Master Chief WIP Still Ago..sort of!

Where does the assault rifle reload? The back, a bullpup design?

It's rear loaded magazine. I'll be getting a seperate mag casting sometime shortly though.

Some update! I got my electronics kit for the ammo counter today! Going to get some batteries to test the thing out. My real only concern now is figuring out how to properly install the trigger switch, well, in the actual trigger, and make it functional.

Pretty excited!

-TC
 
Re: Halo 3 Master Chief WIP Still Ago..sort of!

So I got the thing wired up and working. It's very well put together and I couldn't be happier! Very very bright, which is good, and the tissue paper he included really helps to defuse it so it's not too bright, but just right.

Here's a short vid of me testing it out. Not the best quality, but you can definatly see how bright it is.

YouTube - 005

It has a double-pole, single throw switch (turns on/off the whole thing), a push pressure switch (to "reload"/reset the counter) and the lever switch (acts as the trigger)

I also went about chopping off the "screen" portion of my AR. A little rough now, but I'll make it look nice. Gotta cut out the area, sand it down, and give the areas the proper curve, and shape.

My next big hurdle is getting everything actually installed into the rifle. I have a good idea of how to actually get the whole counter and screen mounted, but the next thing is getting the trigger/lever switch installed in such a way to actually make the trigger move. Of course, I don't have alot of room to move around in there, so it's going to be a challenge. Another thing I was thinking of doing, was once I get my magazine cast in, to attach the reload switch just above where the magazine will rest. The idea is to allow the mag to bump the switch whenever I place the magazine into the magazine well.

Going to be a challenge and think I could use some help with this part!

-TC
 
Re: Halo 3 Master Chief WIP Still Ago..sort of!

Hmm..I didn't see any PVC sheets, but I'll look again. As for the pop rivets, I remember you mentioning you using them, but how did you go about actually applying them? I used them for my snowtrooper armor, but did you just drill holes straight through the pieces?

I actually did buy some thin plastic, but I was going to be using it for part of my assult rifle. Not too sure how well it will work for this though. I'll see what it can do, but I imagine that using the foam would feel more comfortable in the long run.

They're not full sheets, just a handful of strips about an inch and a half wide. They're foam PVC (the same thing as Sintra) so they're a lightweight, rigid plastic. When you warm them up with a heat gun they bend like leather. To attach them to the other pieces I just drilled a hole where I wanted to pop rivet in both the strip and the armor part. Then I added a bit of epoxy for insurance and riveted the two pieces together. Be careful when you do this so you don't drill all the way through the armor casting. It won't hurt anything, it just adds a bit of patching work you'll have to do to cover the drill hole.

If you don't want to use pop rivets, you could probably get away with just using epoxy. You can read my brief writeup on the assembly of the upper arm armor in my build thread: http://www.therpf.com/f24/halo-master-chief-costume-progress-thread-37115/index13.html

You're looking for post #307, about a quarter of the way down the page.
 
Re: Halo 3 Master Chief WIP Still Ago..sort of!

They're not full sheets, just a handful of strips about an inch and a half wide. They're foam PVC (the same thing as Sintra) so they're a lightweight, rigid plastic. When you warm them up with a heat gun they bend like leather. To attach them to the other pieces I just drilled a hole where I wanted to pop rivet in both the strip and the armor part. Then I added a bit of epoxy for insurance and riveted the two pieces together. Be careful when you do this so you don't drill all the way through the armor casting. It won't hurt anything, it just adds a bit of patching work you'll have to do to cover the drill hole.

If you don't want to use pop rivets, you could probably get away with just using epoxy. You can read my brief writeup on the assembly of the upper arm armor in my build thread: http://www.therpf.com/f24/halo-master-chief-costume-progress-thread-37115/index13.html

You're looking for post #307, about a quarter of the way down the page.


Yea, I just tore apart the box and didn't find anything :/ My roomate dosn't seem to happy to have a bunch of packing beads everywhere :lol

But yea, could you pick this up at a local arts/crafts store? Cause I would like to try it out now.

As for your buildup, I actually went back and forth to that post quite a bit. The pain was trying to attach the tricep to the shoulder portion. I have clamps, but the nature of the pieces didn't allow clamping to work very well. I'm curious to know what brand/kind of epoxy you used? It appears that you covered the whole inside with it lol

Anyways, going to work getting the ammo screen ready and work on the rifle to clean it up. Also, work a bit more on the helmet vent

-TC
 
Re: Halo 3 Master Chief WIP Vid added of ammo counter!

Mostly I tacked those two pieces together lightly with zap-a-gap to hold them steady and then just poured more casting resin along the seam. The same trick will work with epoxy.

You can find Sintra in a lot of places, but I'm not sure about craft shops. If it's not in the package I'll make sure to send you more strips when I send you the torso and gauntlet armor.

Sounds good, thanks! Yea, I'd like to be able to get some resin casting materials, but I can't say how well that would roll over with some of my Sgt.'s. Maybe white, oderless, like simple casting resin.

Anyways, I posted this in my other thread:

001-5.jpg


002-5.jpg


Other than the installation of those pieces, the only thing is having to clean up the edges of the removable portion. I'm thinking of either using magnets (large silver ones like at Joanne's) or my roomate actually suggested using a piano hinge one one side with magnet on the other. I'll throw the options around.

I did try to cut the mag portion, but that area turned out to be significantly thicker then I thought. I lost sunlight and will get back at that tomorrow..

So that's it for now. I might need to get a new filler, because the epoxy putty I have been using dosn't like to stick to the outside surface of the rifle. IDK, it seems to hold well after it's cured though.

-TC
 
Re: Halo 3 Master Chief WIP Vid added of ammo counter!

Alright! Made some headway so far to the next step, the trigger! I drew up a quick sketch for the mechanism I'm going to construct, and I think it will work pretty well. I managed to cut the trigger off without causing collateral damage and came out pretty clean considering the awkward cut angles. Still need to touch up the areas around it.

I also recieved a magazine casting from Ithica over on the 405th board, to which I promptly cleaned up and is about ready. I'm debating if I want to "styalize" it in a particular way I saw in a more recent Halo reach video, in which they made the mag look more like real-world mags for M-4s and similar weapon systems. I did take another go at trying to cut the mag well out, but the more I sand, the thicker the plastic is... :/ I'll get it...

So here it is..

001-120.jpg


002-92.jpg


003-81.jpg


Picked up a spring to use from a pen, and I'm going to try and start construction tonight!

-TC
 
Re: Halo 3 Master Chief WIP Vid added of ammo counter!

Good work! Good detail on it!


Alright! Got productive today, and went ahead building the trigger mechanism. I changed my design slightly after trying not to fall asleep during class! It appears it will work out fairly well, the hardest part after this is getting it installed correctly so it works smooth.

Yet again, another reason why I regreted buying this camera..no close up shots AT ALL, but the best I can do.

DSC00190.jpg


Basically, your looking at it like a cross section. There will be another wall covering the closest side (just like what's behind everything) there are slots i cut out, to which, I will be installing a "T" shaped piece of plastic, that will be attached to the upper portion of the physical trigger, just above the spring system. this "T" will prevent the trigger from moving out of place, and lock it into a designated area. It will also perform a secondary function of pushing against the actual electronic trigger switch. Also, hard to see in the pic, but I imbeded a spring w/ prong thingy from a pen on the backside, middle portion of the trigger. Should work good...I think!

-TC
 
Last edited:
Re: Halo 3 Master Chief WIP UPDATE: 27AUG, Trigger assembly

Looks good - have you tried rough-fitting your trigger assembly into the AR yet? You may want to tack it together and try that first - there's not a whole lot of depth/space behind the trigger unless you offset it vertically. Not to threadjack but here are some pics of what I did (also an Adam AR) - they may give you an idea of what kind of space you have available.


100_1940.jpg


100_1942.jpg


100_1946.jpg


100_1947.jpg


Basically, I went with a two-pin setup with pen springs on both. The pins are epoxied into the trigger itself with two matching holes in the "body" of the trigger assembly. One pin is "hooked" at 90* (after insertion) to retain the trigger. The other acts as the plunger to depress the switch. There are two steel wings that are epoxied onto the body which serve to hold the switch in place at the rear. The switch is hot-glued in place. Everything was painted, inserted, and then hot-glued in place in case it ever needs to be removed.

Sorry the pics are so bad but I hope this helps. I also have pics of how I built/recessed the counter (and remote located the light and on/off switches) if you are interested - just let me know...

Good work and good luck!
 
Re: Halo 3 Master Chief WIP UPDATE: 27AUG, Trigger assembly

Very nice how you did your set up, and appears very simple. As for fitting it, I have been going back and forth making sure it will. Fortunatly, I have a significant amount of space for the set up. The hardest part will just getting the trigger to slide almost unobstructed, but that shouldnt be to much of an issue.

I would like to see your ammo counter build up if you don't mind! I have some ideas on how to to about mounting it but still kind of iffy

thanks!
 
Re: Halo 3 Master Chief WIP UPDATE: 27AUG, Trigger assembly

I like keeping things as simple as possible - it's been going strong for almost three years now so I'm happy...


As far as the ammo counter goes it looks like I'm missing a few pics but I can hopefully fill in the details.

First I cut out the existing "display" section along the existing recess:

100_1937.jpg


Then I needed to pour in some additional resin to add some depth and strength to the piece:

100_1938.jpg


Then cut the recessed area for the display itself (using the display as a guide) and clean up the piece:

100_1945.jpg


This is where the missing pics would come in handy - basically I cut a piece of smoked plexiglass for the display window. It wasn't dark enough (you could still see into the cavity and the edge of the display) so I masked the "display section" plexi with painters tape and blacked out the surrounding area. That worked perfectly so I mounted the display to the plexi (tacked w/ hot-glue) and then did the same with the plexi to the resin section.


The whole assembly was then epoxied into place and the join was resculpted with Apoxie-Sculpt. The wires/leads for everything feed back to the controller (ReplicaFX). The yellow "status" LEDS were put in before I closed her up.

Counterpic.jpg


SideLEDs.jpg


I finished it off by using the existing moulded "switch" as the on/off (cut it out and inserted a switch) and set up an identical switch on the opposite side for the light (removed the existing "tail cap" switch and ran remote leads instead). Then I added a recessed speaker (with rigid grill cloth) and that's about it!

Sorry - I seem to have taken over your thread. If you would prefer that I pull this stuff out and start another, just let me know...

Good Luck!
 
Re: Halo 3 Master Chief WIP UPDATE: 27AUG, Trigger assembly

Great! Yea, pretty much what I had in mind. I need to get the larger LEDs for the sides, but I still need to grind down the inside screen area. What you did using the plexiglass, thats actually something I never considered, but now think that might need that for strength. I'd need it clear though..hmm

The hardest part right now with the screen is cleaning up and making it look sharp and even. Wish I had a sound board to go along with it lol Thanks!
 
Re: Halo 3 Master Chief WIP UPDATE: 27AUG, Trigger assembly

Ok, another good day of work! I finished contruction of the trigger mechanism, and it's functioning perfectly. It's not the prettiest looking thing I've scratch built, but hey, I just need it to hold together and work as I need it to. For the sake of getting it to fit properly, I had to flip the physical trigger to help acomodate the entire system inside the rifle. All I need to do now, is paint it, and clean up the trigger well on the rifle, add some longer wires for the switch, and attach it in place.

YouTube - Trigger assembly finished

Also did some other clean up work, particularly the screen display. I'm aiming to get it close to accurate as I can without compramising the structural integrity, but it's getting close to how I'd like it. I feel the right side is pretty much finished, but the left just need some more filler and sanding.

004-2.jpg


Getting there..

-TC
 
Back
Top