You are using an out of date browser. It may not display this or other websites correctly.
You should upgrade or use an alternative browser.
You should upgrade or use an alternative browser.
HAL 9000 - beyond the face plate
- Thread starter Markus
- Start date
Markus
Sr Member
Thank you. I will glue wooden strips (3/4" x 3/4") on the back of the front plate, around the monitor to hold it in place. I don't think that the frame itself needs any further stabilization.Excellent job Markus. Are you going to add some thickness on the frame surrounding the flat panel?")
Markus
Sr Member
I remove some wood from the back of the front plate, so the monitor buttons will not be pushed when the monitor is inserted.


Wooden strips are added to hold the monitor and the USB hub in place.

The little detail (I don't know what I should call it) is glued to the front and the base plate is added.


Then, the two triangular pieces are glued into the corners.

That pretty much finalizes the wood work (except for two plates to cover the backside - those will be added later). Now it's time for spackling & sanding.
Wooden strips are added to hold the monitor and the USB hub in place.
The little detail (I don't know what I should call it) is glued to the front and the base plate is added.
Then, the two triangular pieces are glued into the corners.
That pretty much finalizes the wood work (except for two plates to cover the backside - those will be added later). Now it's time for spackling & sanding.
Last edited:
Rolud
New Member
Hi All,
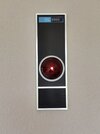
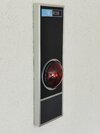
As a lot of people in this forum is interested about "HAL" replica, and also because Markus is still using the Adafruit Massive Arcade button, I'd like to present you my just finished V2.0 own replica... made with an old aluminum photo frame, the Adafruit button, some 3D printed parts AND a completely disassembled Google Mini...
This replica was made to be as close as possible to the real one, however for me the most important thing was his "usefulness", and here is the result...
Attachments
joberg
Legendary Member
Great job Rolud...but you should start your own threadHi All,
As a lot of people in this forum is interested about "HAL" replica, and also because Markus is still using the Adafruit Massive Arcade button, I'd like to present you my just finished V2.0 own replica... made with an old aluminum photo frame, the Adafruit button, some 3D printed parts AND a completely disassembled Google Mini...
This replica was made to be as close as possible to the real one, however for me the most important thing was his "usefulness", and here is the result...
Rolud
New Member
Thanks joberg for the “New thread” suggestion… however I’m actually very impressed by the wonderful job done by Makus… and I replied in this thread just to show him that it’s possible and quite simple to "improve the look" of the “Adafruit” button, if you have access to a 3D printer…Great job Rolud...but you should start your own thread
Markus
Sr Member
Thank you, Rolud, for your nice compliment.Thanks joberg for the “New thread” suggestion… however I’m actually very impressed by the wonderful job done by Makus… and I replied in this thread just to show him that it’s possible and quite simple to "improve the look" of the “Adafruit” button, if you have access to a 3D printer…
Actually, I have a few ideas how to improve the face plate, and I will probably do this at some point in the future.
I really love what you did. The frame looks great, but also what you achieved starting from the "Adafruit" button. The silver ring and the black ring (with the "Nikkor") are a huge improvement as compared to the original button. Actually, based on your images, I wouldn't have assumed that you had used the "Adafruit" button at all.
The thing is: If you have a hammer, everything looks like a nail. I don't have access to a 3d printer - just to the laser cutter. So, I approach all challenges with the latter.
But, as joberg said, it would be great if you could start your own thread and post more details in there. I would certainly be interested in seeing those. And maybe, at some point the moderators will see the need of adding a dedicated "2001" forum.
Markus
Sr Member
I had not really thought this through....


When preparing the back plates, I remembered that the RaspberryPi and the LCD monitor probably need a little fresh air, so they don't overheat. While the original Podbay unit seems to have a closed back plate,

I need to add some openings - of some kind. Usually, I really like the Star Wars Death Star pattern.

But I think that it would not match the "2001" style.
Does anybody have a suggestion what pattern would be appropriate for the vents on the back plates? Maybe inspired by something else seen in "2001"?
When preparing the back plates, I remembered that the RaspberryPi and the LCD monitor probably need a little fresh air, so they don't overheat. While the original Podbay unit seems to have a closed back plate,
I need to add some openings - of some kind. Usually, I really like the Star Wars Death Star pattern.
But I think that it would not match the "2001" style.
Does anybody have a suggestion what pattern would be appropriate for the vents on the back plates? Maybe inspired by something else seen in "2001"?
Lt Washburn
Sr Member
Only vents I can think of offhand are the big ones on the ceiling of the Pod Bay.
David3
Sr Member
they wouldn't have to be visible vent patterns as such but long narrow inconspicuous single slot openings concealed along the bottom edge of those back plates and then a single long slot at the top, like the old imacs, so the air naturally circulates through the bottom and out the top
Markus
Sr Member
You mean this:they wouldn't have to be visible vent patterns as such but long narrow inconspicuous single slot openings concealed along the bottom edge of those back plates and then a single long slot at the top, like the old imacs, so the air naturally circulates through the bottom and out the top
But I still want to browse through the movie to see if there is anything recognizable.
Markus
Sr Member
Yes, that would be an option too!Maybe putting the vents at the top? I know that some gutters have a sort of plastic guard preventing the leaves clogging them.
They're either in metal or plastic and are pierces with little holes.
Just, in my case, I have already painted the frame, and consider this to be finished.
So, I really want to have a solution that affects only the back plates.
Markus
Sr Member
People who are following this thread may like this too:
quote:
It is a rare 1960's Space exploration concept film directed by Con Pederson. Con Pederson was a photographic effects pioneer who worked with Stanley Kubrick on the film classic: “2001: A Space Odyssey.” In 2001: A Space Odyssey, Con Pederson is credited as one of four Special Photographic Effects Supervisors on the film, he and Doug Trumbull created a myriad of stars, planets and space ships, plus the unforgettable "stargate" sequence.
It is a rare 1960's Space exploration concept film directed by Con Pederson. Con Pederson was a photographic effects pioneer who worked with Stanley Kubrick on the film classic: “2001: A Space Odyssey.” In 2001: A Space Odyssey, Con Pederson is credited as one of four Special Photographic Effects Supervisors on the film, he and Doug Trumbull created a myriad of stars, planets and space ships, plus the unforgettable "stargate" sequence.
Markus
Sr Member
Some thoughts about: Vents in "2001: A Space Odyssey"
As mentioned by Lt Washburn, there are the ceiling vents in the pod bay room.

These look good, but I don't think they would be appropriate for the HAL unit.
Then, there are those that we can see on the bottom (in this perspective).

I love this shape and I will keep this in mind for future SciFi projects. But, honestly, these shapes seem to be too much work for something that is only featured on the back side.
Finally, I found these two.


These are very minimalistic. And they do remind me of something else - yes:

... just a little smaller.
I think, I will go with these. A little boring but easy to make, certainly good enough for heat exchange, and perfectly consistent with the movie.
As mentioned by Lt Washburn, there are the ceiling vents in the pod bay room.
These look good, but I don't think they would be appropriate for the HAL unit.
Then, there are those that we can see on the bottom (in this perspective).
I love this shape and I will keep this in mind for future SciFi projects. But, honestly, these shapes seem to be too much work for something that is only featured on the back side.
Finally, I found these two.
These are very minimalistic. And they do remind me of something else - yes:
... just a little smaller.
I think, I will go with these. A little boring
but easy to make, certainly good enough for heat exchange, and perfectly consistent with the movie.
Last edited: