You are using an out of date browser. It may not display this or other websites correctly.
You should upgrade or use an alternative browser.
You should upgrade or use an alternative browser.
Gray Fox MGS1 Build
- Thread starter Mach1matt
- Start date
Mach1matt
Active Member
I appreciate that. I’ve been brainstorming different locations I could put the servos. The helmet itself fits. It’s all the extra crap inside it that is complicating things.It's looking good for a first try")
joberg
Legendary Member
Yes, you might have 3 "spaces" you could explore. I'm sure you've thought about it: the space between the helmet and your shin, at the back of your lower ear, behind your lower jaw bone and the cheeks...that's about it.I appreciate that. I’ve been brainstorming different locations I could put the servos. The helmet itself fits. It’s all the extra crap inside it that is complicating things.
Mach1matt
Active Member
I think I’ve found a spot for them. It’s gonna be a drastic change from the first design using the 4-bar link design. The front link bar that is around where my cheeks are was an issue, so I think I found a way to eliminate it all together. I found this video on YouTube where someone used 2 servos hooked together to lift a faceplate for an Iron Man helmet. One was mounted on the faceplate, and the other to the main shell. I am prototyping that same “Stark-Tech” into my build. I’m thinking something like this:Yes, you might have 3 "spaces" you could explore. I'm sure you've thought about it: the space between the helmet and your shin, at the back of your lower ear, behind your lower jaw bone and the cheeks...that's about it.
Or lower:
Either way, it will be pretty solid as the servos will be direct drive. Best thing is, I can put it on much easier. I removed around 1/4”-3/8” worth of brackets. This design is actually closer to the source design as well. Only one linkage for each.
I’m hoping this will work. It’s gonna take some fine-tuning with the servo position and timing. The motion should be similar to pedaling a bicycle half a crank with your feet both horizontal, stopping, then pedaling backwards half a crank. I’ll post pics later today. Hopefully I can get one side mounted completely and do some simple coding tonight or tomorrow.
Mach1matt
Active Member
Well, I didn’t get as far as I wanted to with building today, but, I think this is gonna work. Putting the helmet on is SO much easier and literally pain free. So much more room too. The rear servos are in front of my ears now, instead of on top of them.


The range of motion of the faceplates is better than before. They go father back and hug the side of the helmet like they should. The front servo is just taped in place at the moment. I still need to make “L” brackets to hold them in place. I had to use thin aluminum flat bar for the linkages instead of the 1/4”x1/4” steel. I don’t have a vice, so bending it wasn’t happening. I figured the aluminum would at least prove the concept until I can bend the steel.


I’m very pleased with how this is working out, and especially that I won’t have to start this whole journey over again. Once I make the brackets for the front servos, I’ll probably just use a simple servo sweep Arduino code to test them. If this works I’ll probably redo the forehead system as well with an additional servo. I also ditched the hinges for the neck cover too. I’m gonna fasten the two pieces together and just make it detachable. I’ll update again tomorrow.
The range of motion of the faceplates is better than before. They go father back and hug the side of the helmet like they should. The front servo is just taped in place at the moment. I still need to make “L” brackets to hold them in place. I had to use thin aluminum flat bar for the linkages instead of the 1/4”x1/4” steel. I don’t have a vice, so bending it wasn’t happening. I figured the aluminum would at least prove the concept until I can bend the steel.
I’m very pleased with how this is working out, and especially that I won’t have to start this whole journey over again. Once I make the brackets for the front servos, I’ll probably just use a simple servo sweep Arduino code to test them. If this works I’ll probably redo the forehead system as well with an additional servo. I also ditched the hinges for the neck cover too. I’m gonna fasten the two pieces together and just make it detachable. I’ll update again tomorrow.
Mach1matt
Active Member
Hey guys. Not much to update today. I’ve been crazy busy at work this week and the extra servos I ordered finally came today. I dabbled with the Arduino stuff a little on Tuesday. I’m kind of having to relearn this stuff. I’m gonna mess with it some over the weekend and give an update probably Sunday.
Mach1matt
Active Member
Hey guys. Work has been crazy busy lately, but I had a few hours to work on the helm. Saturday, I remade the drive side of the forehead. I added a second servo, basically mirroring each other. Basically an “L7” design.


The previous design struggled to hold up the forehead. I’m sure this will suffice, just gonna take more tedious programming.
Sunday, I bent some 1/4”x1/4” bar stock for the drive linkages for the faceplates. I didn’t have a lot of time so I didn’t photograph much. This evening (Tuesday), I hot glued the new servos to the faceplates to test the new linkages’ range of motion.


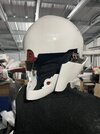
The range of motion is SO much better! It fits on my head still too. The left side needs a little more adjusting but it’s close. All that’s left fabrication wise is a way to attach the neck plates and adding magnets to the orange cover. I’ll work on it more as soon as I can. Hope everyone is doing well.
The previous design struggled to hold up the forehead. I’m sure this will suffice, just gonna take more tedious programming.
Sunday, I bent some 1/4”x1/4” bar stock for the drive linkages for the faceplates. I didn’t have a lot of time so I didn’t photograph much. This evening (Tuesday), I hot glued the new servos to the faceplates to test the new linkages’ range of motion.
The range of motion is SO much better! It fits on my head still too. The left side needs a little more adjusting but it’s close. All that’s left fabrication wise is a way to attach the neck plates and adding magnets to the orange cover. I’ll work on it more as soon as I can. Hope everyone is doing well.
Attachments
-
 D78C54BA-9252-4F8F-8AF8-863E43F6C48D.jpeg1.6 MB · Views: 108
 -
 94E28FB5-B861-4AFD-9B74-01FB115F0B1B.jpeg1.4 MB · Views: 112
 -
 6667162D-0A84-4866-BEC6-4F2E7462DCC1.jpeg1.7 MB · Views: 112
 -
 95B3A78A-161A-46F8-BE01-6471023E4B96.jpeg1.4 MB · Views: 101
 -
 15F880FA-5F11-4A01-9D88-5C5BB907D4E5.jpeg1.9 MB · Views: 109
 -
 C2E19EFF-432B-46E7-A80A-45074F674255.jpeg1.5 MB · Views: 109
 -
 FDB2B507-7849-4156-A1D7-D98CF7B8464E.jpeg1.5 MB · Views: 107
 -
 205BC894-9092-4E4B-8954-56FBB034BB47.jpeg1.6 MB · Views: 111
Mach1matt
Active Member
Thanks, as always! I wish I’d thought of this in the beginning. It was by pure luck that I saw that guys channel through a YouTube short. I still need to make some brackets for the front face servos, but that shouldn’t take long. The hot glue holds them fine, but I like a mechanical connection. I’ll work on some programming over the weekend to make sure it all works before I button this thing up.Ah yes; polishing the stone to make it better and better.
Mach1matt
Active Member
I appreciate the kind words! It’s been quite the learning experience so far. A lot of it has been trial and error. There’s not a lot of examples of this particular helmet out there to pull inspiration from, mainly the Play Arts version. It’s gonna be finished, one way or another. I think this final rendition is gonna be it though. Again, thanks for the feedback! I’ll try not to disappoint.Really nice work. Just read the whole thread and it's great to see how you've pushed through your difficulties and succeeded. I know you're not over the finish line yet but the helmet is looking fantastic. Look forward to seeing your future work.
Mach1matt
Active Member
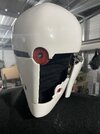
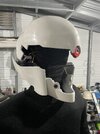
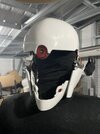
Hey guys. Got a small update. I worked on programming over the weekend, and changed the forehead servo configuration once more, but it’s great now. The dual servos on the faceplates work amazing. See for yourselves
Got a few more tweaks to make but I’ll update soon. Thanks!
Mach1matt
Active Member
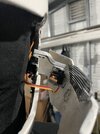
Lol. Like a nose guillotine. There’s actually quite a bit of room in there. I gotta make the test connections a little more secure before I put it on and try it. There’s 20 wires hanging out of it currently, and I need to touch up the paint job before I start soldering everything in permanently. I’m hoping to touch up the paint today or tomorrow.Great update and dude...the way that helmet closes; you better make sure no piece of skin/beard gets in the way
Mach1matt
Active Member
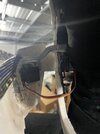
Hey everyone. Sorry this thread has been quiet lately. With the weather warming up, work has been kicking my butt. I’ve barely had time to do anything, much less work on this thing. I did get around to repainting it though. I had to change the type of spray paint. The first two times I tried, I was getting an insane amount of wrinkling and cracking in the first couple coats. I took extra care to sand everything out and try again, but the same result happened. Here in South Georgia, the humidity is crazy most days. But, I found a different paint that works. The primer acted crazy, but once the paint went on it laid nicely. Im gonna apply one or two more coats then clear it. After the paint is done I’m moving on to making the electronics permanent and hopefully finishing this thing. I have no clue if I’ll be able to finish the suit this year but I’m gonna try. If anything I’ll move on to maybe the neck, arms, and hands first so I can somewhat wear it. We will see. Im done setting deadlines and time goals. I’ll try to update more frequently. Thanks everyone!
George
Master Member
This. It increases the joy and reduces the stress many of us needlessly impose on ourselves. If it's not (for) work, then it should be relaxing...not taxing. "One small step for man..." as the famous quote goes.Im done setting deadlines and time goals.
Looking forward to your next update, but above all I hope you have fun. It's such a cool suit to begin with
Mach1matt - thanks for sharing all the aspects of your build, both the ups and downs have been illuminating and make your work all the more impressive. Not being familiar with the source material I had no idea the helmet opened up as it does and then I read that you were going to make it open with servos! That was a true "hold my beer" moment!! The helmet looks fantastic and I hope you are proud of your progress!
Similar threads
- Replies
- 8
- Views
- 301
- Replies
- 0
- Views
- 303
- Replies
- 2
- Views
- 1,213
- Replies
- 56
- Views
- 1,612