Good Han Solo Costume for Halloween in Germany

METATRON

Active Member
RPF PREMIUM MEMBER
Hi, after a long, long time… I finally started my first Star Wars costume for myself and the DL44 prop build of my dreams. I build some weapons for a Mando costume for a friend in the last weeks (just the pistol and rifle, 3D-printed, painted and weathered sorry, but I didn’t bother to document it).
The “Germany” in the title here is important for this build, because we can’t get a lot of stuff, you US folks can get easily and cheap.
For example Wallmart isn’t a thing here. The next Costco is in Britain and 8h away from me. I will put sources in Germany in this thread, but most of my stuff I buy online or in a Globus or Bauhaus Hardware Store near by.
I decided on a Han Solo costume - old style. Because I really want to have the Blaster and I would like to build the holster myself.

The clothing:
So, I want this one:
CD10E6FC-7198-4671-995D-BCF9136741A0.jpeg

I want to have it ready for a little convention in Speyer and Halloween this year. For the clothes I will try to find some cheaper options first, not the expensive replica stuff … like with most of my projects I will need out on it, build most of it myself and it would have been cheaper to buy the right stuff in the first place ;) I bought first online:
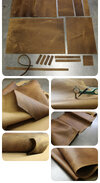
A black fishing vest and cut out most of the zippers (I bought 3 in different sizes - M was the right one)
4A8337F6-A70C-4D78-8791-D6C86FE10D1B.jpeg


Linen shirt
EB3E4F6F-588B-458D-B4B7-BCD2CA2ED95A.jpeg


some really cheap (17€) black PVC riding boots
A77B06B8-22FA-420B-BC03-748FBD18DBEE.jpeg

I tried this blue Halloween costume Han Solo trousers with the red stripes, but it’s horrible, I send them back
05BCBF3C-D3E1-4A57-9F5B-22BCC989984C.jpeg

and a black leather belt with holes. Yes, I know. I will get a better one later.
26EA8D3D-11D1-4DF1-BA34-C3D87C6C37B1.jpeg


The boots are ok looking for the price, but soft leather would be nicer. The sole is just soft rubber. And the belt has just 2 lines of holes, maybe I put the middle hole line in for nerdy detail.

The Blaster:
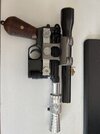
After some research and printing a blaster with my 3D-Printer I bought a Set from Blaster Factory. I think it’s the best for the buck. The package arrived today. Fastest shipping from the US ever. A week before I got a call from FEDex, about my package and that I‘m not allowed to ship weapons of mass destruction from the US to Germany. The hole ghostbusters proton gun Desaster again ;)
Important the customs “HS Code: 95030081 - Spielzeugwaffen” for importing that kind of thing into Germany. The officers will open the package.

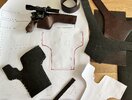
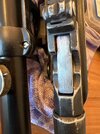
Here the half assembled Blaster with real wooden replica grip shells for a Mauser C96 and some leather strips for the holster, from EBay.
BD30238A-D2DD-4022-A79F-1CEF5884B1CB.jpeg


C7130C11-8718-4180-8FD7-E2150CEACE6A.jpeg
0BC4324C-1EAA-4DDC-9178-AC6C03BAE7F0.jpeg


It’s a Denix Mauser full metal replica pistol with good weight and wooden grips from Spain. Buying the pistol from Spain directly and the parts separate isn’t cheaper, I had to find out and the Blaster came mostly assembled.
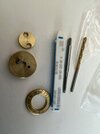
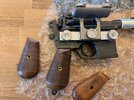
First step, changing the grips… isn’t so easy :) The Denix construction differs here from the original. But the size is the same. I was nervous, because I read the Denix is smaller then an original Mauser, but not the grips! I have to grind of the thing in the middle and drill a hole for the “real” screw. I will also define the lanyard ring eye more with a file (picture of a real one).
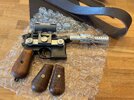
4A8B941C-098D-46D8-B073-8134445F9876.jpeg


Will look nice:
43453261-97D4-41A7-9D29-ABFF6BB13E1B.jpeg

I think I will put the Denix grips on my 3D printed blaster and give it away.

For the next steps with the blaster I will mostly follow Boba Debt description: “Denix Mauser Accurizing Services for ALL Blaster Versions” Link but I will do it myself and skip the magazine details for example all together.
The “milling marks“ I think I will do just with my drill press. Will look accurate to a real Mauser, wich are really badly milled.
 

Attachments

  • 78BFBE9C-756C-4067-BB54-DF2A8A227853.jpeg
    78BFBE9C-756C-4067-BB54-DF2A8A227853.jpeg
    3.9 MB · Views: 68
  • 74E2C39C-B815-49CD-BB57-651814A84E28.jpeg
    74E2C39C-B815-49CD-BB57-651814A84E28.jpeg
    4.2 MB · Views: 78
Last edited:
The holster:
I want to make the holster myself because I bought leather working tools last year during Covid lockdown and haven’t really done anything with it yet :)
Working from the original photos, researching plans and forums, reading the Smugglers-Holster pages, making my own plans… I think I will make multiple holsters over time. I bought this brown thick leather, looking like the one used for the Anovos Star Wars Holster, but… First thing’s first.
I blow up all good pictures I could find from the original holster and the official replicas in Adobe Illustrator for a 1:1 plan:
tg_han solo anh holster pattern_001.jpg


Knowing the belt part is around 2” (50,8mm) and having the blaster replica size, I made a pattern that I could print out 1:1 on a big printer. I cheated a little bit and bought 50mm leather strips for the two belt parts and 20mm strips for the leg and gun holding parts ;)

Next step will be making a first holster from EVA foam for measuring and sizing. EVA foam is a good substitute material for leather and with it I can easily find the right measurements for my own belt.

Something else… I like this forum, but I found that sometimes people here are not so helpful with measurements and don’t like to share information, because they want to sell everything on Etsy or so. I don’t like that. Not the selling part, sell what ever you want, but share the information. No one of us has the rights on the stuff we’re building. It’s all “copy cating”.

That’s why… I put my first Han solo pistol belt holster pattern smugglers pistol belt - call it what you want. Not ready yet, but have fun with it! If you haven’t a big enough printer you can print it out on multiple pages and glue it together.

Update:
For a good fit and size, I really recommend to make your first belt from EVA foam in the thickness of leather you wanna use. My leather is relatively thick (around 5mm) and I had to change the holster part a bit:
for a good fit on my holster, because you can not wet form this kind of leather. I really changed my mind on this kind of leather. It’s the nicest stuff I can imagine for my holster. It’s soft but firm like thick rubber and behaves very nice. Wet formed natural holster I see are often to hard in my mind for a prop or costume part and you can easily destroy the weathering on you prop by using it.
 

Attachments

  • harry-in-star-wars-new-hope-harrison-ford-36029508-1268-1900.jpg
    harry-in-star-wars-new-hope-harrison-ford-36029508-1268-1900.jpg
    181 KB · Views: 101
  • 5B4FC692-B5C5-4975-B888-C747AB07D338.jpeg
    5B4FC692-B5C5-4975-B888-C747AB07D338.jpeg
    1.7 MB · Views: 105
  • Han Solo Blaster Cosplay Fan Holster 001 page 1.pdf
    338.2 KB · Views: 108
  • E160D1F7-04E0-4FCF-9C1B-8591ED259959.jpeg
    E160D1F7-04E0-4FCF-9C1B-8591ED259959.jpeg
    2.5 MB · Views: 82
Last edited:
Little update on: How to put real Mauser grips on a Denix C96 replika

I got “real” replika grips for a Mauser C96 for my Denix and after some little work it looks way better then the one’s coming with the Denix.
image.jpg


image.jpg

Don’t cut the middle grip thing out entirely like on a real Mauser C96. The Denix is just made from pot metal, not steel or iron. It needs every bit of reinforcement it can get.
The grips will not fit. I used a japanese saw and a small chisel for laying it in. It wasn’t so hard.

The former metal stud in the middle I cut down with a countersink and I just used a small metal file for the rest. Then a drill for making the hole bigger.
 

Attachments

  • image.jpg
    image.jpg
    1.6 MB · Views: 70
Last edited:
I have some unexpected problems with the scope parts of my blaster.

image.jpg


They gave me not fitting screws for the top parts. Metric M2 or M3 will not fit (would be possible when you copy a German scope ;) )
I measured it and the screws are UNC 4-40 wich you can’t get in a tool shop in Germany. I had to order a tap set online. I retapped the part and it fits. I think what happened was that there tap bits are getting old and smaller. Well, now I have a 4-40 and 5-40 drill and tap in my tool box I will never ever use again

Oh by the way, I got post from the customs office, they want me to pay tax on the blaster kit. 68€ (around 71$).
 

Attachments

  • image.jpg
    image.jpg
    1.4 MB · Views: 69
Last edited:
I was looking at the real movie blasters and the grips are different from mine. So I filed my walnut grips down a little bit and put some nice furniture wax on them and started the paintjob.

image.jpg
 
I own a little CNC. But I found a better way for having these milling marks on the side.
Just use a zylinder carbide rotary burr on this soft Denix replica’s.
image.jpg

image.jpg
 
How to weather a DL44 Flash Hider?
Now I want to weather the front flash hider.
I thought about just putting it in the dishwasher. Should work, right? Aluminum gets nasty in the dishwasher.
First I was not brave enough and tried the vinegar trick. Cleaning it with alcohol, so that you haven’t any fat on it and putting it in a mild acid. I mixed vinegar with citric acid.
Before:
image.jpg
image.jpg


And after 1 hour the Same :( Maybe over night would do the trick. But I’m inpatient and don’t think it will work. Maybe a much stronger acid, but I think that’s dangerous, too.
So let’s try the dishwasher.
I just put it in on the fast one hour program:
image.jpg

WOW! YES! I’m very happy with this result! Looks fantastic. Maybe a second time for more? I think it’s ok for now.
I love it!
image.jpg
 
Last edited:
Because it’s my party and I can do what I want to…
The Denix has this horrible wood screw holding the upper together with the lower. I tried a M3 hex screw in it …
image.jpg

But the head is to small and it’s slips through the hole and stops holding it together. I had to use M4 and tap the hole, but I didn’t want to separate the upper from the lower. So, tapping wasn’t so easy
image.jpg

Bye the way, I like the magazine bottom this way.

And the bigger M4x8 looks awesome!
image.jpg
 
Last edited:
Same with the Bolt. I thought about programming the CNC for the Extractor, but … why! I want to have the Blaster of my dreams and not a Mauser C96 replica. So I just filed the ugly seam down on the bolt and gave it some scratches and a little color and wash because it was too shiny for my liking in the white

image.jpg
 

Attachments

  • image.jpg
    image.jpg
    1.5 MB · Views: 66
Last edited:
DL44 Mystery Disk
The first blaster was build in England, right?
Working on my Blaster I thought about what to do about my missing “Mistery Disk”, because I forgot to order it for my kit.
In Europe we have this special kind of flat washers from the car industry.
image.jpg


In German it’s a funny name: Kotflügelscheiben , wich translates to “fender washer”. I use a 25mm with a 6.4mm hole for my Mistery Disk. Maybe that’s the Original source?
I put it in my drill on a sandpaper holder I never used on double sided tape and put some sandpaper to it:
image.jpg


image.jpg


53543963-83C1-49F2-818C-F7AA03EB6171.jpeg

Maybe… just maybe…

E10ECDEE-5808-4F07-A727-A2A47B41A62D.jpeg
 
Last edited:
Now the black vest. I use a smaller one then normal, because it should stay open.
I cut out the big zipper and cut away the little handles. In the front I will paint the rest of the zipper black
image.jpg


Maybe I will make the things on the back, but I don’t know yet.
Oh, the trousers are horrible, I send them back and will use just blue trousers I have. I don’t know yet how to replicate the red stripes.
 
Last edited:
I had some time today and I made the holster part of the pistol belt from this beautiful leather I found. It’s very thick mahogany wax or oil leather. I got big rest pieces from a dog leash manufacturer. The seams aren’t perfect, but I like it this way. It give’s the piece some character. Or maybe I’m just in denial. Anyway… For the round part I used different, thinner material in the same color (looks black in the pictures but not in reality):
4426CB22-1828-4783-B996-00D87734C495.jpeg
A50D9239-AA93-4A05-9201-986FAC34C325.jpeg
67E2C6F1-8BC9-4559-BF64-9CB34C5A78D6.jpeg
53281529-4F51-4BC7-9377-45A3C4511209.jpeg
BE501336-0337-428E-B1FA-FE5F82146B16.jpeg
 
Last edited:
I forgot the leg strap!!!
Oh no!!!
It was late yesterday and I was so happy with the fact that I can put the Blaster in a holster, that I totally forgot about the leg strap.

Seeing here laying down on a 1:1 printout:
69F3BD89-7CD1-42C2-AE6A-F2B04F35289D.jpeg
 
Last edited:
Well, what to do now? Let’s see my options.
1. Trying to sew the leg strap in place just on the holster like it is - No way! It’s not even possible to make the holes for the seams.

2. Open up the seams on the holster again, put the strap and (my second problem) the holes for connecting it with the Y-Shape thingy.

3… I have enough material left for a second holster because I was lucky and bought the last 3 giant rest pieces for a steal.

So, let’s make another holster! Sewing is the most work, wich I have to do for option 2 anyway. Cutting is fun. And I don’t like my seams on the first holster, too.
 
Last edited:
Change of plan. Again and literally ;)
Because I wanna go out off this project with a really nice set of plans for myself and all of us, I decided to go with option number 2 first. Cutting my bad seams open and documenting the form for the plans (By the way if Death Pool is looking for his pencil rubber, I think my daughter has is ;) )
720618FC-ECE9-47ED-A7F7-76D2390A82F4.jpeg
 
Ok. I think I have figured out the order to sew the belt parts together. Last steps will be closing the holster up, but punch the stitch holes first in the holster part.
First leg strap, then Y-Shape, close the holster, put the round piece in and last attaching the gun holding strap.
I found the „leap frog stitch“ from Corter Leathers YouTube Channel works best for me, because it looks good and is fast and easy:
Corter Leather Stitch without Pony

And don’t mix up your top and bottom parts. I had to stitch the leg strap twice because of that:
14A314ED-DBD9-44F7-9ECE-C2A55293F25B.jpeg
 
Last edited:
Thinking about it, I just have to call the „leap frog stitch“ the „Yoda Stitch“ from now on ;)

So, I „Yoda stitched“ the parts together and the stitches are looking really good now:
A20D6A8A-B265-4947-9D01-BE093E73CBFE.jpeg
CA0ABB7C-3DCB-4C85-8C2E-735E2AF314CE.jpeg
04DD7597-F562-4639-ACC7-4902D1FCFB23.jpeg
1A1ABE07-6973-4B7F-926A-48809A03A064.jpeg


Now I have to buy new rivets, because mine are to short and I forgot the groves on the leather edges, but that’s not a problem.
I decided to not put rivets in the holster area under the gun, because I think even this shiny chromed cabs can scratch the blaster a bit.
977E6ADD-1CA8-4202-A058-5C178AB159B1.jpeg

But I don’t like the stripes so much I think.
I will go more in this direction I think:
46D10A26-7A3E-4273-AF28-C1C520856CF4.jpeg
4BFC398F-CBEA-45CE-A225-CB1FDAB184B3.jpeg
 
Last edited:
Closely looking at this picture where you can see the backside of the pistol belt, it’s clear that the rivets are push buttons for changing the length of the belt:
9EA7D4B4-5A1C-4D84-AED4-E85648D878F8.jpeg
 
Last edited:

Your message may be considered spam for the following reasons:

If you wish to reply despite these issues, check the box below before replying.
Be aware that malicious compliance may result in more severe penalties.
Back
Top