Gears of war MK2 Lancer build

Madmanad

New Member
Hi all,

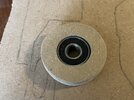
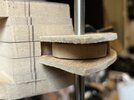
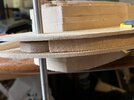
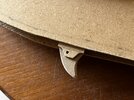
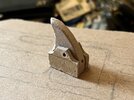
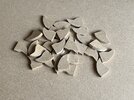
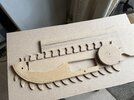
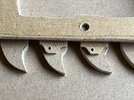
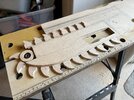
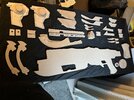
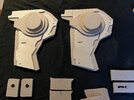
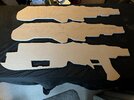
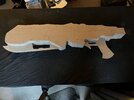
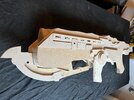
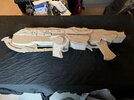
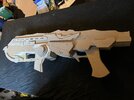
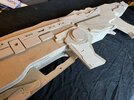
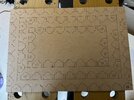
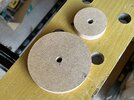
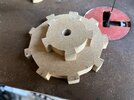
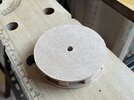
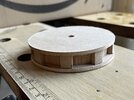
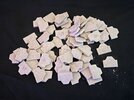
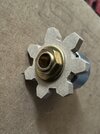
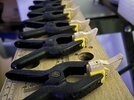
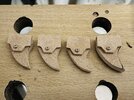
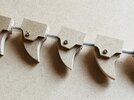
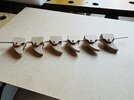
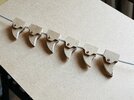
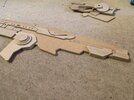
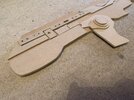
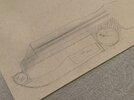
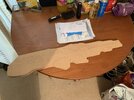
So I’ve wanted to buy the lancer replica for years but could never justify the price, thought I’d have a go at building a replica myself. It’s going to have a working chainsaw (it will spin but won’t cut anything!) and it’s going to hopefully fire Nerf darts or something similar. Using mainly MDF I’ve cut out a fair few pieces so far, nothing is fixed together yet but I’m enjoying the project.

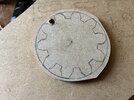
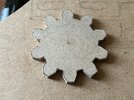
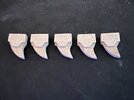
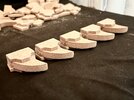
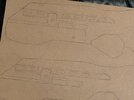
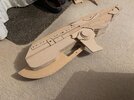
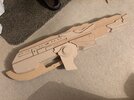
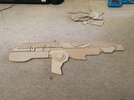
In the process of working on more parts but this is pretty much my progress so far..
 

Attachments

  • EF71F1B3-55C0-495A-B80B-69CE947BFC50.jpeg
    EF71F1B3-55C0-495A-B80B-69CE947BFC50.jpeg
    2.7 MB · Views: 103
  • 41452E45-14AA-4534-B20A-A8B20D9D96D8.jpeg
    41452E45-14AA-4534-B20A-A8B20D9D96D8.jpeg
    4.1 MB · Views: 105
  • 2B25C859-D638-4945-8692-885CE4F432D3.jpeg
    2B25C859-D638-4945-8692-885CE4F432D3.jpeg
    3.9 MB · Views: 99
  • 5AD8B976-0534-4057-B814-C1D709A24421.jpeg
    5AD8B976-0534-4057-B814-C1D709A24421.jpeg
    3.4 MB · Views: 107
  • 31556698-9675-485A-BA94-4EFAC522833F.jpeg
    31556698-9675-485A-BA94-4EFAC522833F.jpeg
    4 MB · Views: 108
  • FADF7DB1-4A5E-4D79-809E-F2FA9AA4CA89.jpeg
    FADF7DB1-4A5E-4D79-809E-F2FA9AA4CA89.jpeg
    4 MB · Views: 87
  • 77E8B42D-9D85-47FF-A89B-578CDB712661.jpeg
    77E8B42D-9D85-47FF-A89B-578CDB712661.jpeg
    3.5 MB · Views: 95
  • 7FDBED00-0F2D-4275-873A-90A8283E8BA9.jpeg
    7FDBED00-0F2D-4275-873A-90A8283E8BA9.jpeg
    2.2 MB · Views: 95
  • 5639E7EF-00BF-4C85-927B-6CC637317566.jpeg
    5639E7EF-00BF-4C85-927B-6CC637317566.jpeg
    2.6 MB · Views: 111
Managed to make a few more parts, setting up the wheel at the front for the chainsaw to go round, and just finished the first tooth for the chainsaw!
 

Attachments

  • 10A01626-B6DE-4581-ACB7-EE1AD89CE4FA.jpeg
    10A01626-B6DE-4581-ACB7-EE1AD89CE4FA.jpeg
    2.8 MB · Views: 90
  • 033E4D42-891C-4AAE-A5D6-4DA83EDD559C.jpeg
    033E4D42-891C-4AAE-A5D6-4DA83EDD559C.jpeg
    2.6 MB · Views: 108
  • EBAC0FC7-5764-4E40-8D89-4B8C4591702B.jpeg
    EBAC0FC7-5764-4E40-8D89-4B8C4591702B.jpeg
    2.4 MB · Views: 93
  • E8C0338E-C3C6-4FF6-95CA-3645F16D8FE3.jpeg
    E8C0338E-C3C6-4FF6-95CA-3645F16D8FE3.jpeg
    2.7 MB · Views: 100
  • 7CF2EC22-5754-4672-B891-AF953DC806BD.jpeg
    7CF2EC22-5754-4672-B891-AF953DC806BD.jpeg
    2.5 MB · Views: 79
Finished cutting out all the teeth this morning (just the main parts) laid them out to get a rough measurement of the chainsaw sections. Also cut out a few other parts for some detail. Think it’s coming along nicely, so much work to do but I love it!
 

Attachments

  • 646C1902-EC70-4284-A8A4-4C03F298A65C.jpeg
    646C1902-EC70-4284-A8A4-4C03F298A65C.jpeg
    4.6 MB · Views: 82
  • E8DF5FAD-371B-496E-9969-D5F539E08EFF.jpeg
    E8DF5FAD-371B-496E-9969-D5F539E08EFF.jpeg
    4.5 MB · Views: 78
  • 73EE8F8B-87EB-4572-BF50-D72E65739424.jpeg
    73EE8F8B-87EB-4572-BF50-D72E65739424.jpeg
    3.4 MB · Views: 85
  • 74E09837-8907-48F6-ACCC-8990F07C4C79.jpeg
    74E09837-8907-48F6-ACCC-8990F07C4C79.jpeg
    4 MB · Views: 92
  • F4672429-32B7-45AD-AA4A-82BDD27029A7.jpeg
    F4672429-32B7-45AD-AA4A-82BDD27029A7.jpeg
    4.8 MB · Views: 80
Morning guys, thought I’d show in a bit more detail the parts I’ve made so far, layer it all out to get a rough idea of the look once fixed together. Think it’s coming along nicely.
 

Attachments

  • 8CFCF9A9-A63F-4AE2-B317-DF16D7E53107.jpeg
    8CFCF9A9-A63F-4AE2-B317-DF16D7E53107.jpeg
    3.6 MB · Views: 109
  • ED9AF8A4-DF51-48CF-897D-465E6019AA45.jpeg
    ED9AF8A4-DF51-48CF-897D-465E6019AA45.jpeg
    3.7 MB · Views: 84
  • E1586588-6EAD-4E17-B357-7C8FD17AC859.jpeg
    E1586588-6EAD-4E17-B357-7C8FD17AC859.jpeg
    3.2 MB · Views: 90
  • 200EF4A0-90A6-4834-AC53-15437ECED3DA.jpeg
    200EF4A0-90A6-4834-AC53-15437ECED3DA.jpeg
    2.9 MB · Views: 82
  • 19C0717A-1AC2-4C87-AE5F-BBD5F9CAAF00.jpeg
    19C0717A-1AC2-4C87-AE5F-BBD5F9CAAF00.jpeg
    4 MB · Views: 97
  • 2C8826DA-0508-4A2F-8FFB-C855C33AF9C7.jpeg
    2C8826DA-0508-4A2F-8FFB-C855C33AF9C7.jpeg
    3.3 MB · Views: 96
  • A9C6664D-5EC5-4878-86CA-6276804E284D.jpeg
    A9C6664D-5EC5-4878-86CA-6276804E284D.jpeg
    3.8 MB · Views: 85
  • A1D7F434-7D00-48CC-A988-AD4D69E8DE16.jpeg
    A1D7F434-7D00-48CC-A988-AD4D69E8DE16.jpeg
    3 MB · Views: 102
  • F21144C5-D221-4C87-BD33-D98B82BB2797.jpeg
    F21144C5-D221-4C87-BD33-D98B82BB2797.jpeg
    3.8 MB · Views: 92
Lots of tedious small pieces to cut out, hopefully I can start working on the pulleys for the chainsaw soon…
 

Attachments

  • 6D12BB2E-D9AD-4D15-952F-590DB41C36A9.jpeg
    6D12BB2E-D9AD-4D15-952F-590DB41C36A9.jpeg
    3.5 MB · Views: 81
Almost finished making the sprockets for the chainsaw today, took a lot of time but I’ve been meaning to get this part done for a while, I can hopefully progress a little quicker with these parts made.
 

Attachments

  • 75147672-A737-4506-A148-EE93DB082DFC.jpeg
    75147672-A737-4506-A148-EE93DB082DFC.jpeg
    3.5 MB · Views: 77
  • 02470FA9-DD3F-4559-B5DD-3E449D0A7840.jpeg
    02470FA9-DD3F-4559-B5DD-3E449D0A7840.jpeg
    3.3 MB · Views: 81
  • D72841A0-5CC7-474B-8068-C8D516964543.jpeg
    D72841A0-5CC7-474B-8068-C8D516964543.jpeg
    3.4 MB · Views: 70
  • D4C71370-62E4-45AD-A654-BB9D60BDE4FA.jpeg
    D4C71370-62E4-45AD-A654-BB9D60BDE4FA.jpeg
    2.9 MB · Views: 73
Making some gears now to power the chainsaw sprocket!
 

Attachments

  • 6D7FD5DD-0ED8-4BCF-8AB8-6DA24B42C26B.jpeg
    6D7FD5DD-0ED8-4BCF-8AB8-6DA24B42C26B.jpeg
    4.5 MB · Views: 82
  • DEB8B17B-A62A-41A0-8EF7-F169EE10FB77.jpeg
    DEB8B17B-A62A-41A0-8EF7-F169EE10FB77.jpeg
    4 MB · Views: 82
  • D26E38B8-8CC7-409D-9511-AC20DE6389AE.jpeg
    D26E38B8-8CC7-409D-9511-AC20DE6389AE.jpeg
    4.8 MB · Views: 69
Thanks for the progress updates! I'm enjoying watching this come together! What is your plan for painting the MDF?
Thanks glad you’re enjoying it! The plan is to seal it all with either PVA or an actual mdf sealant and then I’m probably going to be using something like rustoleum to finish it off. Haven’t fully decided yet.
 
Finally got some more tooth parts cut out, not had a lot of time this last week. Teeth are coming along well, can’t wait to get them all fixed together.
 

Attachments

  • 65C6DB8C-8EEA-4422-8CC1-A84723647306.jpeg
    65C6DB8C-8EEA-4422-8CC1-A84723647306.jpeg
    2.5 MB · Views: 66
  • D332F4D1-0913-4D4E-8BCA-7E1891C3F1FE.jpeg
    D332F4D1-0913-4D4E-8BCA-7E1891C3F1FE.jpeg
    2 MB · Views: 71
  • 44B6438A-ED92-4AF7-8474-7FC12F11FF42.jpeg
    44B6438A-ED92-4AF7-8474-7FC12F11FF42.jpeg
    2.3 MB · Views: 78
Glued a few teeth today and inserted some screws for detail, now waiting for them to dry. Also fitted one of the gears to the motor, just to check sizing and fittings.
 

Attachments

  • CE728157-809A-4AC5-ABB4-DD1C3D56C3F5.jpeg
    CE728157-809A-4AC5-ABB4-DD1C3D56C3F5.jpeg
    1.1 MB · Views: 82
  • D664E624-E197-4EB5-B373-93D4B95F4EBB.jpeg
    D664E624-E197-4EB5-B373-93D4B95F4EBB.jpeg
    2.4 MB · Views: 75
Really think these little screws make a huge difference to the look! It’s all in the detail
 

Attachments

  • A6BA6044-2FFA-4930-9340-513E0AAA2A53.jpeg
    A6BA6044-2FFA-4930-9340-513E0AAA2A53.jpeg
    2.8 MB · Views: 79
Just checking the teeth fit on the wire with the spacers and all that before I go too far making them all, seems to work out how I wanted.
 

Attachments

  • 5A940C2C-73FD-4615-9333-A0CF13868E3D.jpeg
    5A940C2C-73FD-4615-9333-A0CF13868E3D.jpeg
    2.9 MB · Views: 81
  • B78078D4-38DA-4EF4-A31D-ABF2517141CF.jpeg
    B78078D4-38DA-4EF4-A31D-ABF2517141CF.jpeg
    2.1 MB · Views: 76
  • 4ED85252-91F5-496F-9641-6F548DEF0365.jpeg
    4ED85252-91F5-496F-9641-6F548DEF0365.jpeg
    3.5 MB · Views: 64

Your message may be considered spam for the following reasons:

If you wish to reply despite these issues, check the box below before replying.
Be aware that malicious compliance may result in more severe penalties.
Back
Top