Game of Thrones Jorah Mormont Sword Belt/Scabbard Build

FPLeatherCo

Well-Known Member
RPF PREMIUM MEMBER
I've been planning to do a 100% screen accurate rebuild of the sword belt from my Jorah Mormont costume for some time and I've finally got the tools, hardware, and other supplies together. So here's the build thread!


25.jpg Game_Of_Thrones_S04E03_1080p_KissThemGoodbye_Net_2242.jpg IMG_0442.JPG
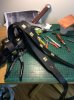
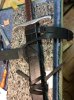
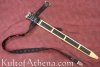
These are some of the references from which I was working off of. A primary impetus for getting this going was I was able to find the exact buckles and studs as used in the show.


IMG_0016.jpg


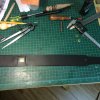
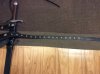
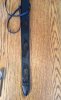
I picked a decent double shoulder of black veg-tanned leather and after cutting a straight line into one edge, I could make some nice even belts with a strap cutter. Jorah's belt uses a double-belt design with the thinner upper belt supporting the thicker lower belt that actually attaches to the scabbard so that the sword hangs at a comfortable level and isn't too tight. I calculate that the top belt is 1 3/8" and the thick is just about 2" wide.


IMG_0011.jpg

Here's the end of the upper belt once I cut an indentation to accommodate the 1" belt buckle.


IMG_0012.jpg

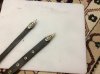
I skived the back down a bit so that the end could fold over better and not be too thick at the end. And I put on some extra dye to darken up the exposed inner leather.


IMG_0015.JPG


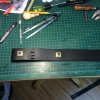
Here's the other end of the belt that is tapered down to about 1" with buckle holes punched.


IMG_0014.jpg


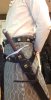
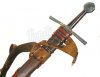
And test-fitting everything together with the buckle temporarily set. I'll use some black leather strip to secure the buckle as done on the original prop. Up next with be to round-over and burnish the edges and mount the studs.
 
Last edited:
Nice start!

My wife doesn't really get into the cosplay/costuming thing, BUT she does kind of want to do a Khalessi/Jorah duo costume bit so the bug has bit :p. Will be watching with great interest.
 
IMG_0022.JPGIMG_0021.JPG


Thanks Solos!

And here's the finished top belt. I beveled the edges and then burnished them down with some water then applied some edge dressing. Lastly, I burnished them again with some beeswax. I also secured the buckle with some black leather strip and attached the studs. I'll do some weathering to the hardware once all the pieces come together. Now on to the lower belt.
 
IMG_0034.JPGIMG_0035.JPG


I've got the lower belt buckle section patterned out and I'm in the process of finishing the edges and getting all the hardware installed. Once done with that, I can attach it to the scabbard and get working on the eyelet section of the lower belt.

I'm also working on getting the belt chapes going. I found the actual pieces used but they seemed a little cost prohibitive so I used those pictures as a reference for modeling the piece in Scupley and then casting it in resin. The first one came out a little bubbly so I'm gone try again and also maybe mount a rivet in the mold or figure out another way of attaching it to the belt.

I did a couple test fittings of the slits in the back of the lower belt that the upper belt slips through - trying to get those measurements and cuts as tight as possible.

Until next time...
 
attachment.jpg
attachment.jpg
attachment.jpg
attachment.jpg


Here are some shots of the lower belt where it attaches to the scabbard and where the upper belt passes through it. Looks pretty decent on test fitting after a lot of careful
measurements and cuts.


attachment.jpg


I got a test fitting of the eyelets on the lower belt in there and measured out where the others will be. I got em spaced just right so when I have the belt buckled at the right height it has the right number of eyelets visible above and below the buckle - a nice surprise. All the edges are now finished too.

Things to do:

- finish setting the eyelets and trim the end of the belts
- get the belt chapes cast, painted, and attached
- figure out exactly how to tie up the strap ends around and behind the scabbard. I know how to do it from the front but the back is still a bit of a mystery
- glue some peacock feather to the scabbard
- do some weathering on the hardware

And I think that's about it. Excited to see this project coming to fruition.
 

Attachments

  • 16.JPG
    16.JPG
    1.3 MB · Views: 3,464
  • 17.JPG
    17.JPG
    1.2 MB · Views: 3,326
  • 13.JPG
    13.JPG
    171.2 KB · Views: 3,541
  • 12.JPG
    12.JPG
    74.3 KB · Views: 3,370
  • 19.JPG
    19.JPG
    707.8 KB · Views: 3,512
attachment.php


Got the eyelets in. Had to skive down the back of the strap a bit so the eyelets would fit. But pleasantly surprised with how the spacing and number of eyelets turned out. I was able to match the look of the prop and have the same number of eyelets exposed above and below the buckle as pictured in the reference material. I'll get some pictures of that next time.
 

Attachments

  • 18.JPG
    18.JPG
    1.1 MB · Views: 3,730
Everything looks amazing!! Great job! I want to build this costume for my husband. Would you be willing to share where you found the buckles and studs?
 
Thanks!
I got the hardware from the UK site Abbey England. You need to register an account with them but they have a lot of other Game of Thrones hardware on there too.

The buckles are 1" and 1-1/4"
http://abbeyengland.com/Store/tabid...2/ProductID/68629/language/en-GB/Default.aspx


I got the square rein tip in brass. They're listed as 1" which threw off all my measurements but happily when they arrived it turned out they were actually closer to 3/4", the size I had estimated them at. Make sure not to get the more expensive and poisonous lead filled version.
http://abbeyengland.com/Store/tabid...2/ProductID/68405/language/en-GB/Default.aspx


I also got the eyelets from them in 17/64". I spent a long time trying to find exactly the right size eyelet with washer as used in the show. The standard eyelets either don't have a washer or are too thick around the lip or both. But I think these are as close to or actually the ones used on most of the belts on the show.
http://abbeyengland.com/Store/tabid...2/ProductID/69265/language/en-GB/Default.aspx


Everything looks amazing!! Great job! I want to build this costume for my husband. Would you be willing to share where you found the buckles and studs?
 
attachment.php
attachment.php


And I've gotten the belt chapes finished up. I pulled some good casts from the mold I posted earlier in the thread and drilled out the back so I could mount some Chicago screws with Milliput epoxy. Then they got some gold paint and black shoe polish for weathering and to bring out the details. And they look pretty good mounted on the belt.

That's the last step for the belt itself. Next up will be tackling a few things on the scabbard end.
 

Attachments

  • IMG_0056.jpg
    IMG_0056.jpg
    1.2 MB · Views: 3,520
  • IMG_0055.JPG
    IMG_0055.JPG
    1 MB · Views: 3,478
So good, you must be pleased with it. Can you post a. Photo of the back of the. Sword belt where it attaches to the scabbard. I can't work it out and Im inspired to try and upgrade my belt.
 
So good, you must be pleased with it. Can you post a. Photo of the back of the. Sword belt where it attaches to the scabbard. I can't work it out and Im inspired to try and upgrade my belt.


Here's the back of my scabbard. This is how I have it set up but I don't think it's exactly right. I've also put up a couple reference pics of other scabbards (John Snow's Long Claw and one from Riddley Scott's Robin Hood). I think Jorah's does something similar to these.


attachment.php


attachment.php
attachment.php
 

Attachments

  • 126433-t1.jpg
    126433-t1.jpg
    27.9 KB · Views: 3,617
  • 23.jpg
    23.jpg
    2.1 MB · Views: 3,536
  • VS0108_4_l.jpg
    VS0108_4_l.jpg
    258.6 KB · Views: 3,528
Thanks for sharing the secrets of your build and all your research. This has given me so many ideas for my own costume. I cant wait to see what u do nNextel
pi just realised, in order to do something similar Im gonna need to buy 2 more belts. I already have a 1inch by 50 belt, I'll need a thinner belt that loops through the big belt and just goes round my waist. But the actual sword belt gets cut in half and at least a foot of the belt ends up being wrapped around the scabbard, so if I want the end of the belt to hang low still I will need another 1 inch belt to add to it. This could get exspensive
 
Last edited:
attachment.php


Finally getting some time to update this build. I'm mounting the peacock feathers to the scabbard with a combination of super glue to secure them and future floor wax to go over everything. The super glue was one of the few adhesives I could get to adhere to the vinyl covering and it looks like the future will give a nice top coat. I still need to apply a few more coats so I'll post another pic once everything's dry.
 

Attachments

  • 24.jpg
    24.jpg
    1.4 MB · Views: 3,212
It's looking very good. Thanks for the information about attaching the sword to the belt. I'm working on Bronn and I think his belt uses a similar method.

Also, if it helps you (or anyone that may be following the thread) I recently made a 3D model of Jorah's pommel for another costumer and it's free on Thingiverse: http://www.thingiverse.com/thing:977947

jorah pommel.png
 
Thanks! Nice pommel model. I'll have to use that if I do a sword re-build. Any pics/info on your Bronn build?

And quick update: I'm remaking the entire belt out of higher quality full-grain latigo leather I now have on hand. So far looks and feels a whole lot better and I'll get pics up once it's all together again.

- - - Updated - - -

It's looking very good. Thanks for the information about attaching the sword to the belt. I'm working on Bronn and I think his belt uses a similar method.

Also, if it helps you (or anyone that may be following the thread) I recently made a 3D model of Jorah's pommel for another costumer and it's free on Thingiverse: http://www.thingiverse.com/thing:977947

View attachment 519070
 
This thread is more than 3 years old.

Your message may be considered spam for the following reasons:

  1. This thread hasn't been active in some time. A new post in this thread might not contribute constructively to this discussion after so long.
If you wish to reply despite these issues, check the box below before replying.
Be aware that malicious compliance may result in more severe penalties.
Back
Top