Pilot
Sr Member
I got my hands on one of gw2tulsa's fantastic PAL castings (thanks again, Gary.) and decided that it needed to have a light that worked when you pressed the button up top. This is about as basic a circuit as you can get, and I think even someone who's never done any wiring before could set this up in a matter of minutes.
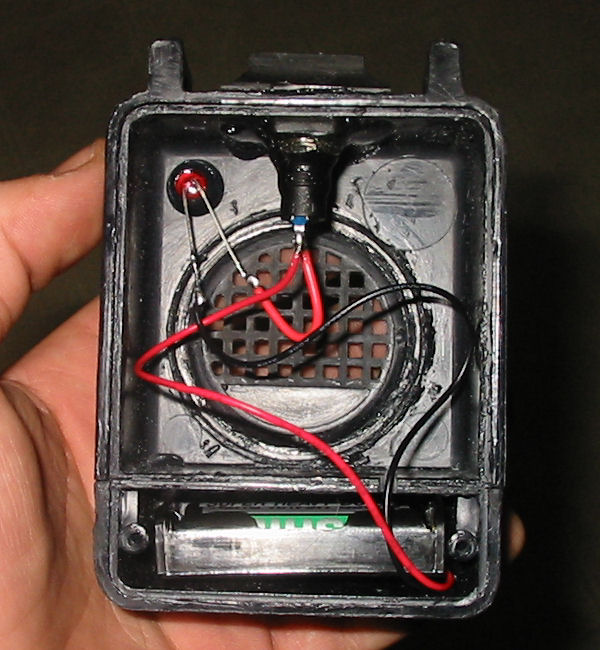
From the back, you can see the minimal parts involved. For those interested, it all came from Radio Shack to the tune of about 6 bucks:
5mm red LED, stock #276-041
Momentary contact pushbutton switch, stock #275-1566A
AAA battery holder, stock #270-398B

Not some of my best solder work, but since it was 4 small connections that aren't going to be under any real stress, I just sort of stuck it together.
The positive (red) wire goes from the battery holder to one terminal on the switch, and the positive lead of the LED (always the longer lead, known as the anode) goes to the other terminal. I used a small bit of red wire to close the gap between the LED and the switch.
The negative (black) wire goes directly to the negative lead, or cathode of the LED. Stick some batteries in and you've a complete, working circuit. Easy as pie. It's best to solder everything together, but you could do the old twist-'n'-tape method in a pinch.
The battery holder fits perfectly in the bottom cavity. I'm going to cut a small piece of foam and glue it in there just to keep it from rattling around.
On top, I just stuck the rubber button cover down with some RTV silicone sealant I had laying around. It looks like it's going to be pretty secure, but still flexible enough to let the button work unimpeded.
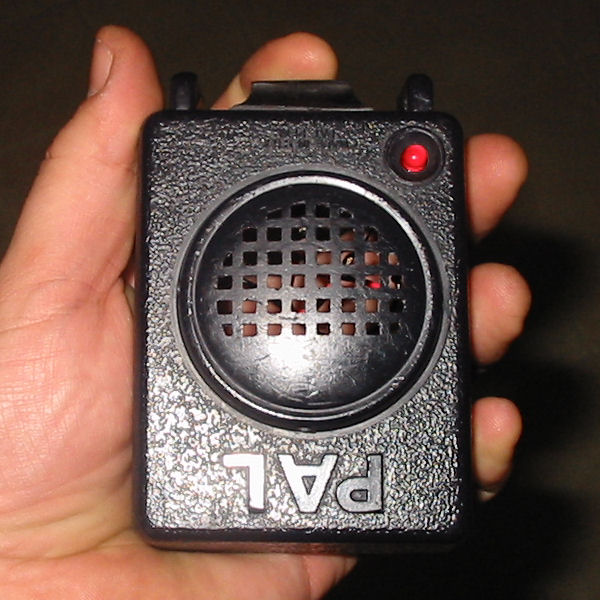
Here it is lit up - the flash washed it out pretty badly, but I assure you that it works quite well. :lol

My next steps will be to put a little bit of black fabric behind the speaker grille, and to cut a back plate out of some sheet styrene to close the whole thing up.
Hope this helps at least a couple of people out. Feel free to ask me anything if you need a hand.
From the back, you can see the minimal parts involved. For those interested, it all came from Radio Shack to the tune of about 6 bucks:
5mm red LED, stock #276-041
Momentary contact pushbutton switch, stock #275-1566A
AAA battery holder, stock #270-398B

Not some of my best solder work, but since it was 4 small connections that aren't going to be under any real stress, I just sort of stuck it together.
The positive (red) wire goes from the battery holder to one terminal on the switch, and the positive lead of the LED (always the longer lead, known as the anode) goes to the other terminal. I used a small bit of red wire to close the gap between the LED and the switch.
The negative (black) wire goes directly to the negative lead, or cathode of the LED. Stick some batteries in and you've a complete, working circuit. Easy as pie. It's best to solder everything together, but you could do the old twist-'n'-tape method in a pinch.
The battery holder fits perfectly in the bottom cavity. I'm going to cut a small piece of foam and glue it in there just to keep it from rattling around.
On top, I just stuck the rubber button cover down with some RTV silicone sealant I had laying around. It looks like it's going to be pretty secure, but still flexible enough to let the button work unimpeded.
Here it is lit up - the flash washed it out pretty badly, but I assure you that it works quite well. :lol

My next steps will be to put a little bit of black fabric behind the speaker grille, and to cut a back plate out of some sheet styrene to close the whole thing up.
Hope this helps at least a couple of people out. Feel free to ask me anything if you need a hand.

