STEVE THE SWEDE
Sr Member
Hi all! I Can't tell you how incredible thrilled I am to finally be able to post again here on the RPF! It's been far to long and I truly missed this incredible place of so much talent! Hopefully some of you old timers still remember me, for all who don't here's a short intro. My name is Steve, I'm 39 years old, I have wife and 2 kids (8 and 5) and I live in northern Sweden. I used to call this place my second home and have had the privilege to be involved in some rather neat projects during my stay here over the years. There's been so much stuff going on in my life the last few years that I haven't been able to do anything prop or model related. The truth is that if it wasn't for Chris King, commissioning me to finish up he's latest project, a one of a kind, 3-D printed, 1/38 scale TIE Fighter, I probably would have stayed in my black non building hole!
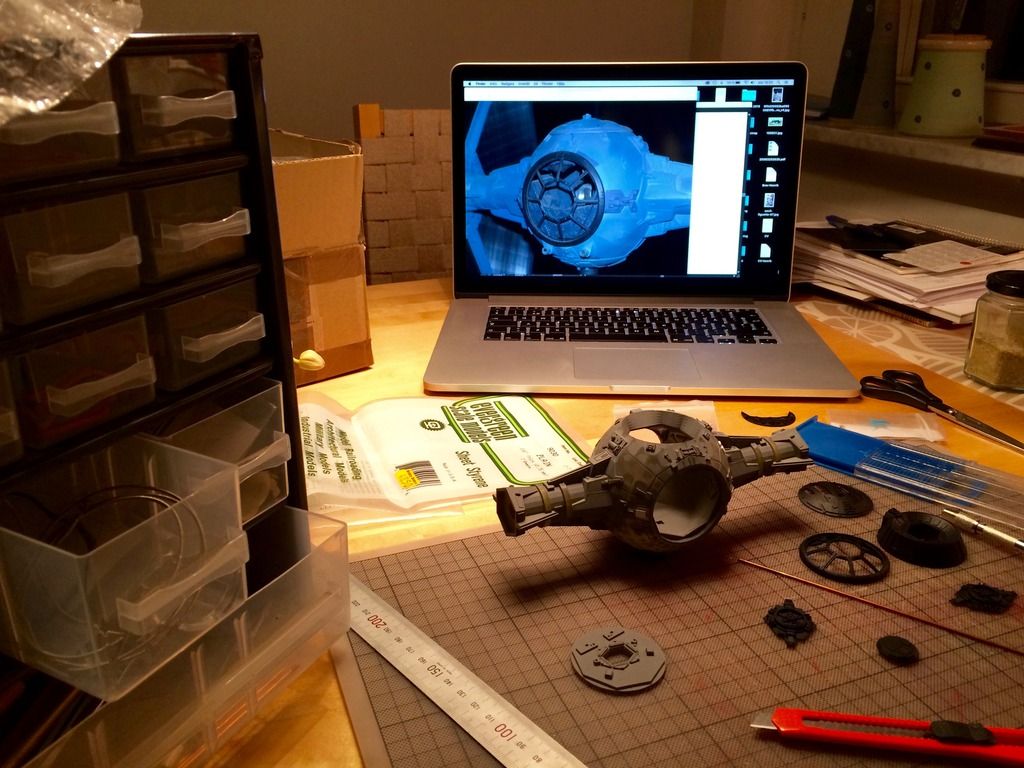
I would very much like to share the building of this unique kit with you guys! Be warned tough, I'm very rusty, everything takes double the time it used to and I no longer have access to a workshop. As a matter of fact it's a true kitchen table project as that's literally where I'm working on this. At the kitchen table!
On to the kit!
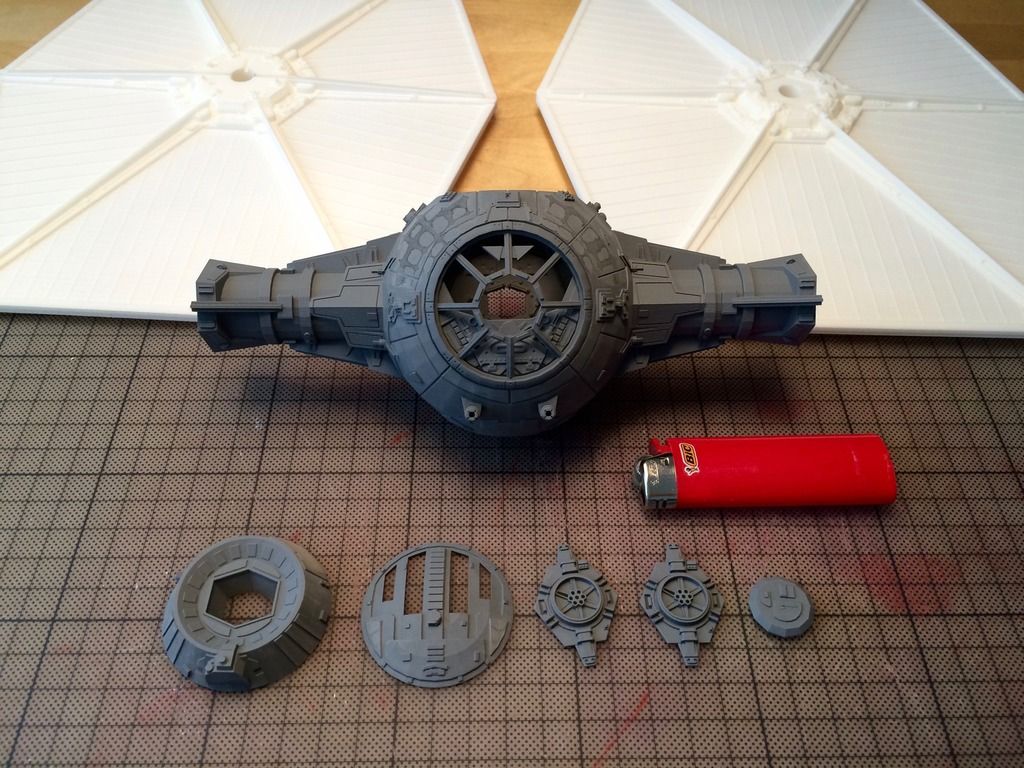
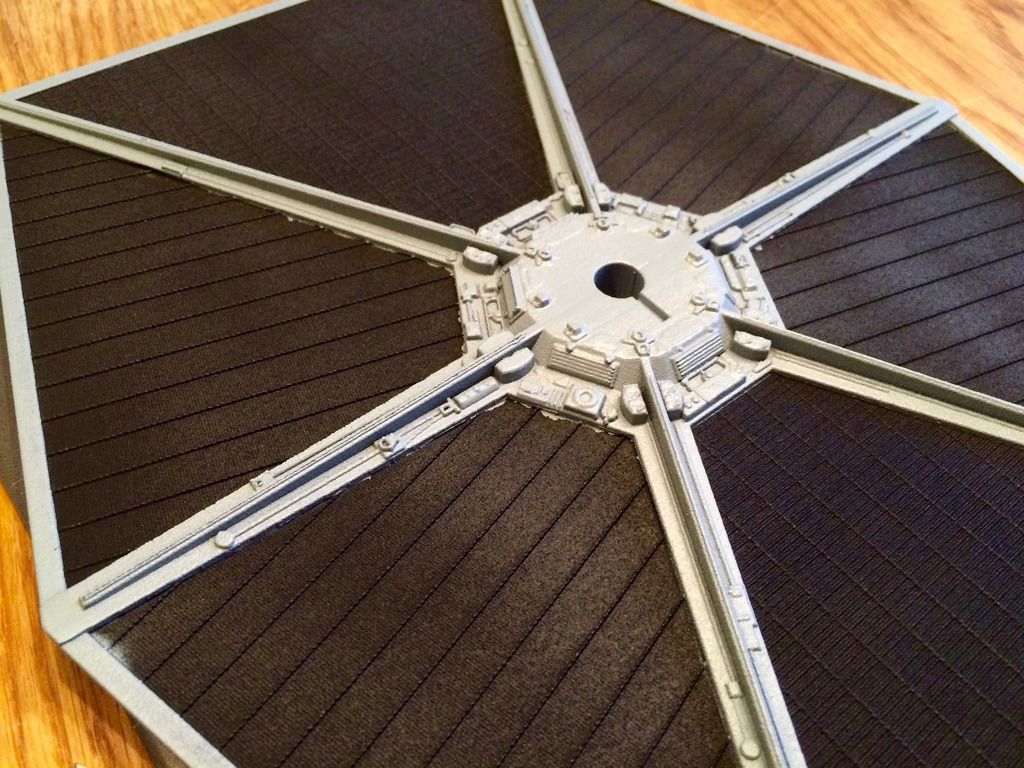
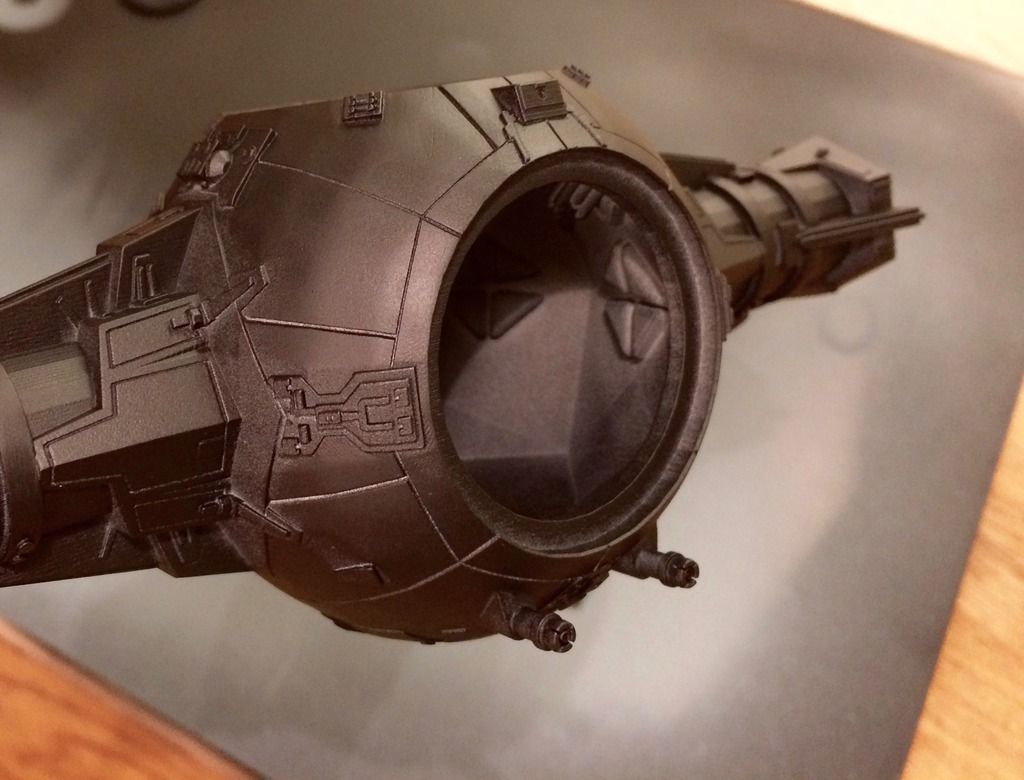
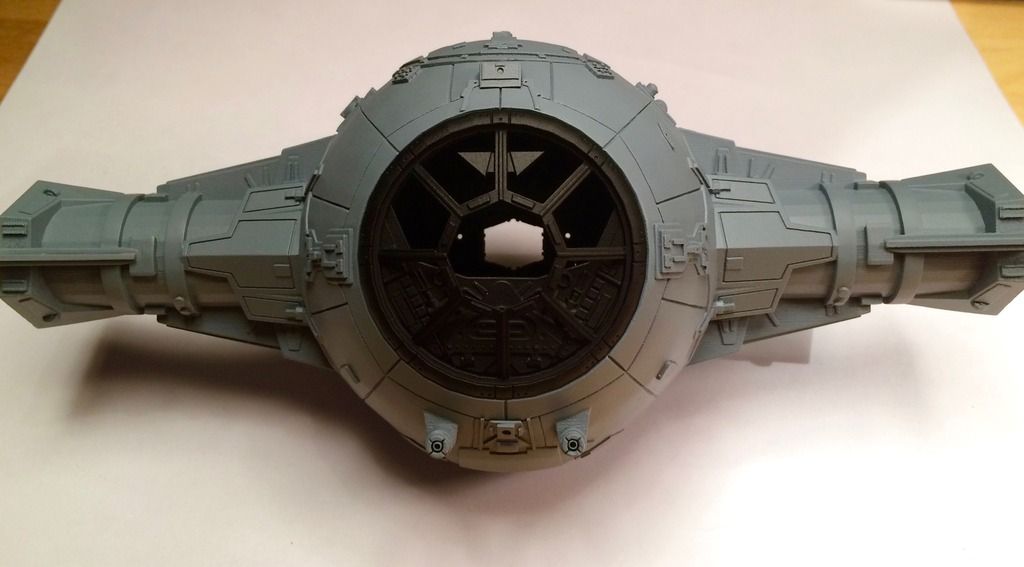
The kit came printed in two types of plastic. A sandy white flexible material for the wings and the fine transparent quality for the hull and details. The hull had already been primed by Chris which made it very easy for my to see what needed to be done. I imagine it being really difficult to pick out any details in it's original transparent form.
Due to some issues with the computer file way above my knowledge to try and explain the body print suffers from a fassett effect. I tried to reduce this with sanding sticks. It proved to be very difficult due to all the details printed into the hull. I was VERY frightened that I would destroy them by accident in the sanding process. I always knew that I would never bee able to remove it all, but I did my best to tone it down as much as I dared to. I was actually quite surprised that appart from this no other clean up was required on the print. Something I'm not used to having spent most of my time filling air bubbles on Studio Scale resin kits.
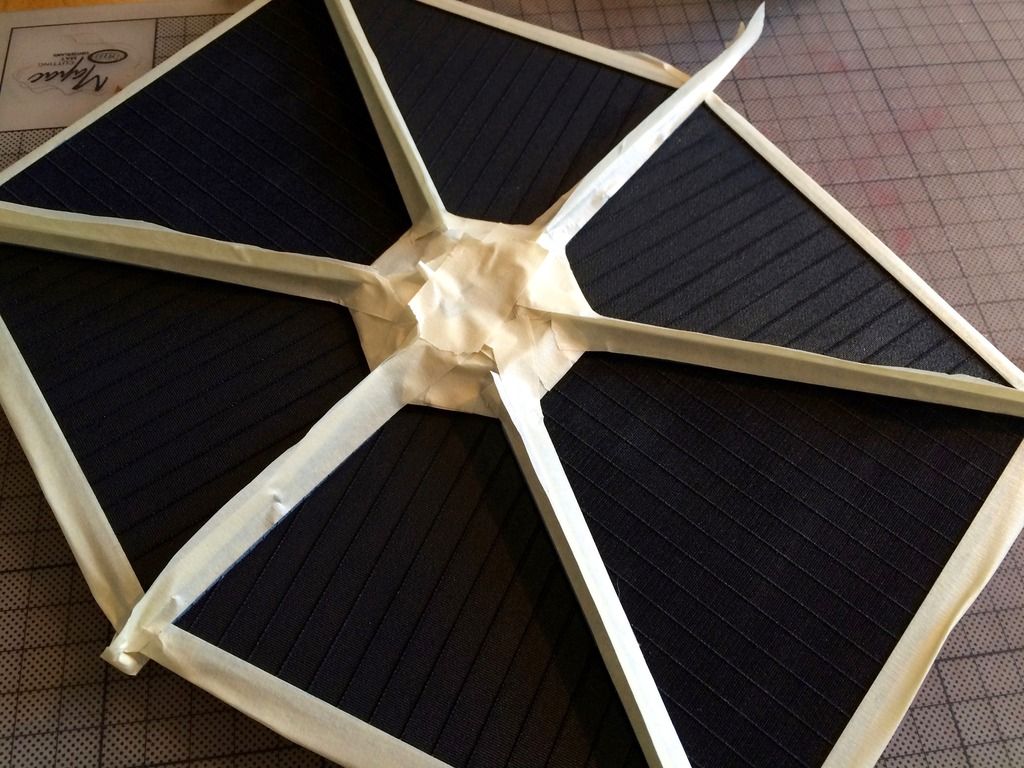
Taking a break from the hull I started on the wings. Being made from the stronger but much courser white plastic they were very different to work with. A completely different media compared to the glass like plastic used on the hull and detail parts. The transparent plastic is so brittle it'll break and snap if you just look at it the wrong way. The wings are completely different, strong and very flexible but lacks the sharp details of the hull. Since all this shapeways plastis is a completely new material for me I've decided to use Citadels Warhamer Chaos black as a primer. This stuff is just liquid gold and I always use it when I'm uncertain of the quality and characteristics of the material. This stuff bites on everything and goes on super smooth! I truly recommend it! On this build it will also dubble as Koolshade black.
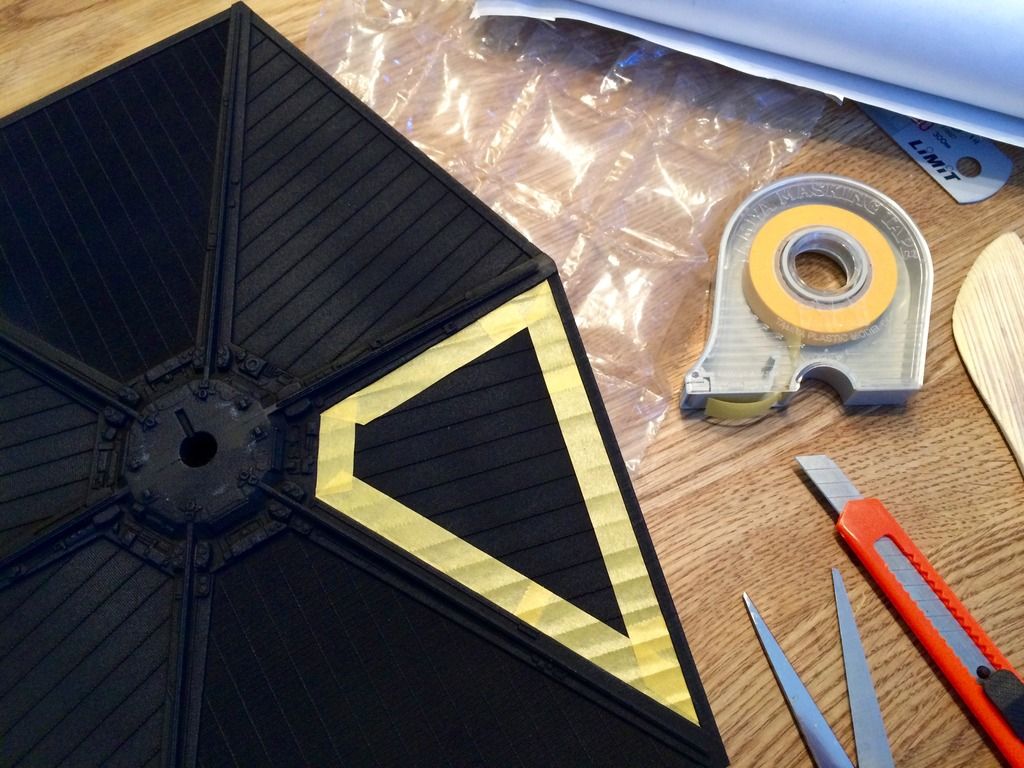
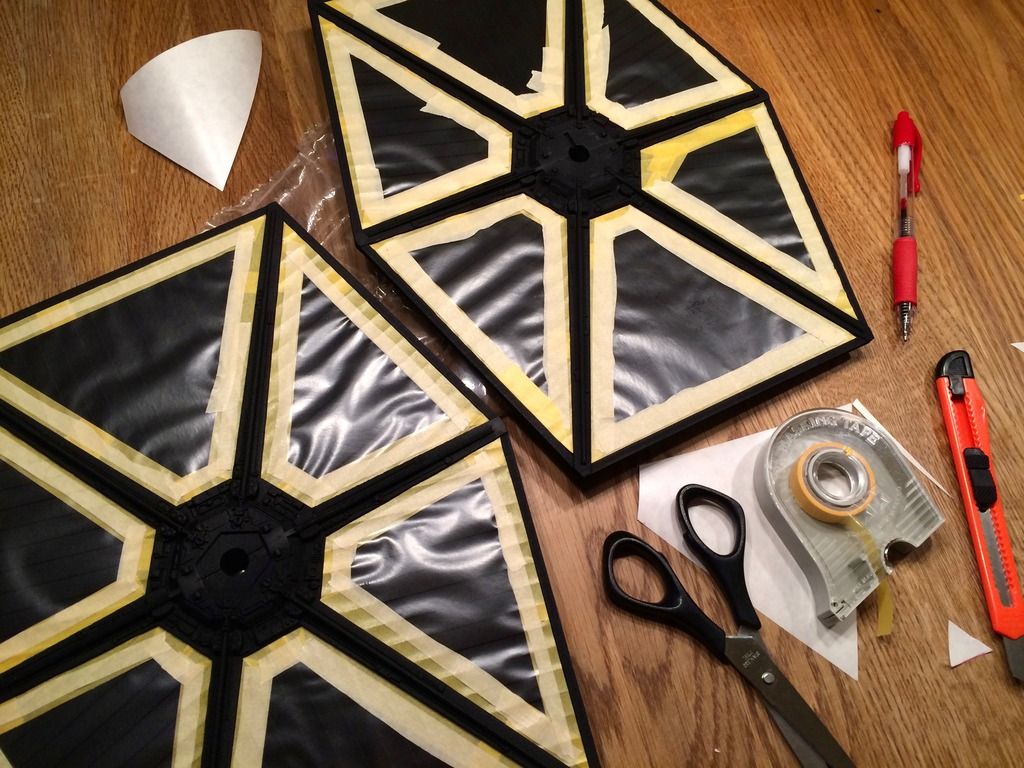
The not so fun part..... Sadly (and god knows Chris tried) Shapeways printer could never produce the stars and Koolshade material separately. Instead the wings had to be printed all together as one sandwiched layer. All of you who have built one of Niessens old SS kits knows what I'm up against! Masking TIE wings are probably what you'll be made to do in the lower levels of hell. It just takes forever. Remember that all steps have to be repeated 24 times!
5 fun filled hours later! Finally ready for the main coat. I'm using Tamiya Haze Grey for this build as it seems to be the accepted and RPF approved color for TIES.
With the masking material pealed away the final result could be seen in all it's NOT so glorious finish..... Lots of bleed thru due to the funky Koolshade texture. Hand painting with enamels where tried to even things out but with even worse result. Enough with the wings, I'll deal with them later.
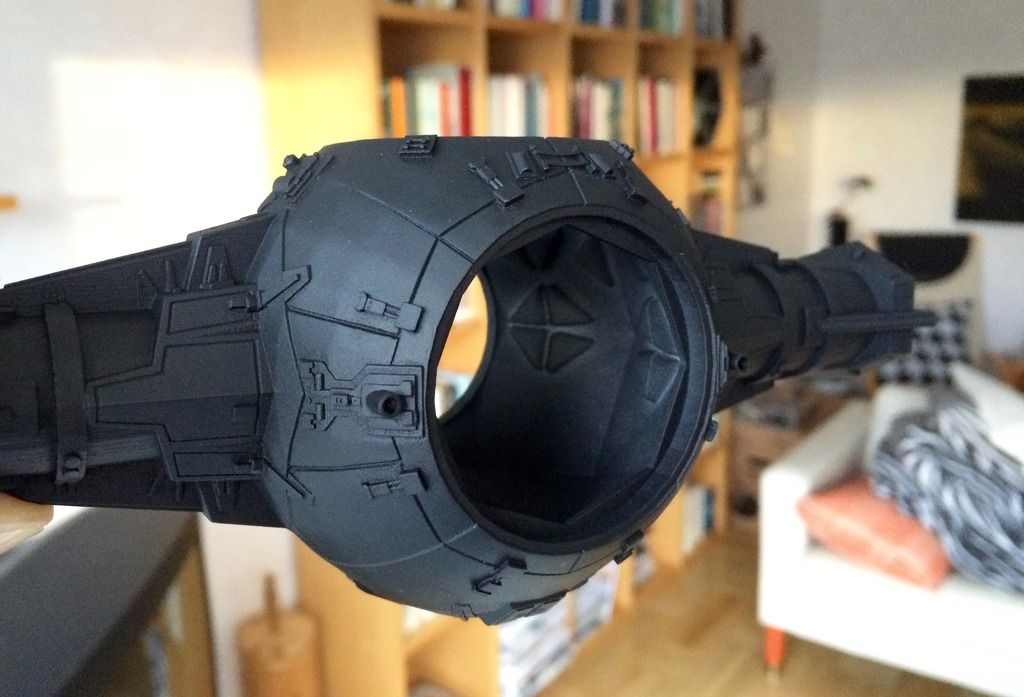
Back to the hull with a pic proving that this truly is a good ol' fashion kitchen table build! Chris and his 3-D modeller have done an absolutely AMAZING job making this model. Even more so thinking that it's a one of a kind, never meant to be made in more then one copy! However, there are some details that (fully understandable) have been missed or left out. I have offered Chris to try and replace the ones that bugged me the most.
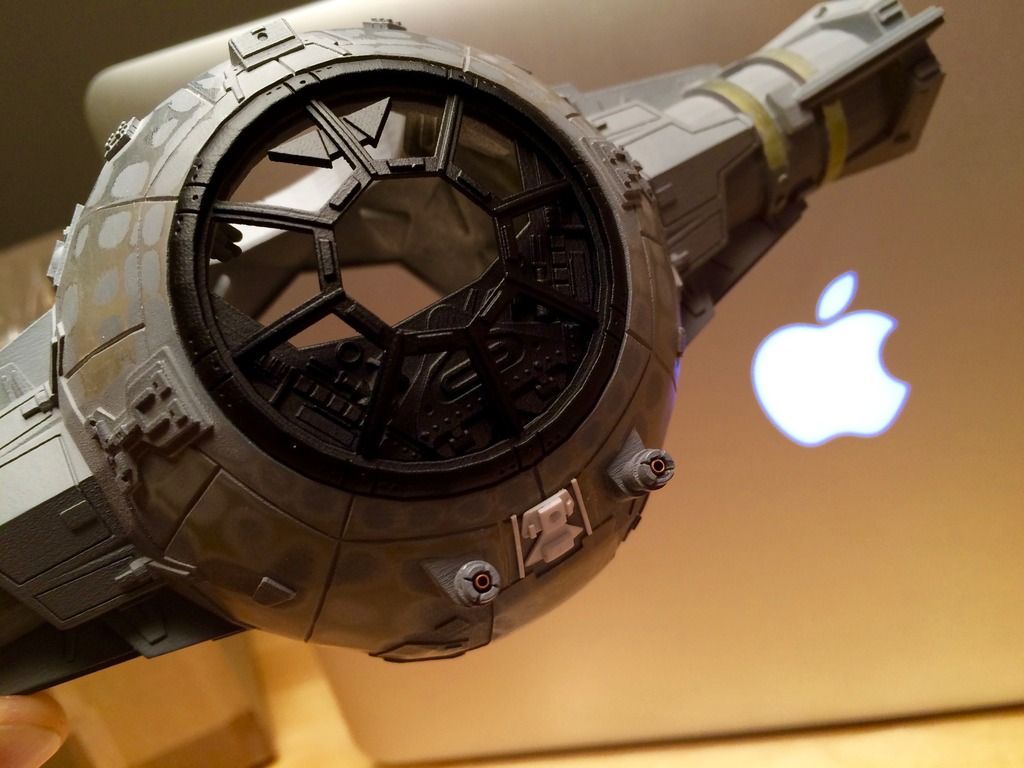
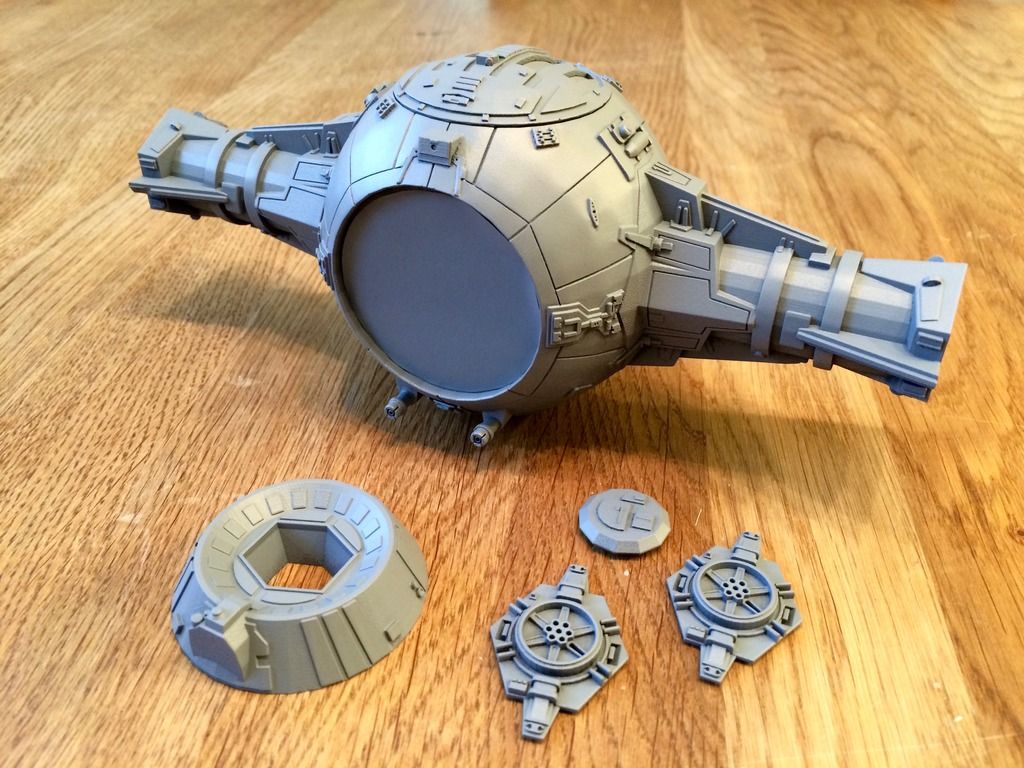
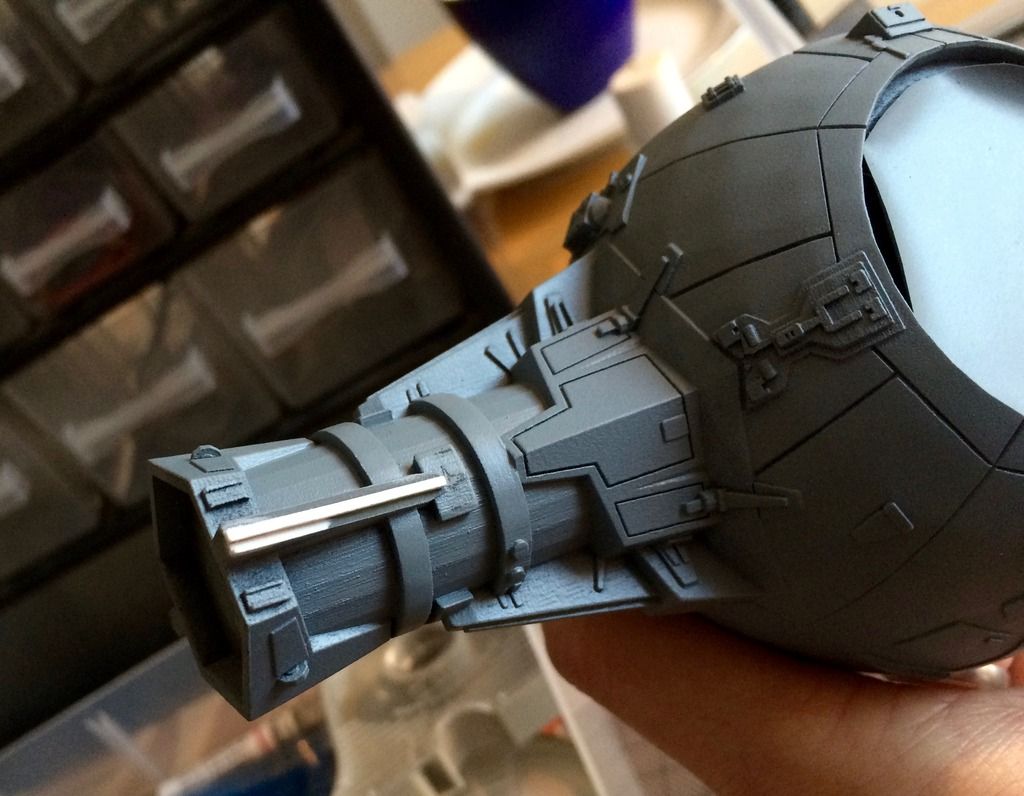
The "LASERS" have been drilled out and fitted with brass inner barrels. Since this isn't a SS model we figured we could ditch the ridiculous looking orange transparent tips and go for the barrel fitted ROTJ Interceptor look. I've also scratched the missing belly details from trusty Evergreen styrene sheets. Dry fitting the now primed canopy and dashboard, looks kind of promising!
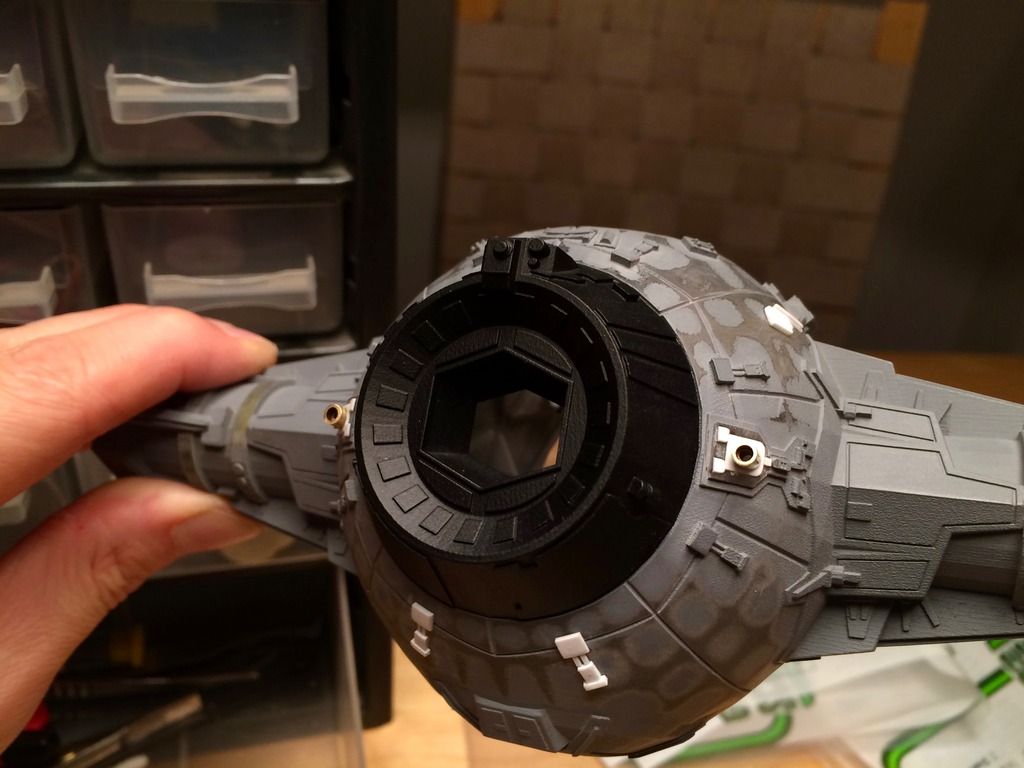
Adding more missing details scratched out of styrene sheets. I also replaced the Ion engines (I always thought they look and appeared like brake lights) with 3mm brass tubes for a more detailed look. One of them had also shattered due to me looking at it in the wrong way so there really wasn't much of a choice anyway.
Once again using Citadels black primer. Just like the original ILM built TIE's I opted for a black primer hoping it will add a pre-shade quality to the final finish. Sadly tough (or good depending how you look at it) primer shows everything you missed in prep face. To much of the original texture can be seen around certain details that was hard to reach with the sanding stick.
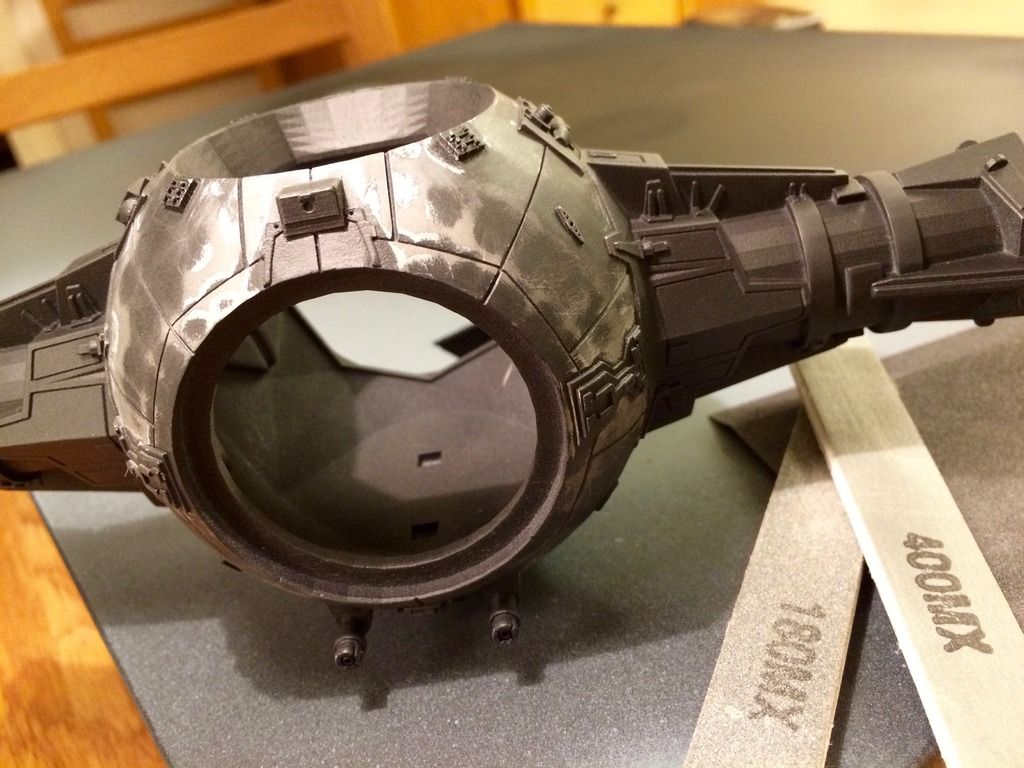
Back to sanding.....
New primer and a much better result!
Finally all covered in Haze Grey! What an amazing color, it worked so well over the black primer creating subtle shadings. Everything that's been said about Haze Grey is true. It completely changes hue depending on which light it's in. Going from a dark bluish grey to a pale light grey in sharp lighting. No wonder there's been so many opinions about how dark or light a TIE should be. Sadly tough I've apparently looked at the hull the wrong way again and shattered the end part of the left strut! The fine plastic quality sure produces fine details but it's nightmare to work with due it's tendency to shatter like glass.
Rebuilding the damaged part with Milliputty and sheet styrene. Good as new!
More Haze Grey and the hulls main coat is finally finished. Couldn't resist snapping a pic with black primed canopy and dashboard again. Am I the only one who thinks the darker ROTJ TIE's and Interceptors kicks ANH and ESB butt!? Chris, you sure you don't want to go ROTJ!?
Sigh...back to the wings. Reversed masking to add more black which will be followed by a Koolshade re-masking and more Haze Grey. This better work this time!!! On a side note I might add that these wings due to their course surface drinks paint! Believe it or not, I'm counting 3 Haze Grey cans so far on this project. I think I read it here in a thread that two was more then enough to cover a SS sized TIE.
Well, thats it for now. It's been great sharing the progress with you so far. Please check back in a week or so for more updates.
Cheers,
Steve.
I would very much like to share the building of this unique kit with you guys! Be warned tough, I'm very rusty, everything takes double the time it used to and I no longer have access to a workshop. As a matter of fact it's a true kitchen table project as that's literally where I'm working on this. At the kitchen table!
On to the kit!

The kit came printed in two types of plastic. A sandy white flexible material for the wings and the fine transparent quality for the hull and details. The hull had already been primed by Chris which made it very easy for my to see what needed to be done. I imagine it being really difficult to pick out any details in it's original transparent form.

Due to some issues with the computer file way above my knowledge to try and explain the body print suffers from a fassett effect. I tried to reduce this with sanding sticks. It proved to be very difficult due to all the details printed into the hull. I was VERY frightened that I would destroy them by accident in the sanding process. I always knew that I would never bee able to remove it all, but I did my best to tone it down as much as I dared to. I was actually quite surprised that appart from this no other clean up was required on the print. Something I'm not used to having spent most of my time filling air bubbles on Studio Scale resin kits.

Taking a break from the hull I started on the wings. Being made from the stronger but much courser white plastic they were very different to work with. A completely different media compared to the glass like plastic used on the hull and detail parts. The transparent plastic is so brittle it'll break and snap if you just look at it the wrong way. The wings are completely different, strong and very flexible but lacks the sharp details of the hull. Since all this shapeways plastis is a completely new material for me I've decided to use Citadels Warhamer Chaos black as a primer. This stuff is just liquid gold and I always use it when I'm uncertain of the quality and characteristics of the material. This stuff bites on everything and goes on super smooth! I truly recommend it! On this build it will also dubble as Koolshade black.
The not so fun part..... Sadly (and god knows Chris tried) Shapeways printer could never produce the stars and Koolshade material separately. Instead the wings had to be printed all together as one sandwiched layer. All of you who have built one of Niessens old SS kits knows what I'm up against! Masking TIE wings are probably what you'll be made to do in the lower levels of hell. It just takes forever. Remember that all steps have to be repeated 24 times!

5 fun filled hours later! Finally ready for the main coat. I'm using Tamiya Haze Grey for this build as it seems to be the accepted and RPF approved color for TIES.

With the masking material pealed away the final result could be seen in all it's NOT so glorious finish..... Lots of bleed thru due to the funky Koolshade texture. Hand painting with enamels where tried to even things out but with even worse result. Enough with the wings, I'll deal with them later.

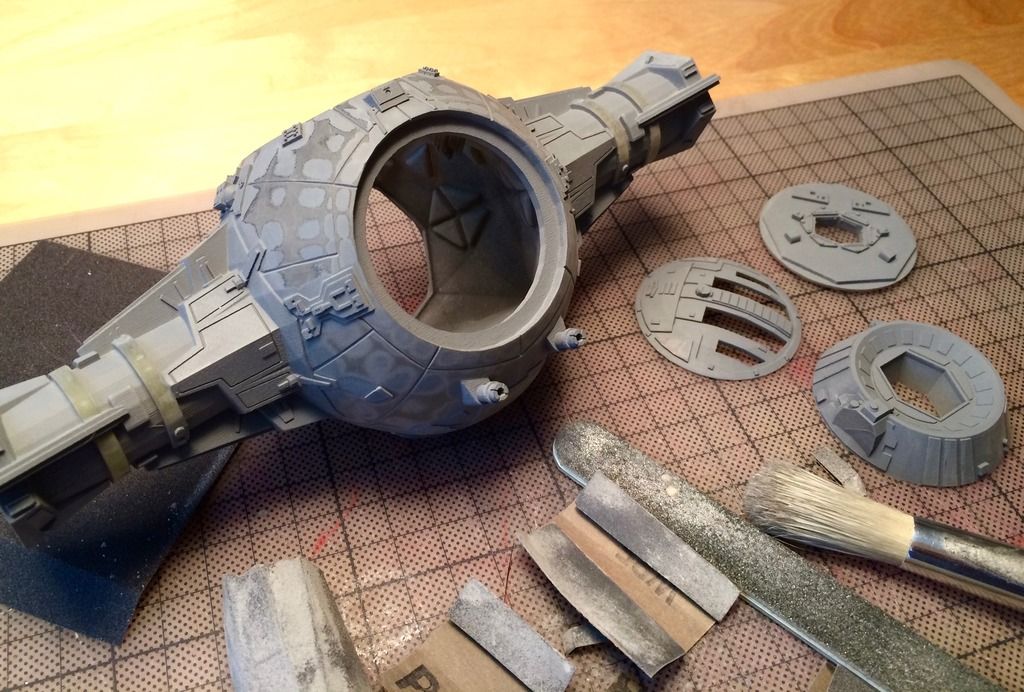
Back to the hull with a pic proving that this truly is a good ol' fashion kitchen table build! Chris and his 3-D modeller have done an absolutely AMAZING job making this model. Even more so thinking that it's a one of a kind, never meant to be made in more then one copy! However, there are some details that (fully understandable) have been missed or left out. I have offered Chris to try and replace the ones that bugged me the most.

The "LASERS" have been drilled out and fitted with brass inner barrels. Since this isn't a SS model we figured we could ditch the ridiculous looking orange transparent tips and go for the barrel fitted ROTJ Interceptor look. I've also scratched the missing belly details from trusty Evergreen styrene sheets. Dry fitting the now primed canopy and dashboard, looks kind of promising!

Adding more missing details scratched out of styrene sheets. I also replaced the Ion engines (I always thought they look and appeared like brake lights) with 3mm brass tubes for a more detailed look. One of them had also shattered due to me looking at it in the wrong way so there really wasn't much of a choice anyway.

Once again using Citadels black primer. Just like the original ILM built TIE's I opted for a black primer hoping it will add a pre-shade quality to the final finish. Sadly tough (or good depending how you look at it) primer shows everything you missed in prep face. To much of the original texture can be seen around certain details that was hard to reach with the sanding stick.

Back to sanding.....

New primer and a much better result!

Finally all covered in Haze Grey! What an amazing color, it worked so well over the black primer creating subtle shadings. Everything that's been said about Haze Grey is true. It completely changes hue depending on which light it's in. Going from a dark bluish grey to a pale light grey in sharp lighting. No wonder there's been so many opinions about how dark or light a TIE should be. Sadly tough I've apparently looked at the hull the wrong way again and shattered the end part of the left strut! The fine plastic quality sure produces fine details but it's nightmare to work with due it's tendency to shatter like glass.

Rebuilding the damaged part with Milliputty and sheet styrene. Good as new!

More Haze Grey and the hulls main coat is finally finished. Couldn't resist snapping a pic with black primed canopy and dashboard again. Am I the only one who thinks the darker ROTJ TIE's and Interceptors kicks ANH and ESB butt!? Chris, you sure you don't want to go ROTJ!?

Sigh...back to the wings. Reversed masking to add more black which will be followed by a Koolshade re-masking and more Haze Grey. This better work this time!!! On a side note I might add that these wings due to their course surface drinks paint! Believe it or not, I'm counting 3 Haze Grey cans so far on this project. I think I read it here in a thread that two was more then enough to cover a SS sized TIE.
Well, thats it for now. It's been great sharing the progress with you so far. Please check back in a week or so for more updates.
Cheers,
Steve.
Last edited: