You are using an out of date browser. It may not display this or other websites correctly.
You should upgrade or use an alternative browser.
You should upgrade or use an alternative browser.
jellis359
Jr Member
So I was checking out some of your first pictures of the handrill. Those gears don't mesh at all properly for the angle you want to use. At least that's how it looks. My 3d printed ones aren't perfect but only require a slight amount of filing to get them working. The planetary gears however require heavy amounts of filing and grease. I'm still trying to get them working fluently. Ie they work but not as smooth as I'd like. I have since assembled I'd say 80 percent of the rifle. I'll post a picture soon.
RockIt
Active Member
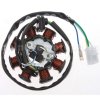
so I found out what real world item those rotors are while working on my quad. I'm an idiot for not realizing this before check it out. they are magneto generator stater coils lol
~
What's the OD on this?


")


I need to know where you got these! Doing the same project and I can't imagine it without that tube hahaSubscribed, the laser musket is the first Fallout weapon I want to build. I love the mechanical aspect of it.
If you decide to release the schematic I would be happy to try to covert it into a 3D CAD file. (Got to finish my Pip-boy first)
Have you considered cutting a glass bottle to get the tube? There are lots of guides on cutting beer bottles into drinking glasses, its the same concept.
/Edit:
A long time ago one of very first PC mods ever used these crackle lightning tubes. They are about an inch in diameter. They would work great to create the charged effect at the center of the glass tube. (Sorry for the tiny images)
View attachment 520377 View attachment 520376
jellis359
Jr Member
Okay so I didn't use a crackle tube but I found a really great cheap substitute. Its a programmable interior car lighting led strip. Its has a bunch of different flash patterns. I just placed one in the tube I made of heated and rounded lexan. I replaced the switch that came with it with a roller lever switch. Turning the crank spins a gear whose teeth hit the switch and activates the lights. Ill take pics later. The light strip is from autozone
Sent from my C811 4G using Tapatalk
Sent from my C811 4G using Tapatalk
Okay so I didn't use a crackle tube but I found a really great cheap substitute. Its a programmable interior car lighting led strip. Its has a bunch of different flash patterns. I just placed one in the tube I made of heated and rounded lexan. I replaced the switch that came with it with a roller lever switch. Turning the crank spins a gear whose teeth hit the switch and activates the lights. Ill take pics later. The light strip is from autozone
Sent from my C811 4G using Tapatalk
I've been frantically looking for crackle tubes, but to no avail.
Aces
New Member
Well it's been a while since I've given an update, but I've had some free time recently to work on the laser musket. I can't recall all of the changes and new pieces I've made, but It's more than it appears. Probably the biggest change is the stock modifications:

I still have some sanding to do, and I need to re-stain the cuts. I ended up using a saw to divide the sections up repeatedly until they were small enough to break off smoothly. These will accommodate the cogs and the capacitor tube.

With all of the holes drilled, I can now attach the trigger guard, gear holder, and side brace.

I also finished all the pieces for the barrel grip. The beveled pieces were each cut out into long strips, bent individually, and then sanded to shape. There is also an end piece which accommodates the octagonal barrel.

I decided at one point to stick to the original barrel focuses and sights, so I won't be doing Preston Garvey's anymore. These are miscellaneous plumbing pieces with a few modifications to be more accurate to the in game version.

The sight rails are copper tubing. I used the salt method to bend them, but in hind sight I should have cut them after bending, since I did end up with some kinks. The sight holder is made from a clothes hanger, since it had the perfect diameter, and the actual sight is just card stock hardened with acrylic sealant, since I don't have any sheet aluminum around. Here is most of the laser musket, held together with tape:


I won't be finishing the laser barrel until i'm done with the electronics, which will be housed inside.
Currently I've been working on the trigger. I found some extension springs which will be anchored to the stock and allow for enough travel to activate a switch.

Unfortunately I will be leaving the country for a semester, so the progress will essentially have to stop here for some time. Again.
By the way @jellis359, how did the 3d printed cogs end up working for you in the end?
I still have some sanding to do, and I need to re-stain the cuts. I ended up using a saw to divide the sections up repeatedly until they were small enough to break off smoothly. These will accommodate the cogs and the capacitor tube.
With all of the holes drilled, I can now attach the trigger guard, gear holder, and side brace.
I also finished all the pieces for the barrel grip. The beveled pieces were each cut out into long strips, bent individually, and then sanded to shape. There is also an end piece which accommodates the octagonal barrel.
I decided at one point to stick to the original barrel focuses and sights, so I won't be doing Preston Garvey's anymore. These are miscellaneous plumbing pieces with a few modifications to be more accurate to the in game version.
The sight rails are copper tubing. I used the salt method to bend them, but in hind sight I should have cut them after bending, since I did end up with some kinks. The sight holder is made from a clothes hanger, since it had the perfect diameter, and the actual sight is just card stock hardened with acrylic sealant, since I don't have any sheet aluminum around. Here is most of the laser musket, held together with tape:
I won't be finishing the laser barrel until i'm done with the electronics, which will be housed inside.
Currently I've been working on the trigger. I found some extension springs which will be anchored to the stock and allow for enough travel to activate a switch.
Unfortunately I will be leaving the country for a semester, so the progress will essentially have to stop here for some time. Again.
By the way @jellis359, how did the 3d printed cogs end up working for you in the end?
Phantomsbuilds
New Member
Hey, I'm new here, But I'm also building a laser musket, The laser musket that appears on the loading slide specifically, I forget it's exact barrel. I was wondering where to get a few parts, First of all, aces, bud, you hit me right where it hurts with that shoulder drill, Moving on. My prop is largely based on what i can scrounge together, like the middle rotating bit of the laser musket, I don't know if any of you noticed, but it's actually a chunk of an alternator, smash one open and one of those pops out. But anyways, I need a cheap way to get the emitter as I call it, but you guys call it the "laser barrel", i need one of those. I also need the gears and the fore grip. Though they won't be rotating on my particular build, I hate working with gears. I don't care about exact measurements. It just has to look the part. I'm hoping by the time i'm done, I'll be able to crank it and maybe have it charge a few capacitors, but that'd just be frosting on the cake.
Last edited:
Similar threads
- Replies
- 1
- Views
- 246
- Replies
- 12
- Views
- 1,046