You are using an out of date browser. It may not display this or other websites correctly.
You should upgrade or use an alternative browser.
You should upgrade or use an alternative browser.
ESB AT-ST
- Thread starter sjanish
- Start date
I wasn't going to say anything but I thought it was funny, too! :lol BTW, I always thought it was cool how Lee found the Lee part. :rolleyes Too immature?
Are you calling me immature? We are probably all still 11 years old at heart. Admit it, fart jokes are still funny. :lol
You're proposed Flak38 part looks close but remember that there are what appears to be weld lines on the opposite end. Also, I'm a firm believer that ILM didn't go out of their way too often to modify small parts like this. But I could be wrong.
Weld lines, or glue blobs in shadows? It seems to me ILM moded pieces all of the time. Even when there is no need. Look at the claw on the Nebelwerfer part on this same leg. Look at the 38mm Flak guns, all cut up and glued back together with the 88mm Flak part in between. Look at the vents on the rear of the 8rad pod. If you really start to think about it the list can go on for a while. Which leads me to the truck wheel rims, it probably cannot be proven, but it is not too hard to sand that lip down. The ILM model makers were artists in their own way. They didn't always do things the quick, easy way.
Your Hummel part looks almost exactly like a part in the F109. The 109 part does not sit on a flat base though. I don't know the part number, mine was loose in the kit and I haven't bothered to find it in the instructions.
I have the tanker and flatbed. I had them mixed up earlier and Julien set me straight.
joewhite
Sr Member
Oh, no, I was asking if my "Lee finding the Lee part" joke was too immature. ")
As far as the Nebelwerfer leg...are you talking about the piece of material missing from the tiny "latch" that points down? Hmmm...never noticed that.
I hear you, I guess what I mean is that I believe they wouldn't have gone out of their way for a part that appears to have no purpose other than to dress the model up. But you are right, this model is strange all around. Not ruling anything out.
Joe
Oh, no, I was asking if my "Lee finding the Lee part" joke was too immature.
I know, I was just goofing around.
Scott, I hear ya on the plastruct orders, I think both me and Lee kept them afloat this year with the probe droids, every time I ordered something I realised I needed something else, this just went on and on and on and on. I even put a big order in direct with them and thought of everything I could....cough, cough....not a chance. Its a perpetual money burner , all for a good cause though.
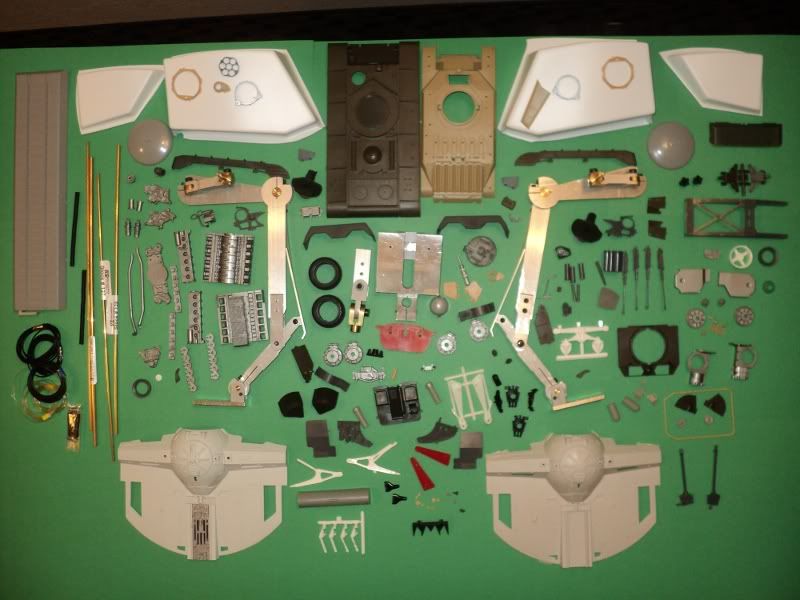
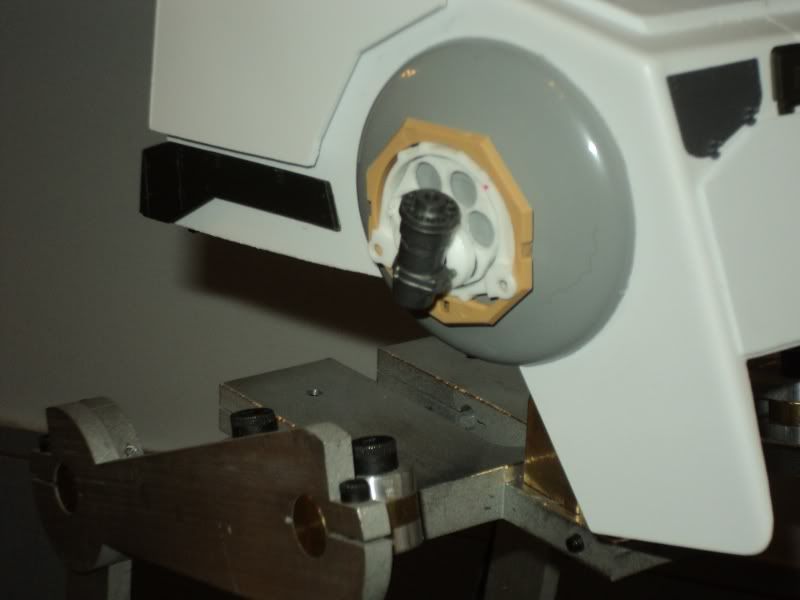
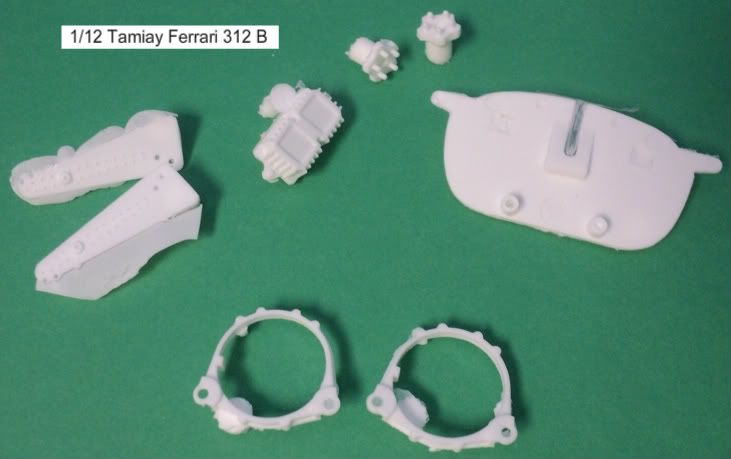
This is the same test head from post #1, it was trimmed too thin and too short. My rear head plate will not fit in it, but it will on the next set I trim. I decided to use it to test fit some kit parts before I cut a second one. All of the kit parts on it are easily removable.
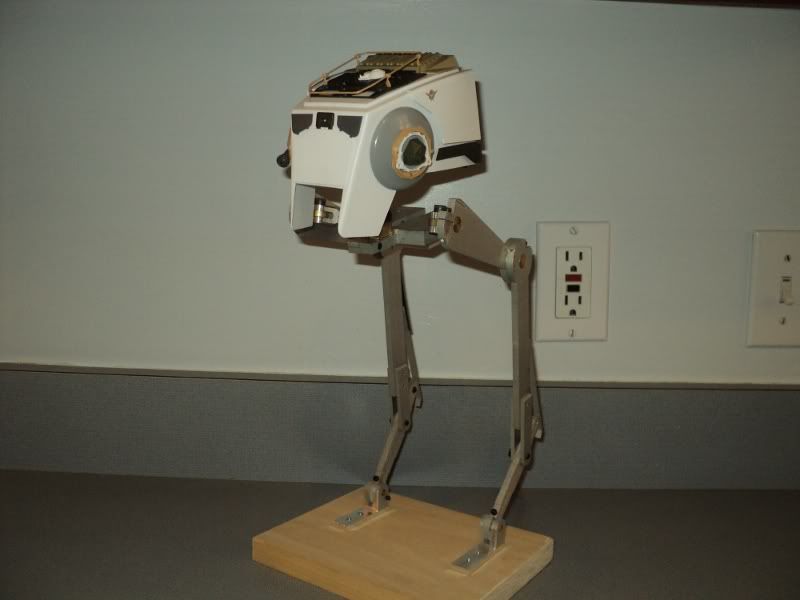
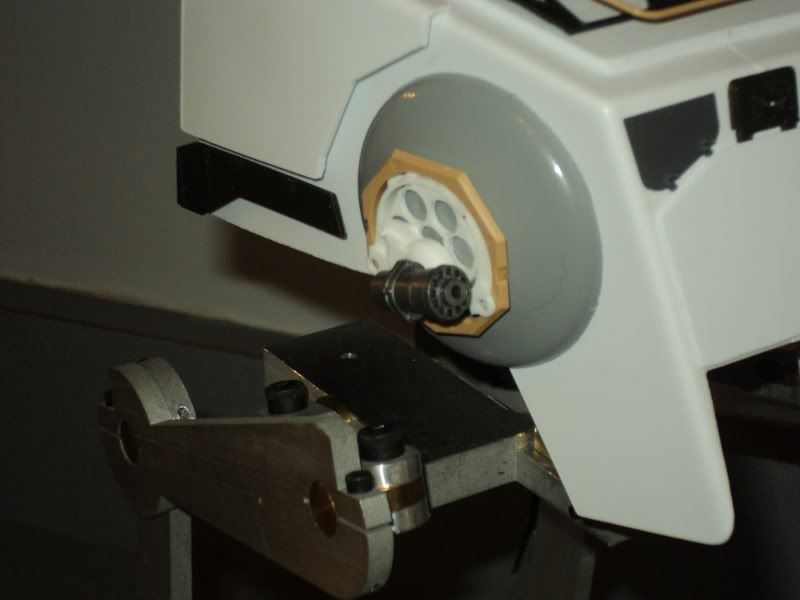
The whole right gun assembly is held on with magnets right now. It started as an 'I wonder...' but looks pretty good and allows some movement.
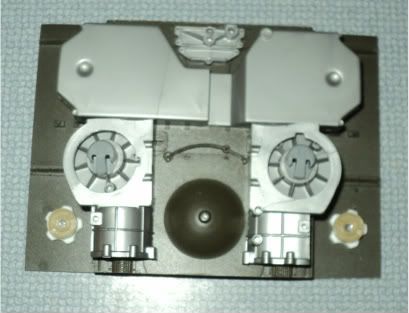
And since it seems like anyone working on an AT-ST has to do Probe Droid pods...
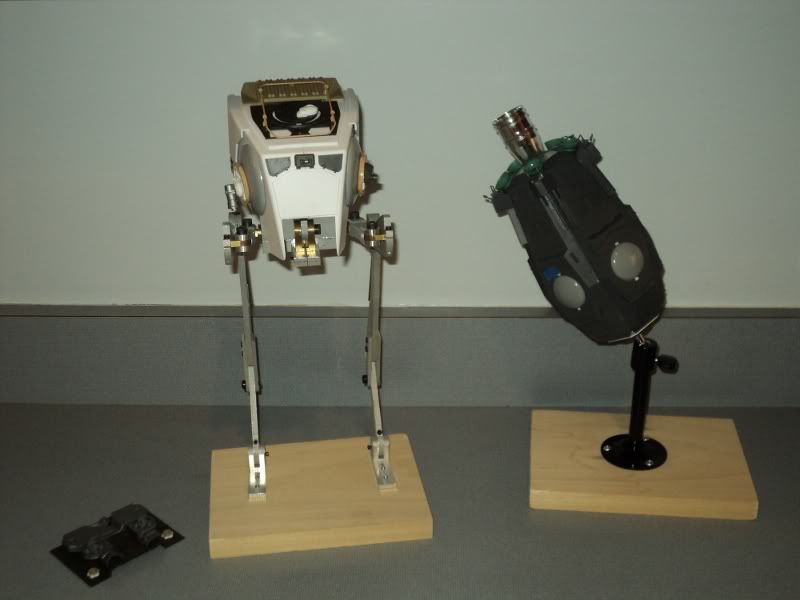
The whole right gun assembly is held on with magnets right now. It started as an 'I wonder...' but looks pretty good and allows some movement.
And since it seems like anyone working on an AT-ST has to do Probe Droid pods...
Last edited:
qcfoundry
Sr Member
Happy to see others getting their babies going.
LOVE the parts layout pic.
Pardon my memory, but did I help with your vac pulls or did you do those yourself? I feel like I sent you a set, but I didn't do "ears" by themselves.
Sad to hear the head is short...the shaping looks pretty damned good.
LOVE the parts layout pic.
Pardon my memory, but did I help with your vac pulls or did you do those yourself? I feel like I sent you a set, but I didn't do "ears" by themselves.
Sad to hear the head is short...the shaping looks pretty damned good.
qcfoundry
Sr Member
this thread was a little dusty so I had to go back and review. realized I needed to give Scott a big thank you. I cut up the B-28 part for the foot shroud. Took me a few nights of adjusting the shape just right, but think I got the shrouds just right. Oddly enough, I haven't taken any pix of them. Just wanted to thank you Scott for the find -- much happier knowing my chicken has his REAL shoes on.
QuincyHappy to see others getting their babies going.
LOVE the parts layout pic.
Pardon my memory, but did I help with your vac pulls or did you do those yourself? I feel like I sent you a set, but I didn't do "ears" by themselves.
Sad to hear the head is short...the shaping looks pretty damned good.
You did send me a set of yours, but I decided to see how my kitchen rig would measure up to the pro you used. I think the main difference was I was nicer to my bucks than he was to yours. You also did some number crunching with me. The design of my buck is heavily based on your drawings.
The shortness of the head is easily fixed by cutting up another pull. I used the wrong template when I cut this one. I designed the buck to have extra all the way around, so, don't be too sad, it will work out. I just decided to use this one to test fit the parts to see where I might want to modify the trim for next time. Plus, I wanted to take it to the prop party and didn't have much time to get it ready.
Last edited:
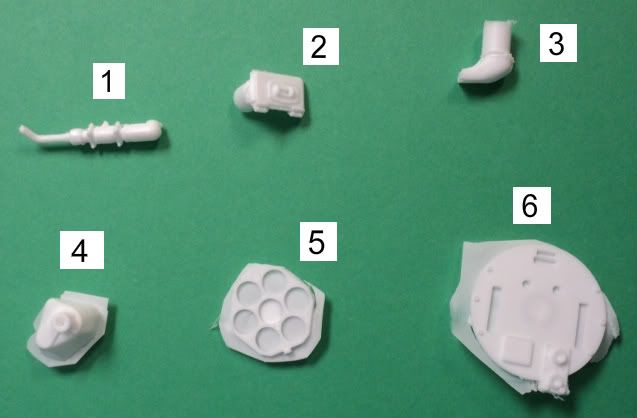
They're from the the heads rear plate, scroll up to the pic above of Scott's build and you'll see them cast in white.
Glad to see your on this again Scott and hows your build coming along Joe?
Finally I got some work done on mine tonight, nearly 4 months since I touched it.
Glad to see your on this again Scott and hows your build coming along Joe?
Finally I got some work done on mine tonight, nearly 4 months since I touched it.
joewhite
Sr Member
Cool, Guy, yeah I was on a break from it due to some other stuff. But I did manage to assemble the head plates. I messed up on the back end, though. I added 5mm to the entire back edge when it should only have been the top edge. Anyway, it's an easy fix. I'll post pics soon.
And, crap, how did I miss those 312B on the back!?! Thanks for setting me straight!
BTW, I cut my top head plate...the one that the M5A1 part sits on....out of .060" sheet. Is this correct? I've seen some that look like .080".
Joe
And, crap, how did I miss those 312B on the back!?! Thanks for setting me straight!
BTW, I cut my top head plate...the one that the M5A1 part sits on....out of .060" sheet. Is this correct? I've seen some that look like .080".
Joe
Joe, see the thread about the North Texas Prop Party in the main forum. It is in the Fort Worth area at Philip Wise's (aka Rebelscum) work shop. Bring stuff to display and/or just geek out. It would be cool to have another Studio Scaler, there are only a couple of us.
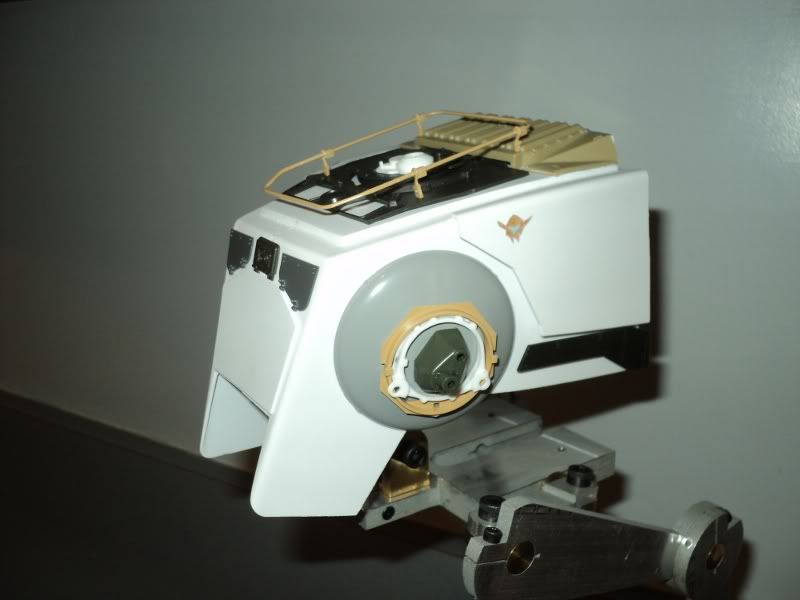
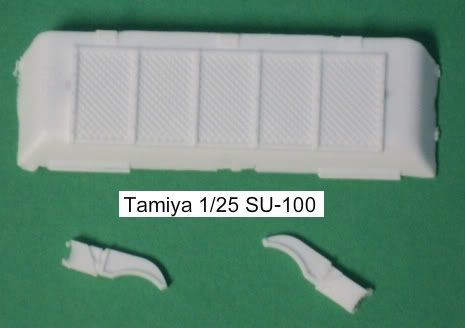
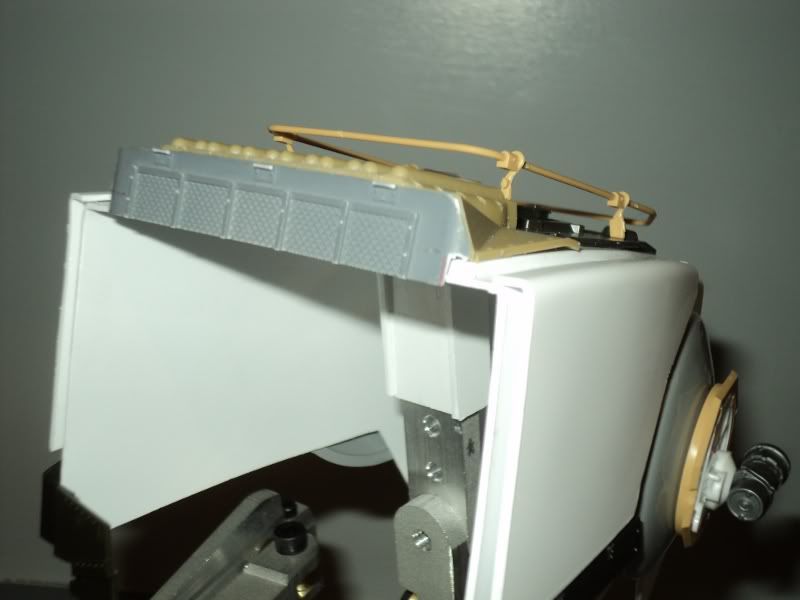
Here is my top plate made out of .08. I am pretty sure I cut the Su-100 grill correctly according to reference and it fits nicely to the Matilda part. Notice that the bottom of the Su-100 part should sit flat on top of the vac'ed formed head, but mine goes below it. I have test fit it onto a flat .1 sheet and it looks right. I am going to try out a .1 plate on my next head. I would love to hear any other opinions on this.
Here is my top plate made out of .08. I am pretty sure I cut the Su-100 grill correctly according to reference and it fits nicely to the Matilda part. Notice that the bottom of the Su-100 part should sit flat on top of the vac'ed formed head, but mine goes below it. I have test fit it onto a flat .1 sheet and it looks right. I am going to try out a .1 plate on my next head. I would love to hear any other opinions on this.
I was working on the left side gun and maybe discovered a "new" part. Allan used the half of the Italeri Nebelwerfer that was left over from the left gun pod for the two tubes under the brass chin guns. He plugged the holes with the same 88mm Flak tubes used on the left gun.
I noticed that the other half of the main Nebelwerfer body wouldn't need the holes plugged. I did a little measuring/math. It looks pretty good to my eye and the numbers line up well enough to make me pretty sure. It just feels right.
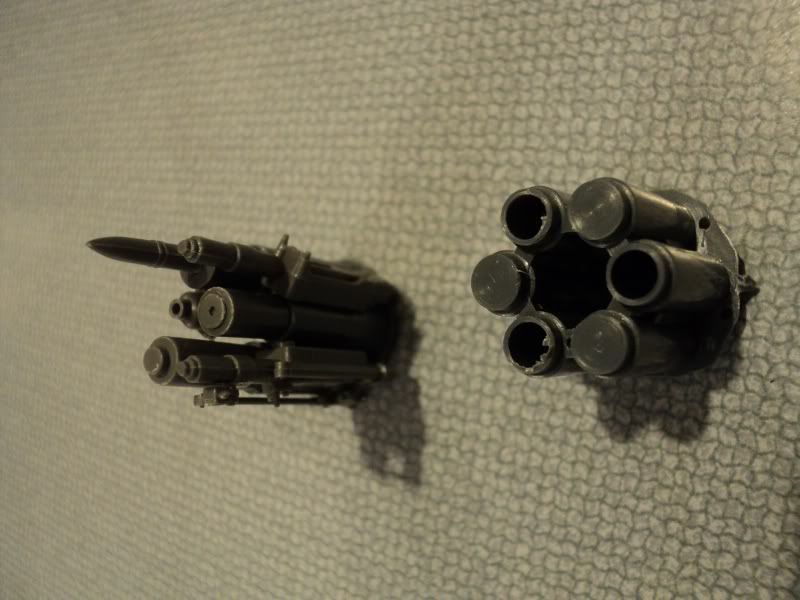
I noticed that the other half of the main Nebelwerfer body wouldn't need the holes plugged. I did a little measuring/math. It looks pretty good to my eye and the numbers line up well enough to make me pretty sure. It just feels right.
joewhite
Sr Member
Joe, see the thread about the North Texas Prop Party in the main forum. It is in the Fort Worth area at Philip Wise's (aka Rebelscum) work shop. Bring stuff to display and/or just geek out. It would be cool to have another Studio Scaler, there are only a couple of us.
Here is my top plate made out of .08. I am pretty sure I cut the Su-100 grill correctly according to reference and it fits nicely to the Matilda part. Notice that the bottom of the Su-100 part should sit flat on top of the vac'ed formed head, but mine goes below it. I have test fit it onto a flat .1 sheet and it looks right. I am going to try out a .1 plate on my next head. I would love to hear any other opinions on this.
Scott,
Cool, I'll have to look into the NTParty thing. I'm moving later this year but it'll be to Wichita Falls....still only 2 from DFW. Plus I'm in FW often since I've got a bunch of family there.
As for the SU-100 grill. Thinking about how I want to build this area has been bugging me.
First, I took some measurements of the ref pics using the parts around the top plate. According to my calcs, the top plate should be .060". Someone correct me if I am wrong. I can't imagine it going past .080"...the donor parts would look too thin-if you get my drift.
Also, I noticed that your SU-100 part is just a tad to tall. the long horizontal cut should be 7.3mm below the top edge of the grill border. Or if you count the grill diamonds....5 whole diamonds, bottom of the last. I think this will bring you above the head sheet. If I am looking at it correctly, your SU part is 1.3mm too long.
LMK what you think.
Joe
Similar threads
- Replies
- 17
- Views
- 1,535
- Replies
- 10
- Views
- 1,655
- Replies
- 8
- Views
- 3,753
- Replies
- 108
- Views
- 13,896