CHROMIUMDIOXIDE
Active Member
what are people using to attack front foot spikes? I see small metal plated tip. Is this made or avail. at shops?
what are people using to attack front foot spikes? I see small metal plated tip. Is this made or avail. at shops?
The metal plate on the boot tip? That's part of the Alpinestars boot. I guess you'd need something different for the total custom boots.
yeah, ordering the motor cowboys and they don't have 'em.
the gulf spikes are mounted on metal toe caps. scroll back to one of magpie's posts. it shows on his bootsI think this person is mistaking the Alpinestars metal boot tips for the golf spikes, if we're still talking about Snake's glider boots. If you listen to the Russell/Carpenter commentary on the EFNY special edition, Kurt mentions "those golf spikes" when he kicks Harry Dean Stanton's character to the wall.
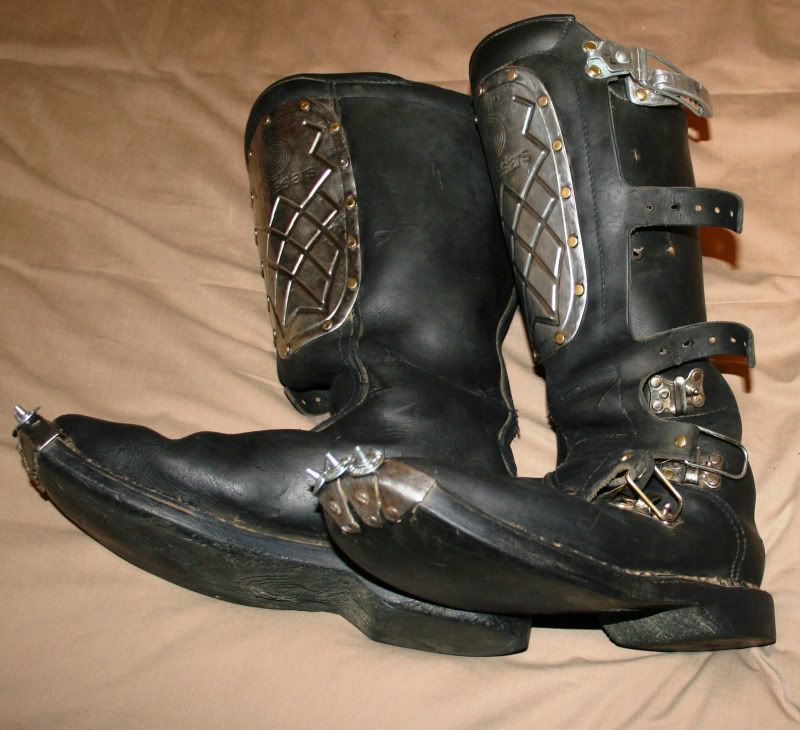
Thought I'd post up some progress of my boots real quick. I decided to go in a slightly different direction with the part of the buckle that holds the cable bale since these will never be 100% accurate anyhow, what with being made from Alpinestars in the first place. So the top 3 bales will be held by those steel swivels and the lower 2 by the old belt bits folded over and riveted.
Everything is just held together by cheap brass brads at the moment before I make anything permanent.
You can see my problem area with the rivets holding the original 2 bottom buckles on. Anything I can do short of busting out a cutting wheel and really hoping I don't slip?
Stellar work on those buckles so gat! I'm glad to see we have a Snake bootlover's community here!
What are you going to do for the kneepads? I have a decent source up in Canada!
Spy
new approach! so... CAN NOT afford $700 steel plates and could but don't want to spend $400 for a sculpture and mold to be made and a resin set SO... i etched the shin plate design into a surprisingly strong and rigid piece of 1/4 in pvc sheet, using a dremel with base attachment. i am fully confident that this thickness of pvc will withstand any impact this boot might encounter. once i cut out the rough shape, i'm going to heat it up and slightly curve it. then add a raised edge. paint flat black and use some pewter and silver rub n' buff to color them.
this is the first one, done free hand. i thought the first would be just a test, but it came out good enough to use.
will continue to post pics as i continue. thoughts???
So, another sleepless night since there's a party going on down the street.
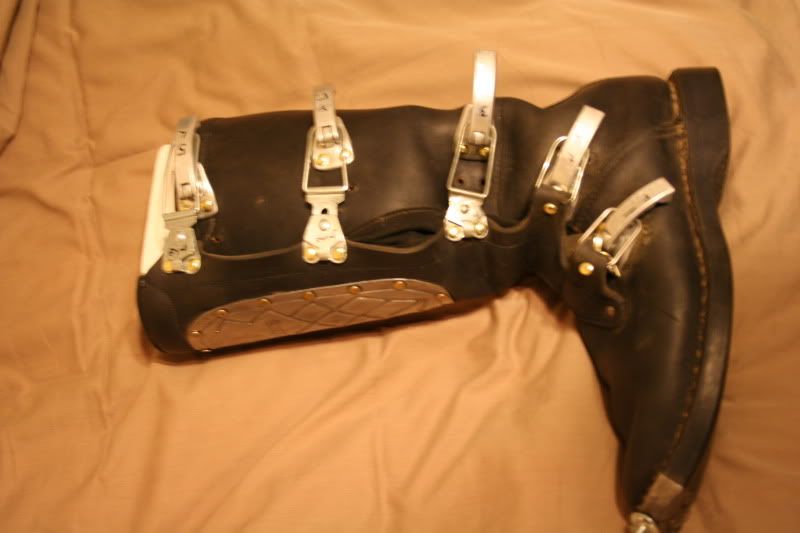
For the lower buckles I just drilled out the rivets from the front very carefully. Scratched up the original buckles a bit but got lucky and didn't scuff the boots much.
Basic mockup of the left boot done. Might switch the bales of the 5 and 3 or the 5 and 4 for a tighter fit without having to drill new holes for the buckles.