Westies14
Master Member
I'm building an organic, convincing dromaeosaur (velociraptor, deinonychus, utahraptor, etc) costume. Here are the attributes I'm aiming for:
Before I show my early progress, here are some of the images that got me on the paths I'm taking:

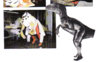
This is a scale sculpture that Stan Winston Studios did while trying to plan a walking suit for the first Jurassic Park movie - that's a mini John Rosengrant hunched over in the belly. He'd look out through hidden spots in the neck, and my build is designed to hopefully fit in the same way.

This image is more early work done by Stan Winston Studios for JP1. The early suit prototype on the left shows some of their construction methods - their final suit involved a full-scale clay sculpture of the dinosaur, from which foam latex skins would be created in a large oven and a core would be pulled. This would be far too expensive and time-consuming for me, but I have some alternate methods that I think will yield convincing (and less expensive) results- without building a dino-sized oven!

This is a much larger dino than I'm working on, but I intend to have a layer of carved upholstery foam musculature on my build. It will provide some nice flexible, soft shaping on top of my fiberglass pieces and help to bridge them aesthetically under the skin. Most of the skin (aside from the detail-rich head, arms, and feet) will be made from lycra. In places, I'll combine that with a layer of the thin packing sheet foam, but in other places it will be glued directly to the upholstery foam muscles. Some of the natural lycra folds will be utilized as it wraps around sections, but some deeper folds will be carved into the upholstery foam before the spandex skin is glued down.
I've found several different spandex products with a reptile print. Some are just dye-printed, 2D - but others use a varnish to enhance the scaling patterns. The varnished shapes should pick up paint a bit differently than the uncoated fabric, so it will still enhance the look of the skin even after I've painted the patterns and textures in:

As indicated above, I can't afford the time or expense of tackling this in the most proper way - a lifecast of myself crouched over used as an armature for a full clay dino sculpt from which a skin and a core are created to make the suit. My build will be part sculpting/molding and part fabrication. It may not be ideal, but for this one-off I'm kind of building the core first. I trust my eye enough to work in this direction, but I can't help but wonder if I'm creating some difficult adjustments to make down the road... We shall see!
First, we took photos of myself standing (for scale) and then crouching in the suit's necessary position. I used several overlays to come up with a template for my suit over my measurements, and set off to work!

I need fiberglass shells for the main body/hull (with the base of the tail and base of the neck attached), the skull, the jaw, and possibly some panels of the neck or the whole neck form cut into a spiral as SWS has done. To create these forms, I'd be carving the life-sized creature from EPS foam. I'll fiberglass the smooth shape when it's finished, then hollow the foam out from my shells. Whatever can't be easily hollowed can be dissolved from the fiberglass using acetone.
I bought 18 2"x24"x8' foam insulation panels from Home Depot - eight feet by two feet by three feet of foam:

I had to adhere all of those sheets together into one big carving block, but it's very difficult to find a suitable glue for this application. Not only do most spray adhesives contain acetone, which dissolves the foam on contact, but most non-spray adhesives cure too thick, hard, or gummy to cut consistently with the foam material itself - especially if you're using hot wire carving tools. I had read that 3M's Super77 spray was good for the foam, but I guess they've changed their formulation since that recommendation was posted. It now contains acetone. I didn't want to wait for a few $25 dollar cans of Super78 (supposedly their foam adhesive replacement) to arrive via ground shipping, so I looked locally and found a pump spray glue called E6000 at Michael's. It's also expensive - about $10 bucks a bottle - but it's latex-based, acetone-free, and local. When I run out of something local, as I did with this glue - I can go grab more of it. The glue instructs you to coat both sides and then mate the parts. They should also instruct you to wait til those sides get tacky before joining them. I had some issues with wet glue inside my block when I began carving. After joining a layer to the stack, I'd put some composite boards and a heavy steel plate from my bending brake on the pile to keep them solidly together:

Once I had my solid block, I mapped out the 1:1 grid from my template and copied my dino silhouette to the block:

I ended up angling my dinosaur within the block to get the most out of the foam form. The angled line going down from the hip to the chest is "level."

Having a 2' foot wide hot wire bow cutter would be amazing - I could keep it level/perpendicular and just trace the outline in three perspectives to get a really close starting blockout to work with. Having only handsaws and small hot wire tools, I'm hacking away at the block and recreating the template markings here and there as I work. It's very important to keep re-establishing the center line and to trust it. It's easy to work one side more heavily than another and have your mind adjust where it'd place it to keep things in (incorrect) balance.


Most people, myself included, would opt for a solid block over a multi-laminate block like this, but I've found some advantages to this method! Especially when trying to form something symmetrical, it's nice to be able to reference the layers of height or the contours as the line between boards wraps around your form. It's like having a one-axis wireframe reference built in!

And here's where he is now:

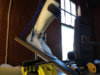
I'm about to go brave the triple-digit temps and get some more work in on him! In the meantime, here's a quick peek at the prototype digitigrade stilts in progress - I hope to be able to wear them with the suit for at least short bits of time:

They've actually come a ways since that shot. If I just can't manage them with the suit, the length of the legs should work with a lesser heel/costume boot - but these would be awesome.
And here are some crocodile eyes I received, but I'm not entirely sold on using them yet:

I'll add more to the thread as I build! Thanks for reading.
- Doug
- 6' foot tall dinosaur
- Concealed wearer - no visible human legs
- Fiberglass underskeleton/forms
- Upholstery foam musculature
- Cast latex or polyfoam face, arms, and feet
- Foam and reptile skin varnished spandex skin glued to foam/frame, painted
- Articulated head, jaws, eyes (blinking)
Before I show my early progress, here are some of the images that got me on the paths I'm taking:
This is a scale sculpture that Stan Winston Studios did while trying to plan a walking suit for the first Jurassic Park movie - that's a mini John Rosengrant hunched over in the belly. He'd look out through hidden spots in the neck, and my build is designed to hopefully fit in the same way.
This image is more early work done by Stan Winston Studios for JP1. The early suit prototype on the left shows some of their construction methods - their final suit involved a full-scale clay sculpture of the dinosaur, from which foam latex skins would be created in a large oven and a core would be pulled. This would be far too expensive and time-consuming for me, but I have some alternate methods that I think will yield convincing (and less expensive) results- without building a dino-sized oven!
This is a much larger dino than I'm working on, but I intend to have a layer of carved upholstery foam musculature on my build. It will provide some nice flexible, soft shaping on top of my fiberglass pieces and help to bridge them aesthetically under the skin. Most of the skin (aside from the detail-rich head, arms, and feet) will be made from lycra. In places, I'll combine that with a layer of the thin packing sheet foam, but in other places it will be glued directly to the upholstery foam muscles. Some of the natural lycra folds will be utilized as it wraps around sections, but some deeper folds will be carved into the upholstery foam before the spandex skin is glued down.
I've found several different spandex products with a reptile print. Some are just dye-printed, 2D - but others use a varnish to enhance the scaling patterns. The varnished shapes should pick up paint a bit differently than the uncoated fabric, so it will still enhance the look of the skin even after I've painted the patterns and textures in:
As indicated above, I can't afford the time or expense of tackling this in the most proper way - a lifecast of myself crouched over used as an armature for a full clay dino sculpt from which a skin and a core are created to make the suit. My build will be part sculpting/molding and part fabrication. It may not be ideal, but for this one-off I'm kind of building the core first. I trust my eye enough to work in this direction, but I can't help but wonder if I'm creating some difficult adjustments to make down the road... We shall see!
First, we took photos of myself standing (for scale) and then crouching in the suit's necessary position. I used several overlays to come up with a template for my suit over my measurements, and set off to work!
I need fiberglass shells for the main body/hull (with the base of the tail and base of the neck attached), the skull, the jaw, and possibly some panels of the neck or the whole neck form cut into a spiral as SWS has done. To create these forms, I'd be carving the life-sized creature from EPS foam. I'll fiberglass the smooth shape when it's finished, then hollow the foam out from my shells. Whatever can't be easily hollowed can be dissolved from the fiberglass using acetone.
I bought 18 2"x24"x8' foam insulation panels from Home Depot - eight feet by two feet by three feet of foam:
I had to adhere all of those sheets together into one big carving block, but it's very difficult to find a suitable glue for this application. Not only do most spray adhesives contain acetone, which dissolves the foam on contact, but most non-spray adhesives cure too thick, hard, or gummy to cut consistently with the foam material itself - especially if you're using hot wire carving tools. I had read that 3M's Super77 spray was good for the foam, but I guess they've changed their formulation since that recommendation was posted. It now contains acetone. I didn't want to wait for a few $25 dollar cans of Super78 (supposedly their foam adhesive replacement) to arrive via ground shipping, so I looked locally and found a pump spray glue called E6000 at Michael's. It's also expensive - about $10 bucks a bottle - but it's latex-based, acetone-free, and local. When I run out of something local, as I did with this glue - I can go grab more of it. The glue instructs you to coat both sides and then mate the parts. They should also instruct you to wait til those sides get tacky before joining them. I had some issues with wet glue inside my block when I began carving. After joining a layer to the stack, I'd put some composite boards and a heavy steel plate from my bending brake on the pile to keep them solidly together:
Once I had my solid block, I mapped out the 1:1 grid from my template and copied my dino silhouette to the block:
I ended up angling my dinosaur within the block to get the most out of the foam form. The angled line going down from the hip to the chest is "level."
Having a 2' foot wide hot wire bow cutter would be amazing - I could keep it level/perpendicular and just trace the outline in three perspectives to get a really close starting blockout to work with. Having only handsaws and small hot wire tools, I'm hacking away at the block and recreating the template markings here and there as I work. It's very important to keep re-establishing the center line and to trust it. It's easy to work one side more heavily than another and have your mind adjust where it'd place it to keep things in (incorrect) balance.
Most people, myself included, would opt for a solid block over a multi-laminate block like this, but I've found some advantages to this method! Especially when trying to form something symmetrical, it's nice to be able to reference the layers of height or the contours as the line between boards wraps around your form. It's like having a one-axis wireframe reference built in!
And here's where he is now:
I'm about to go brave the triple-digit temps and get some more work in on him! In the meantime, here's a quick peek at the prototype digitigrade stilts in progress - I hope to be able to wear them with the suit for at least short bits of time:
They've actually come a ways since that shot. If I just can't manage them with the suit, the length of the legs should work with a lesser heel/costume boot - but these would be awesome.
And here are some crocodile eyes I received, but I'm not entirely sold on using them yet:
- Doug
Attachments

Last edited:

")
