[DONE] Shriek - Villain from Batman Beyond

Re: [WIP] Shriek - Sound Villain from Batman Beyond

Lots of paint work in process, which is tough now that daylight savings time is over and it is dark when I get home from work!

I am using this build to experiment with different types of paint, as well as different applications of Plasti-Dip, primer, and paint. For example, I am testing out a "primer+paint" option from Krylon on my upper arm pieces, after hitting them with just 2 coats of Plasti-Dip. But I should mention that there are certain parts of the armor that the Plasti-Dip never reached, due to how the armor was laid out on the table. The paint is covering just fine on the Plasti-dipped parts, but not so much on the other parts. I'll probably need a couple extra coats in those areas.

What I've learned so far is that an even coat of Plasti-Dip will save me some time paining, and I can probably skip doing separate layers of primer and paint, since the combined one seems to do just fine. (Granted, this for foam. Were I working on metal or resin, I would be doing separate coats so that I could wet sand between layers.)

Here's just some of the stuff I worked on in the past two days, first is the plastic domes (from the light fixtures that will become the hand sound generators), primed and wet sanded. I should note that I took some fine sand paper to the very smooth surface of the dome first, and I do not regret it. I think the paint would not have stuck as well had I sprayed it without any pre-treatment.
IMG_20151102_203544_056.jpg

Over the past 2 days, I...
-Applied 2 coats of Plasti-Dip to every piece (4 hour drying time for each application, black for the claws which had to be done one side at a time, clear on everything else)
-Applied a coat of primer to all the hard plastic parts (domes, outer edge of chest piece, and visible part of hand generators)
-Applied a coat of gloss gray to the domes (gloss black to come tomorrow)
-Applied one coat of White to the arm bands

IMG_20151102_215110_929.jpg

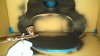
What you see on the chest piece above (upper right of the photo) is a circle of contact paper covering up the light so that it does not get painted over. Contact paper is the stuff you might buy to line a shelf or a drawer, with one adhesive side. It is really useful for making custom masking shapes, such that simple painters tape would make far more difficult. I'll post a picture tomorrow of how I am using it on the domes.
 
Re: [WIP] Shriek - Sound Villain from Batman Beyond

This looks awesome, Vox. I love Batman Beyond and it's great to see someone tackle less prominent characters in the Batman-o-sphere. Can't wait to see the final result.
 
Re: [WIP] Shriek - Sound Villain from Batman Beyond

Thanks to the unseasonably warm few days we've had in Chicago, I was able to finish all of the spray painting! I'll have pics of everything closer to the weekend, since most of it is drying right now. And let's face it, most of it was spraying white paint on white foam armor, which doesn't make for very interesting before-and-after photos. However, I did want to show you guys who I did the sound generators.

After spraying the domes gray (see previous post) I meticulously cut out the masking needed before spraying the black. It was a long process between the measuring, careful cutting, and even more careful placement.

IMG_20151103_200054_201.jpg

I sprayed 2 coats of black on those and on the chest piece, then carefully removed the masking...

IMG_20151104_183723_131.jpg

They are not perfect. Thanks to the steepness of the curve, there were some ripples in the masking and some black paint got underneath, so I may have to go back retouch that all up if my perfectionism gets the better of me. Also, if I could redo it, I would have chosen a lighter, more metallic silver for the gray parts. But as it is, I'm very glad with how they came out!
 
Re: [WIP] Shriek - Sound Villain from Batman Beyond

As promised, here's a few more photos.

First the bad news: foam flexes, paint doesn't. the chest rim fits over the light fixture pretty snugly, which means it expanded just a bit while fitting it on there, thus cracking the paint. :( I have some fine paint brushes, so I am first going to try touching up the cracks with acrylic paint to see if that makes them less noticeable (I have already had similar paint-fissure problems on some of the arm pieces and the claws). If the touch ups don't work, well... thank goodness foam is cheap, and I may try using my local makerspace's paint booth with a more flexible paint (e.g. Krylon Fusion, vs. the Krylon Ultra Maxx and ColorMaster that I used this time).

IMG_20151105_180458_189.jpg

I couldn't let that get me down, though. I placed the chest and hand details to get an idea of how they look, and I am pretty happy with the result. Again, nothing has been glued yet, because I will be doing touch-ups, but I placed things to make sure it all fits.

IMG_20151105_180053_512.jpg

When I was originally spraying the claws here with Plasti-Dip, they were blowing all over the place because they were so small and light. I was able to fix that with a bit of painters tape rolled up and attached to the back. Spray, let dry, flip to other side and move tape to that side, repeat. No more flying claws!

IMG_20151105_180201_122.jpg

Thanks to everyone who has been following this build! It's been a ball so far, and I will continue to update this thread as assembly continues.
 
Re: [WIP] Shriek - Sound Villain from Batman Beyond

This is amazing! So great to see the Batman Beyond series getting some love, easily my favourite animated Batman series! Well done!
 
Re: [WIP] Shriek - Sound Villain from Batman Beyond

This build is looking fantastic, can't wait to see more. Wishing you the best of luck on your progress.
 
Re: [WIP] Shriek - Sound Villain from Batman Beyond

This is amazing! So great to see the Batman Beyond series getting some love, easily my favourite animated Batman series! Well done!

Thanks so much! I agree: the series has some GREAT characters that just do not get enough exposure.

This build is looking fantastic, can't wait to see more. Wishing you the best of luck on your progress.

Thanks WireFox! I am definitely going to need the luck.


I'll preface this update by saying I believe in a transparent process. This is a community that helps one another, and I have learned much from seeing people outline their mistakes. Now it is my turn, unfortunately.

As I said: the wonderful thing about foam is that it flexes easily, and therefore forms easily. But spray paint from a rattle can does not! On a piece that won't flex that much, such as chest or back armor, this isn't such a problem. But my design requires a little more give/motion. This was the result:

IMG_20151110_081128_220.jpg

Not exactly pretty. Unfortunately I had to scrap nearly all the armor. But I am not discouraged! I ordered nearly double the amount of foam I needed for just such a problem, and already have all new pieces cut out. I'll find a few hours this weekend or next week to hit the workshop and bevel them all.

Once again, I have to thank Bill Doran of Punished Props for his sage advice. He recommended using acrylic leather paints because they are made to flex, with an airbrush. Thus, a relatively affordable airbrush and air compressor have been added to my holiday wish list. I'll also be building a collapsible spray booth so that I can spray indoors over the winter. Thankfully, the airbrush means minimal fumes, so I'll only have to focus on containing the spray mist.

Setbacks happen. But C2E2 isn't until the end of March, which gives me 4 months to get this done (PLENTY of time). Updates will probably be put on hold from now until after the new year (since any progress I make before then will just be a redo of stuff I've shown already). Once I get to painting again, I'll post some new stuff.

Thanks for all the support, everyone! I, too, am excited to see this finished, the right way this time.
 
Re: [WIP] Shriek - Sound Villain from Batman Beyond

Almost a full 2 months off, but I now have a new set of armor, an air compressor, and 2 airbrushes (1 large capacity and 1 small). BACK IN BUSINESS!

I have also figured out my lighting situation for the palm emitters! As seen in my earlier post, the 4 LEDs made for a rather undesirable visual appearance with the initial model. So I ordered a small sheet of tinted visor film (usually used for Halo helmets).

I took this:
IMG_20160113_205820_670.jpg

...took it apart and traced out a piece of film to fit inline with the base of the dome...

IMG_20160113_210039_898.jpg

...and put it back together. It definitely diffused the 4 separate LEDs. Unfortunately though, the filtered light was pretty dull, and a deeper shade than the chest and helmet...

IMG_20160113_210623_712.jpg

Back to the store! I found a different set of moon lights that look exactly the same from the outside, but inside only have a single small LED bulb in the center. Not as energy efficient, but I hoped it would give me a different appearance.

So I took the acrylic disc I had initially cut out...

IMG_20160113_210114_392.jpg

...and put it into the single bulb moon light.

IMG_20160113_210421_816.jpg

It's not perfect, but it is much brighter than the LED+film solution, and with the single light source it doesn't look so bad. Thankfully the R&D for this part was pretty cheap (moon lights are about $5 or $6 a pair).

If I can figure out a way to heat form the acrylic to the approximate shape of the dome that comes standard with the moon lights, I think that would ultimately give me the diffusion effect I desire. I'll keep brainstorming on that and any other alternatives, but for now it feels good to have found a viable solution.
 
Re: [WIP] Shriek - Sound Villain from Batman Beyond

I did a little painting tonight. Just used regular acrylic black to paint the inside of the helmet. I taped the electronics to the visor to keep them out of the way and will glue them in place once the paint has dried. I started with a fine tip brush to get the perimeter and around the visor, so that I could be detailed as well as careful to avoid spots that were to remain unpainted. Then I used a sponge brush to relatively quickly fill in the rest.
IMG_20160114_205437_814.jpgIMG_20160114_215800_849.jpg

I also did some testing of the leather paint on a scrap piece of foam. The only prep work I did on it was blast it with a heat gun for a few seconds. In the first shot, it is white paint on white foam but you can see how much I am bending the foam with out any cracking (yay!). The second shot shows the metallic silver (which will be used on the chest detail) next to the black. These are just single coat tests, applied with a brush, purely to measure the resistance to cracking.

IMG_20160114_211403_275.jpgIMG_20160114_211422_339.jpg

I was actually pleasantly surprised with how evenly a light coat could be spread with a brush. I will apply a few more coats to the test piece with a brush over the weekend. If I can keep the evenness consistent (i.e. get full coverage without any visible brush strokes) I may forgo the airbrush method because that will save me having to build a decent sized paint booth.

Stay tuned!

IMG_20160114_205437_814.jpg


IMG_20160114_215800_849.jpg


IMG_20160114_211403_275.jpg


IMG_20160114_211422_339.jpg
 
Re: [WIP] Shriek - Sound Villain from Batman Beyond

I'm kinda in the same boat with painting. I was thinking I could use a refrigerator box or PVC frame with a box fan to blow the air out a window so I could spraypaint, but I'm not sure.

Brushing on the paint thin seems to work pretty good like you mentioned, but the hardest part for me is staying patient, moving slow, and consistently applying it thin. I keep wanting to slap on more paint so I can move faster, but then of course, brush strokes start showing up.

And good job on the light dome. That attention to detail is what's kept this costume looking so professional.

Good luck.
 
Re: [WIP] Shriek - Sound Villain from Batman Beyond

Update!

I realized my forearm armor wasn't going to do too well without a bottom. In a test fit, it was rotating too much on my forearm to maintain the right silhouette, so I cut a base to put on it to help with the cohesion of the whole look.

IMG_20160121_214236_216.jpg

And the painting of the arm armor is complete. 2 light coats on both the black and white seems to be enough to get full coverage. All I have left to do on these pieces is a layer of finisher (Satin for the exterior, matte for the interior). The process was slower than I would have liked, but the results were great. Patience is going to be the name of the game going forward.

IMG_20160121_223830_754.jpg
 
Re: [WIP] Shriek - Sound Villain from Batman Beyond

I thought about doing a black one-piece suit to try to achieve the same look from the cartoon. However, the animation style renders the humans with non-realistic proportions, and I concluded it would look weird. Instead, since I am already modifying the look for real-world application, I will be wearing a black compression shirt under the armor, with the black pants and black combat boots from my Red Hood build, pictured below.

Boots RPF.jpgPants.jpg


My progress this week unfortunately does not have a lot to show, as I have spent the time figuring out:
-How certain pieces are going to fit together
-How to rig the speaker in the "glove" so that I can fit my hand in, it still puts out sound while keeping the speaker low-profile, and I can access the batteries to change them out.
-How to do the above and be able to access the batteries for the light.
-What orientation to fit the acrylic in the palm lights so as not to mess with the push-on-off switch unnecessarily
-In what order I need to assemble and paint the hand to ensure maximum efficiency with minimal problems

I'm sure I'm forgetting a couple things there, but you can see what I've been doing. My table is quite full of stuff at the moment!

Boots RPF.jpg


Pants.jpg


IMG_20160126_222517_457.jpg
 
Re: [WIP] Shriek - Villain from Batman Beyond

I swear, the only thing more meticulous than painting is prepping a piece to be painted. There's nothing like ripping 3/4" tape down the middle so that you can accurately mask out the complex curves of your piece...

IMG_20160128_223635_149.jpg

But after a LOT of blue tape and some paper to cover the larger areas, the arm guards are ready for the bottoms to be painted black. The interior will be painted black as well with a brush, so I only needed to mask off the top and the rims.

IMG_20160128_223557_466.jpg

The last thing I did tonight was assemble both the palm lights. They still need to be fitted into the gloves (after painting), but I don't have to worry about changing them any more.

IMG_20160128_224610_994.jpg


I'm excited for this weekend: barring any unexpected interruptions, I should be firing up airbrush and putting on some paint!
 
Re: [WIP] Shriek - Villain from Batman Beyond

I needed a way to mount the speaker in the palm. So I first traced the speaker into the inside of the palm. I cut a hole, slightly smaller than the speaker itself, all the way through the foam. Then I cut the full size of the speaker halfway through the foam, so that the rim of the speaker has a place to rest. Finally, I cut a swatch of a black t-shirt and super glued it to the inside of the hole, to serve as a dust protector for the speaker.

IMG_20160130_153941_484.jpgIMG_20160130_154935_759.jpgIMG_20160130_155316_593.jpgIMG_20160130_155730_019.jpgIMG_20160130_172231_546.jpg

I applied a couple of layers of black paint to the bottom of the palms with a sponge, to see what the coverage was like vs. application with a brush. I was pretty pleased with how it turned out. You can see the difference between the painted and unpainted foam here. The painted side is on the left, the unpainted (interior) side is on the right. You can see where I tested the paint on the interior of the right piece.

IMG_20160130_174330_240.jpg

Finally, I mixed up some white and black paint with a bit of the leather paint thinner in some mason jars, since those plug directly into my Critter sprayer. Hopefully it comes out beautifully tomorrow!

IMG_20160130_185710_071.jpg
 
Re: [WIP] Shriek - Villain from Batman Beyond

Painting is underway!

I "stole" an empty computer box from work, to serve as a make-shift paint booth. It doesn't eliminate all the paint mist, so I am still wearing a respirator, but it has done the job of catching and containing most of it.

IMG_20160131_135347_501.jpg

Below is a comparison shot of airbrushed paint (on the left) and paint applied with a sponge (right). There isn't much of a difference with this leather paint. The left piece is a bit streaky because that was the first piece I airbrushed and was still getting the hang of it. After another application, you can't see the streaks.

IMG_20160131_142836_368.jpg

Taping up the torso armor was a pain in the ass. Took me near 2 hours to carefully get around all of those curved edges, but I didn't want black paint anywhere that white paint was going to have to end up.

IMG_20160131_230502_982.jpg

Of course, then spraying the paint is a breeze. The first coat (below) went on in about 2 minutes, including a refill of the tiny airbrush paint cup. It needs a 2nd coat at least, maybe one more after that, but it is best to let the leather paint completely dry before additional applications.

IMG_20160201_205341_147.jpg


For this particular project, I probably could have stuck with just a simple sponge or brush application. After 2-3 coats, you couldn't see any streaks from either of those. Yes, painting with those would take much longer than the 2 minutes it took to spray the coat you see above, but when you factor in the time taken to mask the entire piece, set up the airbrush and compressor, measure and mix the paint and thinner, and then clean the airbrush afterward, I don't know if I actually saved any time for what yielded the same results. That said, I see the airbrush being a boon in the future, so I am glad I have it. Nice to know I can use both methods with leather paint!
 

Attachments

  • IMG_20160201_211916_009.jpg
    IMG_20160201_211916_009.jpg
    1.2 MB · Views: 93
Re: [WIP] Shriek - Villain from Batman Beyond
1) There isn't really a glare, thanks to the backer plate on the interior. Once I get the battery plate glued back in place (removed it to paint the inside), I'll get a picture up.
2) I'll have a picture of that in the next update. It will be buttons on the interior of the right hand piece.


Tonight I cut out and applied the masking for the chest detail...

IMG_20160203_210441_625.jpg

...and applied black paint to it, as well as a second coat to the interior of the chest piece. The masking did its job! I'll need to touch up a corner or two, but I'm glad with how well it held.

IMG_20160203_223720_844.jpg

And I super glued the lights to the palms, so that tomorrow I can glue in the sound pieces, then finally assemble the top and bottom of both hands for painting.

IMG_20160203_210441_625.jpg


IMG_20160203_223720_844.jpg


IMG_20160203_230810_810.jpg
 
Re: [WIP] Shriek - Villain from Batman Beyond

Been busy the past few days.

First off, here's a view from inside the helmet. My range of vision is actually much better than the picture implies, but I wanted to give you an idea of what sort of glare there was from the light which, as you can see, is not much.

IMG_20160204_212508_627.jpg


I successfully mounted all the wiring for the sound. The buttons, circuit board, and battery pack were mounted with hot glue, the speaker with super glue. I had to re-solder the grounding wire (black wire) because it came loose while being jostled around in the mounting. That thing isn't going anywhere now though!

IMG_20160204_212234_141.jpg

Then it was finally time to put both parts of the hands together. They went together cleanly enough.

IMG_20160208_214625_126.jpg

Those will need to get painted before I mount the top dome details. Speaking of which, those needed a fresh paint job. So I sanded everything off and...


IMG_20160208_220432_046.jpgIMG_20160209_201202_045.jpgIMG_20160209_223223_440.jpg

I like the lighter colored metallic paint a lot better than the dark grey I had originally.

Finally I unmasked the forearms and torso pieces, and I am pretty pleased with the lack of spill-over.

IMG_20160209_223003_125.jpgIMG_20160209_222918_613.jpgIMG_20160209_222949_406.jpg


One thing I DID notice was that the blue paint tape pulled up some of the surface of the armor just enough that you can see a visible line where the tape was. I'm going to go over it with 1000 grit sand paper and re-heat treat it in an attempt to even it out before I paint it.
 
Re: [WIP] Shriek - Villain from Batman Beyond

Because I was unable to mask the pieces for spray application, I've been hand painting (with a sponge and brush combination) all the pieces white. All pieces have received a two layers of white, and a 1 layer of clear satin finish for some shine and protection. However, I have very little to "show" for it! That kind of happens when you are painting white foam white... The hands have domes now, though!

IMG_20160214_213611_737.jpg


Next up:
-attaching the claws to the hand
-assembling the chest detail and mounting it on the torso armor.

My shirt arrived this past week. Once the above is done, I'll set to work mounting the snaps and straps on the armor, then it should be completed!
 
Re: [WIP] Shriek - Villain from Batman Beyond

The hands are fully complete.

IMG_20160215_224812_528.jpg

No, the claws are not perfectly spaced. But then the hand is not perfectly rounded, the domes do not perfectly line up, and they are probably going to be much warmer than I would like. Point being: the hands have easily been the most challenging and demanding part of the build, and I am just happy everything fit period. I took an extremely small brush and painted the base of the claws black, to give a little bit of dimension and hide the point where they meet.

I also attached the chest details to the torso. A preview:

IMG_20160215_224254_053-1.jpg
 
This thread is more than 7 years old.

Your message may be considered spam for the following reasons:

  1. This thread hasn't been active in some time. A new post in this thread might not contribute constructively to this discussion after so long.
If you wish to reply despite these issues, check the box below before replying.
Be aware that malicious compliance may result in more severe penalties.
Back
Top