You are using an out of date browser. It may not display this or other websites correctly.
You should upgrade or use an alternative browser.
You should upgrade or use an alternative browser.
Doctor Who: Time Agent's Vortex Manipulator *SPOILER*
- Thread starter Risu
- Start date
protokev DMD
Sr Member
i must say i rather excited about this.
Its too bad a led watch couldnt be found that could be easily gutted to install.
Its too bad a led watch couldnt be found that could be easily gutted to install.
does anyone know the THICKNESS of the circular button?
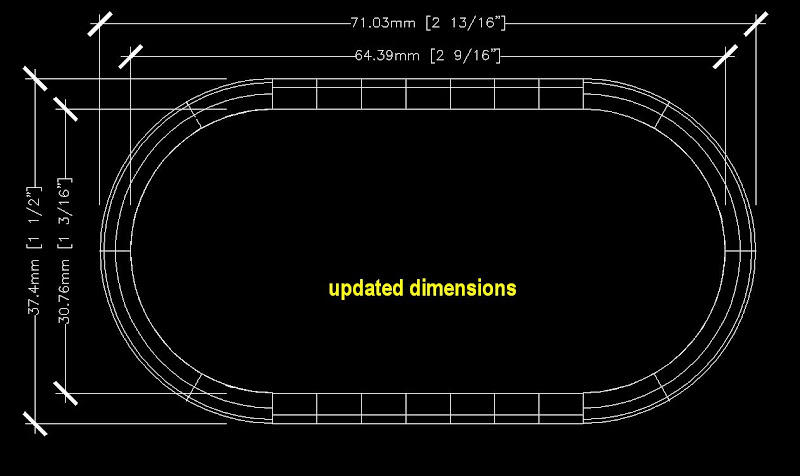
I'm planning on printing this part today or tomorrow so we can get the ball rolling.
hole through angled box added.
Zenix, that looks amazing... one thing, though:
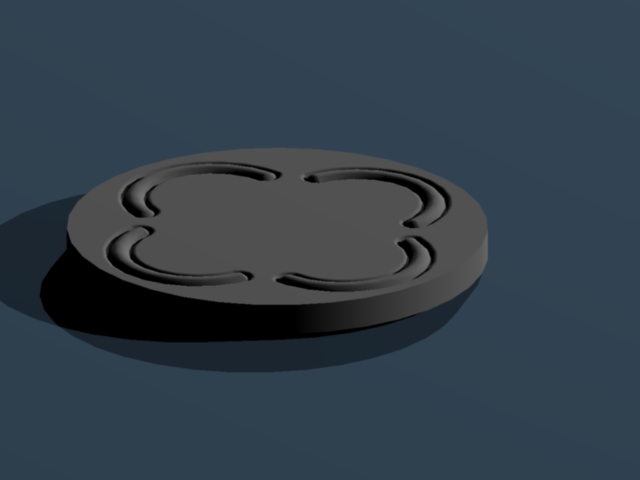
The 4 semi-circle designs on the round button appear to be raised on your model. On the Big Bang VM, they appear to be grooves rather than a relief. And then, on the Jack version, it looks from the screenshots that the shape is flush with the rest of the surface and just made by outlining the semi-circle with a groove.
I'm not 100% though. Anyone care to ring in?
The opening hole through the angled box is going to be 7.29mm x 3.75mm, so anything you can fit in there will work. That's pretty small so i doubt you'll find a mini-watch for that area you're just looking for a light, I'd say. the other hole for the round LED is 3.75mm in diameter.
Yes, currently my arcs are raised.
Yes, currently my arcs are raised.
CJ 617
Sr Member
Not bad. I'd love to see a closer shot of the inside of your cover flap and hear how it's assembled. Even if its not the same as the original it might give me some ideas.
yeh, the top cover was made by molding the piece of leather, over a piece of mdf, shaped the same as the computer, which I gave to the maker..so it would sit snug over the top (hope this makes sense) The light colour of the inside of the cover is just the original colour of the leather....
Risu
Master Member
OK, that's what I figured.
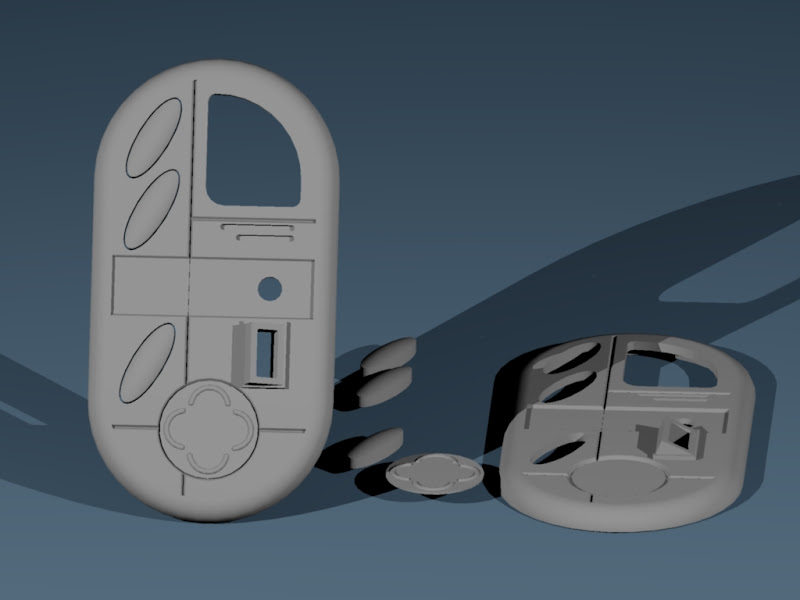
The round cell phone button is actually made of two pieces. The "arcs" are a chromed piece that rests behind the silver plastic pieces and pokes through. The silver piece has 4 curved slots cut out of it and the arcs rise up through those slots. The end result is that they're completely flat in profile, but there is a groove all the way around each arc.
The round cell phone button is actually made of two pieces. The "arcs" are a chromed piece that rests behind the silver plastic pieces and pokes through. The silver piece has 4 curved slots cut out of it and the arcs rise up through those slots. The end result is that they're completely flat in profile, but there is a groove all the way around each arc.
i don't think I'll be doing that button as two pieces. we're getting too small to have individual parts, and i dont think its a detail that matters enough for someone to care. if you want it more accurate, then buy the original phone button. I'll adjust the button to make it LOOk more like the grooved pattern as described above, but two separate parts is just not worth it. the parts will be too thin and break.
i'm adding a lip behind the three oval buttons so that they will not fall out, and will catch themselves behind the faceplate, but still be removable if you first take out the faceplate.
i'm adding a lip behind the three oval buttons so that they will not fall out, and will catch themselves behind the faceplate, but still be removable if you first take out the faceplate.
") A big thumbs up from me too......
A big thumbs up from me too......protokev DMD
Sr Member
awesome! I cant wait
everything is on its way. I'll have the buttons and faceplate at my house in < 2 weeks.
We need to discuss a price for me to sell them at, and in what material. I'll be offering it in resin as the cheapest option, cold cast nickel-silver as another, and maybe in traditional polished cast aluminum. all buttons will be original 3d printed 'masters'.
We need to discuss a price for me to sell them at, and in what material. I'll be offering it in resin as the cheapest option, cold cast nickel-silver as another, and maybe in traditional polished cast aluminum. all buttons will be original 3d printed 'masters'.
protokev DMD
Sr Member
im in at the best level whatever that may be. And i think there was a guy offering leather work in the junkyard that could do it
Dave Porter
Sr Member
Depends on the price as to which I'm up for.....or how many.
Similar threads
- Replies
- 10
- Views
- 1,891