Doctor Who: Time Agent's Vortex Manipulator *SPOILER*

Jack's buttons actually vary in color. In Journey's End, you can actually see that the silver paint has rubbed off onto the cover, leaving them black (With a speck or two of silver):

Picture4-9.png


From this angle, you can also see that the top cover snaps on BOTH sides, which explains why River's VM had no cover at all. They just unsnapped the cover.

-Nick
 
Yea, so it looks like they might actually be the same prop, or at least the one used on Torchwood might be a different one from that used on Who. The part that's still confusing me is the inside of the cover flap. At one point I thought it was just heavily embossed tooling leather, but that doesn't appear to be the case. It looks as thought there might actually be something between the two layers of leather giving it that shape. Anybody have any ideas?
 
Do you have any pictures?

I would have made one a long time ago if this was technically leather work, but it's all garment leather and much harder to work with.

I'm looking for the buckle now, shouldn't take long to find as it's pretty unique and the toy got it just about right.

Yeah, I do have some pictures somewhere...will have a look. If I can't find them, I'll take some more.

The leather worker did great work on it but just no luck tracking down the type of soft leather that would be suitable for this prop, plus he dyed the leather as dark as he could but with no joy, not comin close to the dark brown required but I was still happy with the final product....but continue to try to get a closer, more accurate version.......I'm off to work now, so will have a look for the pictures tomorrow and will post up
 
So I'm starting my 3d model of this part now. i'll post pictures in a little bit
 
vortex1.JPG
vortex4.JPG

vortex2.JPG
vortex.JPG

higher res in my album: Picasa Web Albums - Todd - working

So i was thinking i can print all these 6 parts separate. 3 buttons, 1 round button (phone samsung button), main faceplate, and rim. i'm assuming this rim is attached as one piece and under the leather but i thought maybe people would want them separate. the bottom of the main faceplate is flat, but if this rim is attached you'll have room behind it for wiring, plus it'll make it fit with the leather better. buttons being removable will make it so someone with more skills can wire these buttons to move and push real microswitches controlling an electronic circuit. the samsung button is separate just in case someone wants to use the real phone button. the item is scaled from knowing the dimension of 16mm for the round circle button.

comments are welcome so i can modify the model to be more accurate. once people are cool with the model, i can print it, and do a run. i'll have the printed part/s in my hand in less than 2 weeks from when we finish. it'll take me about a week to make the mold and start making copies, and a few days to ship. so we're looking at ~1 month to get it in YOUR hands
 
Forget my sculpt...I could spend years on it and not make anything that precise. Bravo! It looks gorgeous.

...That said, I'll still be working on a sculpt for myself. :p

-Nick
 
thanks guys! I'd appreciate comments on feature changes since they're not hard to do. any design considerations we can incorporate into the model now will save us trouble later. if anyone is making the electric circuit, or knows what components may be included, we can start now by making sure there is enough space behind the faceplate
 
i think having everything seperate is key because then it can be modified.

whoever does the leather, i suggest having an opening in the back to allow for battery changes
 
It does look amazing.
As far as the leather goes is the top part just molded out of leather to fit over this or is there a plastic piece that is inside the leather?
 
I wanna say just from looking at it that it's molded leather. Since I remember it being bent a little when opened.

Great Job on that Zenix looks great, if we can get all this together (some electronics to, even if it's just lights) then I'd defiantly be down for one.
 
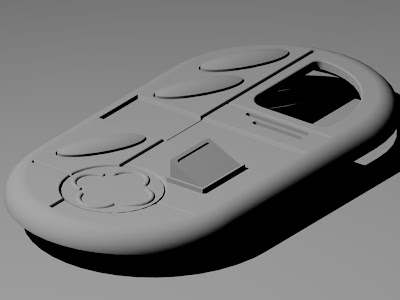
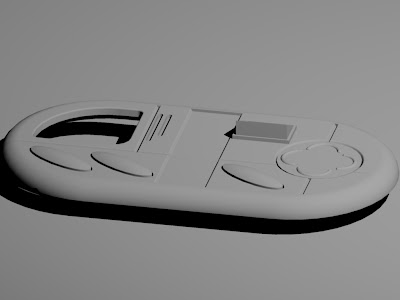
That's a very nice looking model. As for changes, we would need to have the two LED holes left open and space inside for electronics. I think the main plate and rim should be one piece, but the separate buttons is great, it'll make it easier to use the real cell phone button to get the accurate chromed look.

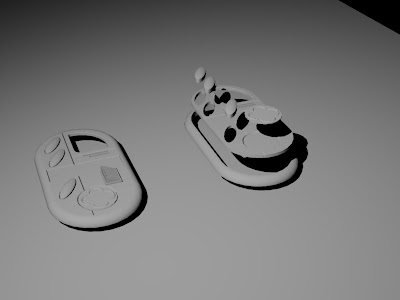
The thing is though, the parts can't just be 3d printed, I think they really need to be cold cast aluminum (main body) and black onyx resin (oval buttons). You mentioned via PM to Rex that you could do cold cast, what might be the price for that, and minimum number of casts that would need to be done?

Your model looks mostly perfect, the only thing left is scaling, right? Or did you already do that? If so, what are the dimensions so I can figure out what size to make my wrist strap and start working on it?

The leather I've got for my strap matches up to the picture of Jack's VM, not the Doctor's. It's a lighter color. IF (and I say if because I don't know exactly how much time I'll have, I still want to do the run of River diaries later this summer), but IF I do a run of wrist straps I'll have to get more leather anyways and I can pick up something darker.

Oh, and there is something between the inside and outside layers of leather on the flap, but I don't know what it is. The inside has the recessed area, but the outside just ramps up to a larger thickness with no definition. I could do it with tooling leather, but I don't have a clue what the real one has in it.

EDIT: Also, on the 3d model, the part that sticks out with the LED in it sticks out at an angle, not straight up, the sides are slanted.
 
Given the size of this item, is cold casting really practical? With the amount of sanding required for a convincing metal finish, wouldn't you lose too much detail?
 
Given the size of this item, is cold casting really practical? With the amount of sanding required for a convincing metal finish, wouldn't you lose too much detail?
You mean 3-D printing, right?

Cold-casting is just adding metallic powder to the resin. 3-D print requires a lot of sanding due to the bonding technique used.

I'm not an expert, but wouldn't you need to get it CNC from a 3D model to get a usable result?
 
Risu mentioned cold casting above. I just know from sanding a CC Jango helmet that you need to do a fair amount of sanding to get the metallic look and I was worried that with a piece this size you may lose a lot of detail from sanding.
 
I'm pretty sure the sanding all depends on the way in which it's cast. For instance powdering the mold, percentage of powder, etc. If done right it should only require a light buffing with some steel wool.
 
Some time ago I was in a K-mart or someplace similar and I saw these tiny media players for around $30, just one or two GB of capacity and a tiny screen. If folks were inclined, it could be a simple matter to cram one of those into a vortex manipulator and load it with whatever sound FX or media one wants. I've thought of trying it out on the toy one, but if someone's making adult-sized VM shells it'd probably be much easier.
 
Back
Top