DIY solution for clear soles for MAG shoes

Monday the 4th of June 2012 and my clear sole project has set as hoped it would. Heat is the key here.

attachment.php

The de-laminated mat. The release agent worked a treat. It just peeled away like removing a sticker from the backing. Easy and smooth :)

attachment.php

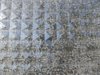
A nice uniform pattern, but heaps of bubbles.

attachment.php

A close up of the bubbles. I am not worried about the bubbles because these are soles and only the ants are going to know :)

attachment.php

For anyone not wanting to wear these shoes, had you considered coasting melted hot glue sticks? The hot glue not only takes the shape really well, it is bubble free and peels away without release agent! It would be perfect if it had a decent shore hardness and would be the answer we are all looking for. It can't be that simple, can it?

attachment.php


Just for giggles, I think I will buy a whole pack ($2.00) of the large 8.2mm sticks and melt them in a pot and make a pour.
 

Attachments

  • Clear Sole Project 10.JPG
    Clear Sole Project 10.JPG
    344.9 KB · Views: 948
looks fantastic:thumbsup

if you were to do some sheets of these which would cover a pair of soles, how much would you want?

maybe sell them in small sheets, enough to make a pair of soles or smaller sheets to make a single shoe.

then people can cut out their sole shapes themselves depending on what they have, kmags, mpoons or any other.
 
For anyone not wanting to wear these shoes, had you considered coasting melted hot glue sticks? The hot glue not only takes the shape really well, it is bubble free and peels away without release agent! It would be perfect if it had a decent shore hardness and would be the answer we are all looking for. It can't be that simple, can it?

I had initially considered it for my build, considering there are VERY high temp glues that have a softening point above the highest recorded sidewalk temperature...but decided to go with a urethane rubber.

So, how hard is it to resist swapping your sole inserts with these sheets? I'd be tearing my shoes apart right now if I was you.

Looks great so far, can't wait to see them in place on your shoes.

-Nick
 
looks fantastic:thumbsup

if you were to do some sheets of these which would cover a pair of soles, how much would you want?

maybe sell them in small sheets, enough to make a pair of soles or smaller sheets to make a single shoe.

then people can cut out their sole shapes themselves depending on what they have, kmags, mpoons or any other.

I ended up only getting three pours out of this, and one sheet is a write off, so not cheap about $100 per sheet.

I had initially considered it for my build, considering there are VERY high temp glues that have a softening point above the highest recorded sidewalk temperature...but decided to go with a urethane rubber.

So, how hard is it to resist swapping your sole inserts with these sheets? I'd be tearing my shoes apart right now if I was you.

Looks great so far, can't wait to see them in place on your shoes.

-Nick

This stuff could be called a urethane rubber, I suppose as it cured like a rubber sheet.

I've poured the last of this stuff today, so when it cures, I'll have enough for 2 pairs (I hope).
 
So it looks like pour 3 is a win as well :) I might just place it in the sun for a few hours today to ensure it is all cured before de-laminating. Heating the mix in the micro wave was one sure way of getting heat into the mix to kick off the exo therm and the results seem to have paid off.
 
To get the stuff bubble free you need to degauss it. Using a vacuum chamber will pull all the air out of it first and when you pour will greatly reduce your bubbles as long as you also pour from high up. if you made molds that were the size of the actual part or slightly bigger you would make your material go farther and prob save you some production time. If you can make a few to start as you have, you then need to make a silicone mold of all those pieces together as an open mold. Then, you would only need to mix the amount you need for those parts already cut to size, and make your material go farther and knock out many many more at a time. just my two cents :)
 
To get the stuff bubble free you need to degauss it. Using a vacuum chamber will pull all the air out of it first and when you pour will greatly reduce your bubbles as long as you also pour from high up. if you made molds that were the size of the actual part or slightly bigger you would make your material go farther and prob save you some production time. If you can make a few to start as you have, you then need to make a silicone mold of all those pieces together as an open mold. Then, you would only need to mix the amount you need for those parts already cut to size, and make your material go farther and knock out many many more at a time. just my two cents :)

Greatly appreciated :) I had a vacuum chamber back in 2006. At this stage, this was more of an experiment to see if the product is actually good for the application. I am out of it now having made my third pour last night. And it looks like I spoke too soon. Pour 3 which was looking really good this morning blistered for some reason leaving me with just one sheet left to make my soles. I am not even sure I want to use it now. I can get bits out of the 3rd pour's sheet, but basically the whole centre is soft.
 
So given that the cold cast clear elastomer requires specialist gear and skill, I decided not to continue down that path, rather choose a new one.

Shoe Goo!

attachment.php


I am hearing nothing but good reports about this stuff, so for the price, it worth a shot. I'll run a test first to see if this stuff sticks to the textured mat that I want to use for the tread impressions. If it peels away, this might be exactly the simple DIY solution.

An alternative to lighting.

attachment.php


Also, whilst I want lights, I have been thinking more and more about not adding them. The MAGs will just not look right without something, so I am getting a quote on some small pieces of 3M reflective light blue tape. Because it is adhesive, it could be stuck to the black part of the sole first, then the layered over with the Shoe Goo.
 
Now this is something that could work. I just hope it is durable enough to withstand everyday.
How much would be needed for both shoes? Maybe 2-3 tubes?
I wonder if it can be lightly dyed with some paint.

Let us know how it turns out!
 
I just checked the progress of the test pour I did this morning. This stuff should work, but it does need up to 72 hours to fully cure. It seems to be an excellent adhesive and seems to be mold-able, however, it will need a release agent to mold so or this stuff will just stick the mat I'll be using to form the tread.

So I also think I need to plan my jig. I just need to use the shoe as a template to make sure I get the angle right on the inside part. The mat will also need a split on the inside to allow the different angles plus I need to allow some space to ensure I get a decent amount of rubber on the shoe.

Something to work on over the weekend.
 
16 hours ago I did a 2nd test and here is the result. Yes it still has bubbles and I really don't know what to do about this as I don't have either a vacuum chamber or pressure pot.

attachment.php


This is the 'negative' off the mold and side we'd want to use as tread.

attachment.php


This is a 'positive' which is identical to the mold and side that would glued to the shoe.

So with my first test, I clearly didn't let it cure for long enough because it bonded with the mat whilst the centre was still in a gel state. I also pressed the Shoe Goo down with a piece of the elastomer to make it thinner.

After it had cured, it did peel off the mold and seems tough enough not to tear. I'm interested to know if this applies to a larger sheet of Shoe Goo or will it tear as it peels? I guess the only way to know is to do this and find out :unsure

Based on this 2nd test, I am hoping it will be possible to make an area large enough to cover the part I want to adhere to. I am thinking that if I glue [with more Shoe Goo] it to the base of the sole and let that cure, I should be able to then wrap the sides up and glue them in place. This should also allow me to pinch the edges to get that fuller look [of the real MAG] we are chasing.

So I guess I am now off to make a sheet large enough to use on a shoe :cool

Wish me luck! :cheers
 
great stuff

is that just shoe goo by itself?

would that be strong enought to widthstand wear and tear outside?

so for this, all you do is get that template sheet, and put some shoe goo gel on it and allow it to dry?
 
great stuff

Thanks :)

is that just shoe goo by itself?

Yes, just Shoe Goo.

would that be strong enought to widthstand wear and tear outside?

Well it supposed to be. Back in the 1990s, I used it to repair [build back up] the soles of my NIKE AIR PRESSURES that I basically wore into the ground.

so for this, all you do is get that template sheet, and put some shoe goo gel on it and allow it to dry?

Yeah, I just poured out the rest of the tube. It seems a full set of soles will require at least 3 tubes of this stuff, so about $45 to make a pair of soles and have enough to bond them to the shoes.

I have just spread it out and am now letting it cure. Something I noticed and so I will have to do in my next test is to use a clear sheet of plastic [I could see through the clear elastomer here] is that as you work the Shoe Goo to cover the area [and push it down to get a uniform thickness] is you can push out the bubbles.

Something I don't think I mentioned in the last post was that the sample was done WITHOUT release agent and I will suggest that we DON'T WANT release agent involved for this method as you'll never be able to glue it to anything after. So hopefully tomorrow when I go to peel this off, it just releases like the small sample did.

The reason I am doing the soles this way and not directly to the shoe is because I am concerned about getting uniform thickness and I can't really see any other way to do this. Once the sole if made, the same working of the Shoe Goo will be required to ensure a uniform layer and full surface area bond. Anyway, we shall see what the results are tomorrow.
 
Around 9 hours ago I said:
I will suggest that we DON'T WANT release agent involved
Well having just checked the progress of this little experiment, release agent is going to be a MUST. The trick will be NOT to get it on the surface that has to be glued to the shoe!

Allot can happen in 9 hours, and I think now release agent is a MUST!

Lucky that mat with the release agent used for pour 2 and 3 still feels slippery and is glued to the table top ready for tomorrow. So this evening, I decided to check the Shoe Goo from today. It has not set and has stuck to both the clear plastic template I made a few weeks back and the mat. I am hoping that by about noon tomorrow [at least 24 hours after the pour], the Shoe Goo will release from the mat the way it did with the test sample. I am not fussed about it sticking to the template.

So in preparation for tomorrows pour, I made some more clear sole templates.

attachment.php


These are made from A4 laminating pouches and I drew the lines on the inside before sealing them through the heating unit. This way as I rub to push out the air bubbles, I don't scratch off the lines.

Now I am confident that the She Goo will just lift right off the mat, but it may stick to the plastic. If that happens, then I simply cut out the shape and glue the sole [template and all] to the soles of the shoe. The plastic is on the inside, so it won't matter.
 
Excellent! I roles you shoe goo was worth looking into B-) . Have you tried while squeezing it into your mold just pressing it down so it's more or less smashed into the mold?
 
Looking good!
What kind of tubes are you using if it gets so pricey? I mean 3 tubes cost 45 dollars?
Amazon.com: SHOE GOO-TUBE CLEAR: Sports & Outdoors
Do you use something similar to these?

diy-solution-clear-soles-mag-shoes-clear-sole-project-11.jpg-97449d1339116105


WOW $6.99 per tube? We are so being riiped off here in AU as it is listed at $14.99 which is close enough to $15.00 per tube.

Excellent! I roles you shoe goo was worth looking into B-) . Have you tried while squeezing it into your mold just pressing it down so it's more or less smashed into the mold?

This stuff is not working out as well as I hoped. The large sheet test seems to have worked, but it is very hard to get off the mat with out a release agent. I may have just made it too thin. it doesn't tear, but it is a challenge to get off the mat. It is also quite soft and I only hope that if applied thick enough, will be "wear hard" enough.

I didn't do anything on this today because I woke to rain, so figured there was no point to doing anything where moisture might get trapped. The more I play with this stuff and the more I think about it, the more my idea of applying the Shoe Goo directly to the shoe, then pressing it against the mat (now with release agent :cool ) looks to be the winner. At least doing it this way ensures the pattern remains aligned.

The Shoe Goop actually gets warm as it cures and it even warped the mat in one of my tests. I guess it has to produce some heat to vulcanize [is that the right term?] to the shoe.

So I think that a sheet of the mat that is large enough to wrap around the sole of the shoe (with a split on the inside part for the different angles) is coated in release agent.

The Shoe Goo is applied to the sole first and the shoe sat on the mat.

Once the base of the sole is done, you apply more Shoe Goo to the sides, then raise the sides and tape them in place. Given you may have to leave the shoe for up to 72 hours, you might need more than masking tape.

Thoughts?
 
UPDATE: After lots thought, I decided that I needed a relase agent and also that it would be best to apply the Shoe Goo directly to the shoe. Simply put, you don't extra Shoe Goo to glue the soles on.

The Release Agent.
attachment.php


This cost about $12.00 so pretty cheap and you don't need much. Note it says "paint-able". Some release agents just won't allow the product to be painted or glued to anything after, so at least this suggests that you can do stuff with the project later if need be.

An Earlier Test
attachment.php


When I did this, I was wanting to apply the stuff thin and I applied it a bit too thin. I also didn't have a release agent on hand at the time, and so whilst it did peel away, the thinner parts also tore. Based on what I observed today, Shoe Goo will self level, so if the project was applied to a mat this used here [with a release agent], there is no reason why you would net get a nice level clear sole.

Shoes Set Up
attachment.php


I simply used a large card board postal tube inserted into the collar and the shoe could then be inverted. It had started to run down the back of the sole, so I just hope it doesn't drip :confused

Close Up
attachment.php


This shot is irrelevant in this thread. I took it to show show that this HIPS vac formed Ankle Buckle looks better on the size 10s than they did on the 8s.
 
Looking great! I can't wait to see it de-mold. When I was making a mold of the buckle, I had a hard time removing the wax master. So in a easy, it almost stocks to everything...even wax!
 
I will leave this for at least 3 days. So we will know on Sunday if this has worked. I need to resist disturbing it any earlier and this means I can't even do the wrap up for the sides yet.
 
Back
Top