You are using an out of date browser. It may not display this or other websites correctly.
You should upgrade or use an alternative browser.
You should upgrade or use an alternative browser.
Disguise Thor Mjolnir Upgrade
- Thread starter Kevin Gossett
- Start date
Just got my two hammers from Target today. I got two incase I mess up. :lol
But, if it works out well, I'm going to try and make the handle like the one in the Avengers and the other from Thor 2. I really liked that handle. If they come out well enough, I'll post pics. Wish me luck.
But, if it works out well, I'm going to try and make the handle like the one in the Avengers and the other from Thor 2. I really liked that handle. If they come out well enough, I'll post pics. Wish me luck.
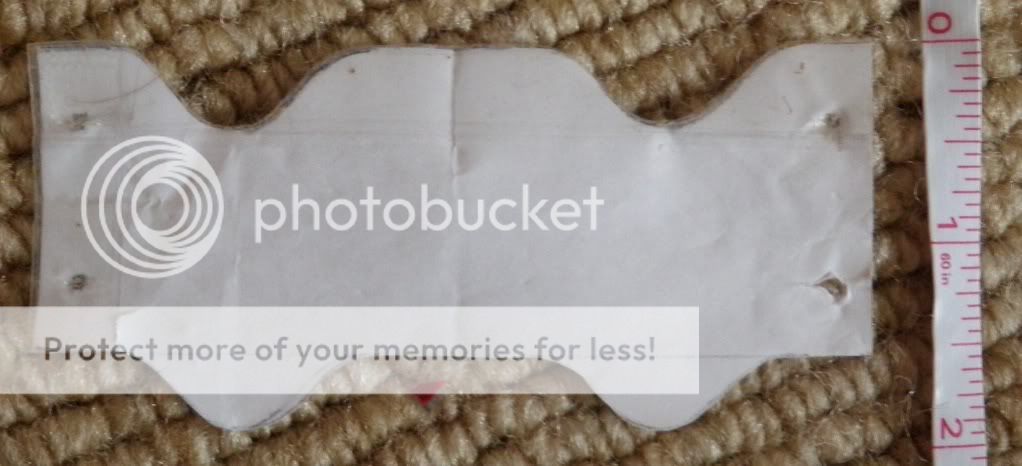
I am having one hell of a time getting the templates for the leather straps in the handle. How did you do it?
Honestly I just freehanded it until I got it the way I thought looked best :thumbsup
FSURobbie
Well-Known Member
This may help.
Nice, thanks, that will be a huge help! I'm debating sculpting the end cap from the Avengers version of the hammer and attaching it. Still undecided at this point. I prefer the leather grips from Thor but the endcap from Avengers. I might combine them. Not screen accurate to either film, but I'm ok with that.
")
Do you guys think Milliput would be a good alternative for filling in the seams on the hammer head? I'm familiar with it and Bondo intimidates me. One day I'll get over it and give it a try but I'm debating using milliput since there is so little touch up I will be doing to the hammer.
Any input would be appreciated!
I'd like to thank Kevin for the inspiration on this piece. Someone else might have done it before him, but his was the first thread I saw on it.
When it was posted in here that the hammers were on sale at target, I ordered one online, as all my local stores where out. Got it in after a few days and got started on it.
Used a dowel painted silver for the handle, then overlayed the leather strips on it. For the head I drilled the handle hole out, slushed several coats of resin mixed with sand to add weight and firm it up a bit, then smoothed both ends of the hammer. Painted it with Krylon chrome, sprayed some clear, then did a wash with some black acrylic and went over it again with some clear. Finalled filled the head with foam and stuck the handle in it. The handle firmed up nicely and it feels really solid.
Awesome job!
Ghostsoldier
Sr Member
It looks great! :thumbsup
I'm staring at my Target hammer, over my desk on a shelf, pleading for me to start this project...
Rob
I'm staring at my Target hammer, over my desk on a shelf, pleading for me to start this project...
Rob
ponchopanda
Active Member
I think I might try this upgrade, can you tell me if this was something they were strictly selling for halloween or is it also a "toy".
It was a Halloween thing, but you can still get them online through various other retailers
TurboTrey03
Well-Known Member
Deserved bump
How did you do the base? Did you gradually go around in circles with the Great Stuff? Did you indent the "crater" with the hammer when it was partially dry?
Thanks in advance!
How did you do the base? Did you gradually go around in circles with the Great Stuff? Did you indent the "crater" with the hammer when it was partially dry?
Thanks in advance!
I roughed out the shape with styrofoam, then built up the layers with Great Stuff. Once cured I carved out the top for the hammer to rest in, then painted. I have since scrapped that base in favor of this h baby
h baby
MikeyDonuts
New Member
Recently did made a Mjolnir from MDF and a dowel from Home Depot. Wrapped the handle in a leather belt blank from Tandy. Thought it came out pretty good. Largely followed directions from Blind Squirrel.


Ghostsoldier
Sr Member
Nice one, Mikey!
Rob
Rob
AsgardAssassin
Active Member
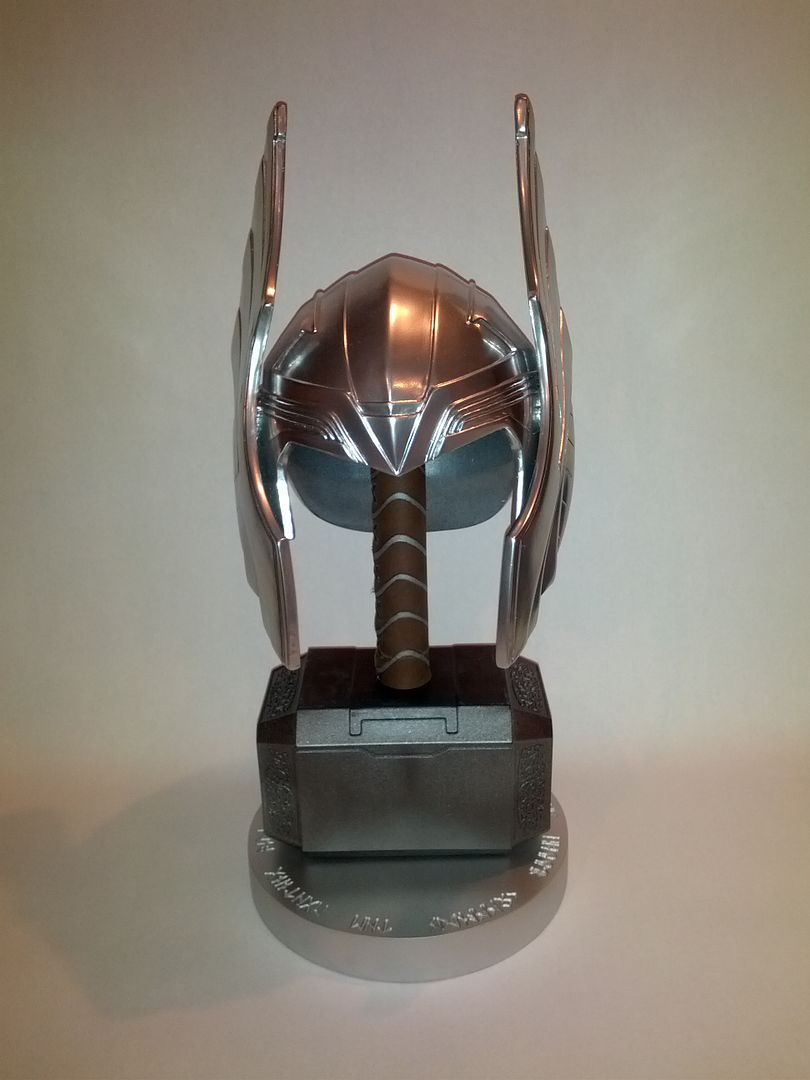
Kevin that setup you have looks awesome! What's the base made of and are the letters engraved? And I need one of those helmets!!
Thanks! The base is MDF that was CNCed by a member, hdtheater
Chris27989
Sr Member
Here is an updated picture of the hammer sitting on the unfinished base (from the NTX prop party this weekend)
http://i60.photobucket.com/albums/h33/wkevingossett/DSC01435-1.jpg
Just need to finish shaping the base and paint it!
How did you go about making the base kev?
When I used expanding foam it spread like a dog all over the floor
I cant seem to built a "mount"!
I built up a frame using pieces of styrofoam first, then I sprayed the expanding foam around that
Chris27989
Sr Member
haha I thought of that as about 30 mins ago... I need to learn not to rush
Feel like an idiot now
Feel like an idiot now
I built up a frame using pieces of styrofoam first, then I sprayed the expanding foam around that
Well, at the top of this page you can see the results of my first hammer. Problem is I used expanding foam in it, didn't put that much in there really because I know the name is true, but still a few days later, it somewhat resembled a football. :sick
So anyway, I thought the first one turned out "ok", for a toy upgrade, but really wasn't thrilled with it. The paint looked just like paint and after seeing The Avengers, I much preferred that style handle.
Last week decided to do a new one. Ordered a new hammer and got to work.
Did the same as last time, slushed some resin mixed with sand in it to add strength, rigidity, and weight. NOT using expanding foam this time, haha.
Then I set out to paint it. I had good luck with doing the gloss black coat, followed by gold krylon on a statue I was working on. Didn't have that extreme reflection, but I was pleased with it. Tried the same thing on the hammer head... bleh, just silver.
I've used Rub n Buff on several other projects with mixed results. Tried it on the head, used silver leaf and then tried pewter. Maybe a small improvement or maybe the lack of blood in my brain (since it was all in my arm from the buffing) made me want to see an improvement. Did the best I could with it and said, ok, that's all I can do for now.
I then got out the stove polish paste (very good stuff for aging) and started using it in the crevices. During the process of wiping it off, I noticed I was getting some great shine. Tried it some more and woah, I really liked the results.
Then I developed a method. I would lay the stove polish on very thick (had to so that it would get in all the crevices) with a dry paper towel, use a slightly damp paper to get some of the excess off (not too much though, it was still pretty black), then take a dry paper towel and buff it. I was thrilled with the finish I was getting. Very realistic steel look, while keeping a bit of aging/dirt to it.
So here's how it sits now. I'm not a photographer by any means and I had trouble getting any of the reflection to show up in the pics, but maybe you can get an idea. In the first pic, the capstone on the right side is still the silver paint.


If anyone wants to try the same technique, I'd recommend painting it silver/chrome, going over it with some 00000 steel wool, then using the stove black polish paste. Here's the exact kind I used, got it at Lowes: http://ecx.images-amazon.com/images/I/21l+Qqh3D8L._SL300_.jpg
Now, if I can get a handle from Fulvio, I should be all set.
So anyway, I thought the first one turned out "ok", for a toy upgrade, but really wasn't thrilled with it. The paint looked just like paint and after seeing The Avengers, I much preferred that style handle.
Last week decided to do a new one. Ordered a new hammer and got to work.
Did the same as last time, slushed some resin mixed with sand in it to add strength, rigidity, and weight. NOT using expanding foam this time, haha.
Then I set out to paint it. I had good luck with doing the gloss black coat, followed by gold krylon on a statue I was working on. Didn't have that extreme reflection, but I was pleased with it. Tried the same thing on the hammer head... bleh, just silver.
I've used Rub n Buff on several other projects with mixed results. Tried it on the head, used silver leaf and then tried pewter. Maybe a small improvement or maybe the lack of blood in my brain (since it was all in my arm from the buffing) made me want to see an improvement. Did the best I could with it and said, ok, that's all I can do for now.
I then got out the stove polish paste (very good stuff for aging) and started using it in the crevices. During the process of wiping it off, I noticed I was getting some great shine. Tried it some more and woah, I really liked the results.
Then I developed a method. I would lay the stove polish on very thick (had to so that it would get in all the crevices) with a dry paper towel, use a slightly damp paper to get some of the excess off (not too much though, it was still pretty black), then take a dry paper towel and buff it. I was thrilled with the finish I was getting. Very realistic steel look, while keeping a bit of aging/dirt to it.
So here's how it sits now. I'm not a photographer by any means and I had trouble getting any of the reflection to show up in the pics, but maybe you can get an idea. In the first pic, the capstone on the right side is still the silver paint.
If anyone wants to try the same technique, I'd recommend painting it silver/chrome, going over it with some 00000 steel wool, then using the stove black polish paste. Here's the exact kind I used, got it at Lowes: http://ecx.images-amazon.com/images/I/21l+Qqh3D8L._SL300_.jpg
Now, if I can get a handle from Fulvio, I should be all set.
Last edited:
Similar threads
- Replies
- 2
- Views
- 527
- Replies
- 1
- Views
- 429
- Replies
- 0
- Views
- 388
- Replies
- 43
- Views
- 3,095