You are using an out of date browser. It may not display this or other websites correctly.
You should upgrade or use an alternative browser.
You should upgrade or use an alternative browser.
Dewy and Anakin Starkiller's Accurate Obi-Wan Kenobi Episode 1 Lightsaber Design
- Thread starter Dewy
- Start date
What an analysis.... great work, to everyone. I've always wanted to build a mixed-media-real part hilt one day. This thread and your modeling work are going to be invaluable. The washers used by the team for the emitters.... straight edged and not soft looking or stamped?
My theory here is they used "regular" stamped 8mm ID x 38mm OD thick fender washers. They then tapped the fender washer for an M10 threaded rod and used that to assemble the saber. Then they cut the excess portion of the threaded rod with a hacksaw as close to the fender washer as they could, and put the emitter face of the assembled saber up against something like a belt sander to make everything flush and smooth. This would also explain why on some of the props (such as the Qui Gon Hero Saber) the emitter face has started to rust. A lot of the threaded rods and fender washers are zinc plated non-stainless steel, if you sand through the zinc plating you'll eventually get rust.
Here’s a comparison of a standard thickness fender washers compared to the extra thick ones I was able to find:

Below is my proof of concept with a threaded rod in the extra thick washer. This one was just manually filed and sanded as I don’t have a belt sander (yet).

Below is my proof of concept with a threaded rod in the extra thick washer. This one was just manually filed and sanded as I don’t have a belt sander (yet).
makes you wonder if there's a threaded something inside the model kit cap on the pommel. I like this idea, this might also explain the addition of the raised lip around the washer because it was thicker than the beveled emitterHere’s a comparison of a standard thickness fender washers compared to the extra thick ones I was able to find:
View attachment 1549114
Below is my proof of concept with a threaded rod in the extra thick washer. This one was just manually filed and sanded as I don’t have a belt sander (yet).
View attachment 1549115
So I let this thread go dormant for a while, but I've been hard at work on this saber design. I was very fortunate to get my hands on some high resolution pictures of the hero prop. Unfortunately, because they are not publicly available I cannot post model overlays or comparisons to them. All that being said I want to show my progress and discuss several aspects of the design.
First the model:

Now some updated comparisons to readily available reference images:


A couple features I want to highlight:
1) Emitter Shroud:
 This piece has been the biggest challenge, I have easily modeled and remodeled this part 30+ times, but I really feel like I finally have it nailed down. This is not a simple axially symmetric part with 3 sets of evenly spaced features. Each cutout and feature is a different shape and size with unique spacing. The corner radii on the right side of each emitter "post" are larger than the radii on the left side. The groove is not a simple rectangular cross section made with a grooving tool on a lathe, but remnants of a regular profiling tool that was lightly touched off against the surface:
 I spent a lot of time visualizing how this part was originally manufactured to figure out a solution that both makes sense and perfectly overlays against reference images.
2) Pommel Cubes:
I believe the pommel cubes are not one solid ring-like part, but 6 individual pieces. A couple features I haven't seen on any prior replicas:

As the model is getting closer and closer to completion, I've been thinking more and more about construction methods, which I think is a good area for discussion.
Discussion: Construction Method
In my mind there are two prevailing options for how the prop was originally assembled:
Option 1: Hollow w/ long threaded rod (Mass: ~550 grams)

Option 2: Solid Core (Mass: ~606 grams)

On the one hand Option 1 seems more practical to me, the prop makers probably had some hollow aluminum tubing and threaded rods just sitting around the shop, on the other hand Option 2 would be more solid and still would not be very difficult for them to make. I am really interested to see what other people think.
I have some other exciting potential developments in the works so stay tuned...
First the model:
Now some updated comparisons to readily available reference images:
A couple features I want to highlight:
1) Emitter Shroud:
2) Pommel Cubes:
I believe the pommel cubes are not one solid ring-like part, but 6 individual pieces. A couple features I haven't seen on any prior replicas:
- There isn't a uniform gap between the bottom surface of the cubes and the pommel. The bottom surface of the pommel cubes has an oversized radius that touches the pommel at the center, but not at the edges.
- The edge closest to the pommel facing away from the emitter has a somewhat prominent chamfer on it
- The portion of the cubes that is inside the pommel grove does not have a curvature to it, but a flat bottom leaving a small gap on each side
As the model is getting closer and closer to completion, I've been thinking more and more about construction methods, which I think is a good area for discussion.
Discussion: Construction Method
In my mind there are two prevailing options for how the prop was originally assembled:
- The saber was more hollow with a threaded rod going from pommel to emitter
- The saber was built around a solid core
Option 1: Hollow w/ long threaded rod (Mass: ~550 grams)
On the one hand Option 1 seems more practical to me, the prop makers probably had some hollow aluminum tubing and threaded rods just sitting around the shop, on the other hand Option 2 would be more solid and still would not be very difficult for them to make. I am really interested to see what other people think.
I have some other exciting potential developments in the works so stay tuned...
Drew and I have been working on this together behind the scenes. I've provided him with a bunch of measurements from my production-made stunt saber, as well as the references that he mentioned, which, unfortunately, can't be shared. I sent him my own OWK ep1/2 model, that I worked on for years, and he took it and ran with it and did an amazing job taking the design to the next level. The work that he's done with this material has been nothing short of amazing and I couldn't be happier with it!
Drew and I have been working on this together behind the scenes. I've provided him with a bunch of measurements from my production-made stunt saber, as well as the references that he mentioned, which, unfortunately, can't be shared. I sent him my own OWK ep1/2 model, that I worked on for years, and he took it and ran with it and did an amazing job taking the design to the next level. The work that he's done with this material has been nothing short of amazing and I couldn't be happier with it!
Thanks Dan! Your knowledge and resources have been invaluable. I was thrilled when I first compared our respective separately developed models and saw how well things lined up. Since then, this model has been 100% co-developed. The significantly better references photos have allowed me to do detailed perspective matching from all angles of the original hero anchored to the measurements from your production made stunt saber.
SteuerEule
Member
Do you team up with AS or anybody else for a run? Would love to see this happen!
Nobody elseDo you team up with AS or anybody else for a run? Would love to see this happen!
")
My quick thoughts:
The rod is probably not floating inside. Possibly the inner metal section is solid or something. I've always thought the black grip was a very thick Delrin piece with a thin aluminum sleeve. The O ring, I imagine, is because the upper Delrin does not extend down to the reduced neck...maybe under the red button though
Wild that the pommel cubes are shaped that way and separate... still processing that one!
Another thing that's always bugged me about this saber, and proved to be a real challenge when creating digital overlays of my model to the hero prop, is how the emitter bezel appears to be off center, at an angle... or both. I bought some niche software that allows me to transparently overlay images on my computer monitor while I work on the model in the background. This allowed me to float the emitter bezel and washer in my model and freely move them until they aligned with the overlayed reference images. It took a lot of iterations to come up with a configuration that actually makes sense. What really bugged me though is that the fact that this would mean the hole drilled in the emitter washer would have to be off center, which just didn't seem possible to me. Well after running out of options I did a some quick image analysis as a sanity check for my findings from the model and, call me crazy, but it really does look like the hole is off center:

The yellow outline traces the edge of the washer, and the red outline traces the outline of the rod. Same image without the ellipses so you can see the edges:

I considered that possible the emitter washer was domed and that the red outline was actually in a higher plane, but from the reference images you can clearly see sanding lines from when this thing was pushed up against a belt sander which would lead to a planar face.
Here's how this same analysis would look if it was centered:

The yellow outline traces the edge of the washer, and the red outline traces the outline of the rod. Same image without the ellipses so you can see the edges:
I considered that possible the emitter washer was domed and that the red outline was actually in a higher plane, but from the reference images you can clearly see sanding lines from when this thing was pushed up against a belt sander which would lead to a planar face.
Here's how this same analysis would look if it was centered:
edited
AnubisGuard
Master Member
I suppose the simplest explanation is that it isn't actually a fender washer, just some metal they drilled a hole in and sanded flat.
Excelsior
Well-Known Member
Excellent work, truly--the best I've seen on this hilt.
Great to see the observations on the "wonky" emitter shroud details--I've always assumed that this was cut and finished by hand with a file and/or fine sandpaper, which would lead to the asymmetry. Even the more accurate Obi TPM replicas done in the past have idealized this detail and made it symmetrical, incorrectly.
Also, great observation on the grooves in the emitter shroud as well being done by an angled tool.
Regarding construction method, Option 1 seems to be more probable and in line with common understanding of how the prequel props were made. The Option 2 solid core mass would have required much more foresight on the propmaker's part. He would have had to start with that piece and work everything around to fit on it, or having made all other pieces, create that piece to fit them all together. As a machinist, making a prototype from a concept sketch, it would be easier to make the hilt in "chunks" or simplified pieces, while keeping the idea of assembling it all around a threaded rod later on.
On that note, I know your software is showing that the threaded rod is off center, but I would be hesitant to accept that without better evidence. I have an easier time believing that's simply a photographic distortion, than that the original had an off center rod, which would negate the entire theory of a centered threaded rod being what the hilt was built around. Is there any evidence of the rod being off center on any of the Qui-Gon or Maul props?
Great find on the LED bezels--those really look close, and better than I've been able to find. Can you PM me your source? The later three-hole emitter version of this hilt, the one with the red hemi, has chromed bezels, but on the Episode 1 prop, the bezels seem to match the finish of the surrounding aluminum. Your bezels have that look, being aluminum, I assume.
Regarding the presta valve... that is a discussion in itself. You have observed the 90 degree knurling, as I did, and you seem to have found the same type of valves I did as well a few years back. These valves are the closest that seem to be available now, but on the best reference photos showing the hemi valve, the threading is clearly visible on the inside around the hemi, and the surface of the valve shows evidence that it was ground down. So there seems to be a variation of this valve that was taller, that when ground down, created the flatter surface and immediate threading visible within. I'll have to post some pictures showing what I mean to better explain it. It's not an easy piece to find, but can be replicated easily IF the proper knurling tooling can be sourced or made.
Keep up the great work--can't wait to see more progress.
On that note, I know your software is showing that the threaded rod is off center, but I would be hesitant to accept that without better evidence. I have an easier time believing that's simply a photographic distortion, than that the original had an off center rod, which would negate the entire theory of a centered threaded rod being what the hilt was built around. Is there any evidence of the rod being off center on any of the Qui-Gon or Maul props?
The rod is centered in the saber, but the emitter bezel and washer are off center/at an angle. This is observed on the resin cast stunt hilts as well.
Great find on the LED bezels--those really look close, and better than I've been able to find. Can you PM me your source? The later three-hole emitter version of this hilt, the one with the red hemi, has chromed bezels, but on the Episode 1 prop, the bezels seem to match the finish of the surrounding aluminum. Your bezels have that look, being aluminum, I assume.
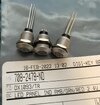
Here are the LEDs, they’re a little too short compared to the original prop, but by far the closest available today.
Bulgin DX1093/TR
Attachments
Similar threads
- Replies
- 43
- Views
- 3,701
- Replies
- 2
- Views
- 895
- Replies
- 11
- Views
- 2,435
- Replies
- 2
- Views
- 1,657
- Replies
- 3
- Views
- 321