Denix Mauser / Blaster Assembly Info

Re: Denix / ROTJ Blaster Assembly Info

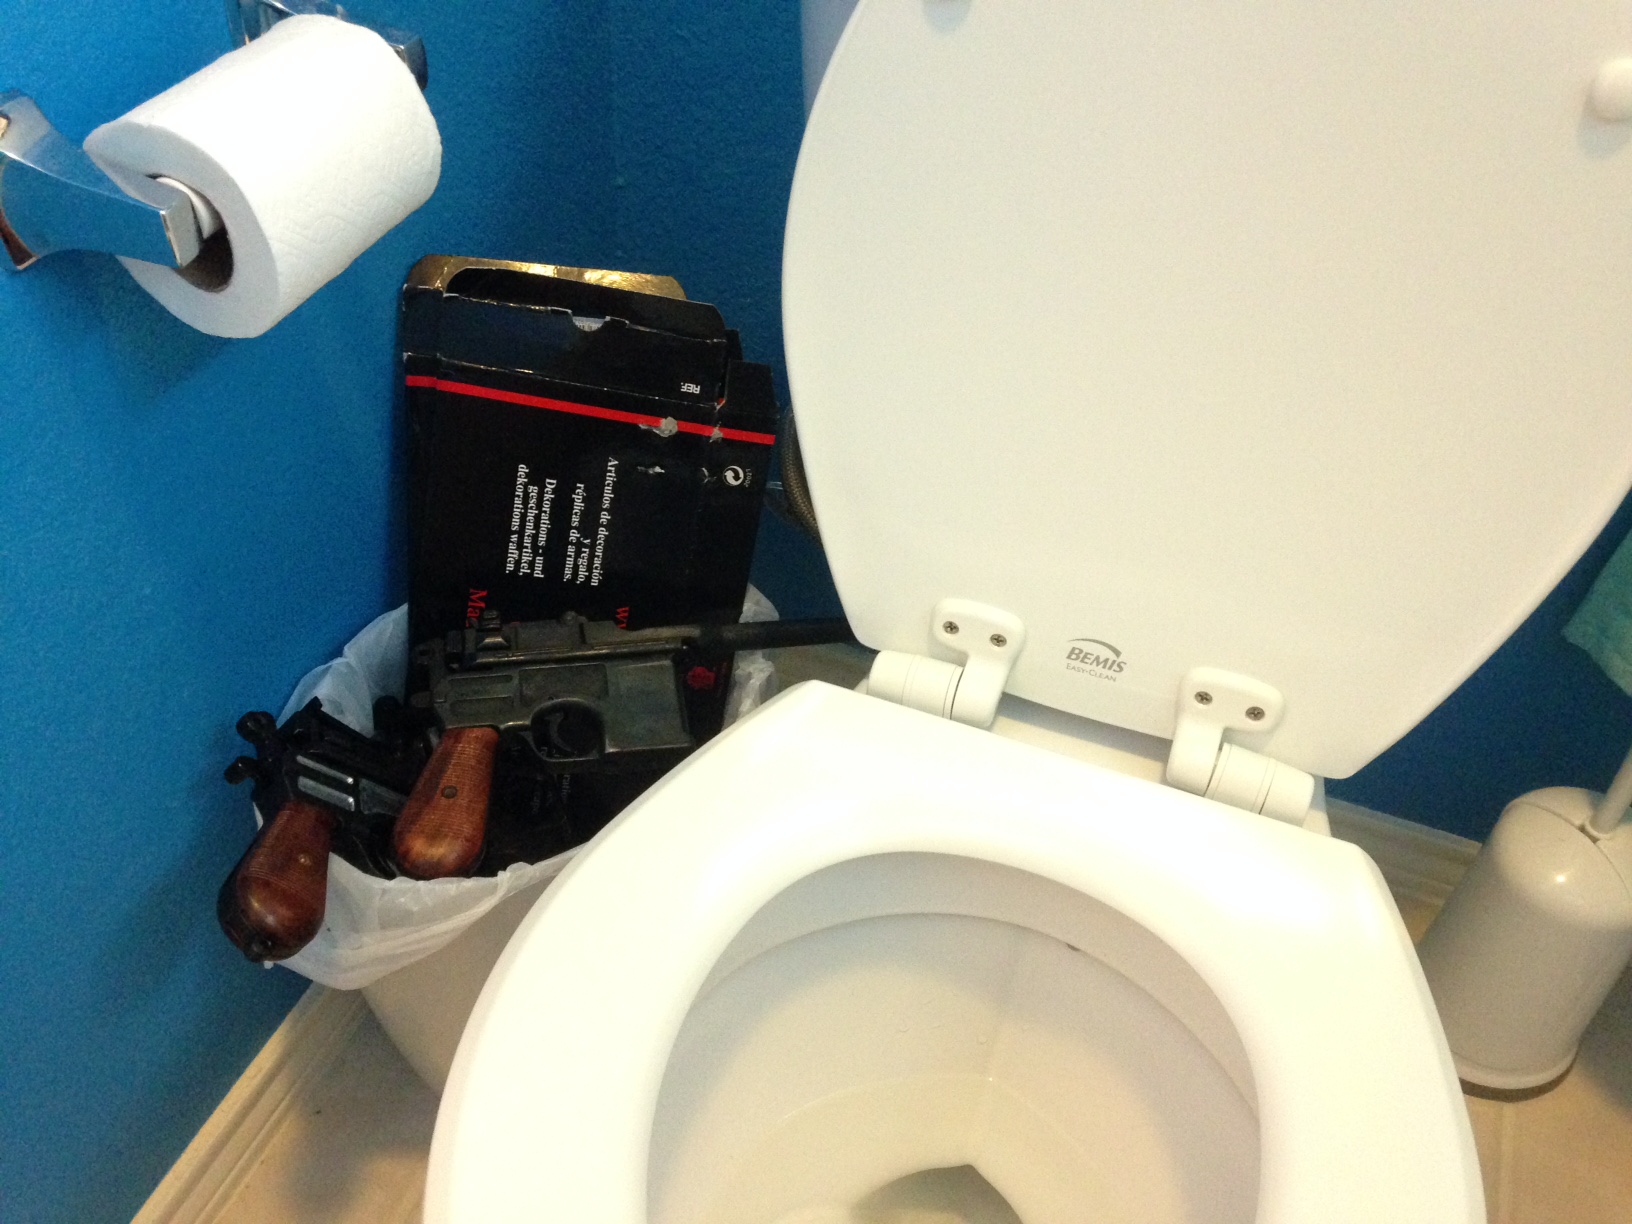
I agree with Scott mostly. But also remember he's playing with MGCs and real Mausers. He has a big bucket of Denix Mausers in his bathroom that he wipes his butt with and throws them away. Sure he has a great blaster collection but I wouldn't want to do his laundry. :p

Anyhow... When it comes to the paint on a Denix, it is not as nice as the finish on a MGC or real broom handle. It's not bad as is, but if you do want to paint over it I just don't trust it. I remember you could easily scratch off the paint with a fingernail. It's not something I would trust a layer of paint over, but that's just me. I think a little rubbing with some steel wool to get the day loose stuff off would be good enough.

Also,,,, Bobadebt has had good results with simply patching up exposed metal of the Denix with just Aluminum Black. This way you do not have to do a coat of paint or remove the original paint.

Let's go back to what Scott is saying. Don't overthink it but I also think you have to look at each blaster as figure out what the prop make was thinking. When I look at The Empire Strikes Back blasters, it looks like they built it then paint the whole thing because the body, scope, and scope mount all look the same type of black. When I look at the Return of the Jedi blaster. To me it looks like they painted the add on parts that were not black prior to assembly like the side doo-dads and the scope mount. The black finish of the scope, scope rings and gun's body all look like the natural finish of the found items. That's my take away. But I will say that people like Scott have been staring at these props a long time. He and Marcus are my go-to guys when I have detail questions and I put my trust in him to do my GK Blaster build.

Lastly, I would not ever do a clear coat unless I was doing a pristine build and wanted to protect it from wear.

pretty much, but I'm running low, so a typical roll of TP works when I'm out of Denixes:

IMG_7656.JPG


So yeah definitely you have to put some AL black on the bare metal... and I would degrease the denix completely. Then just a thin coat of flat or satin enamel. I did mine with everything on except the flash hider. Then used steel wool to rub exposed parts as they would naturally come into contact with things.

I usually bake my painted projects to cure them faster, but with the ROTJ blaster, I hung it up in direct sunlight for a few hours... that cooked the paint nicely and cured it fast.

There are too many variations on the ROTJ... the left side milling is different on them all, so just pick one or your favorite mix up of details and make your own. That's what I did.

I was thinking about it with my holster, and pretty sure the Stembridge or Live fire ROTJ has no right side piston for a couple of reasons. Probably to preserve feeding blank rounds, and also that it would get knocked off easily putting it in a holster. Other shots of the MGC hero version(s), I would imagine were placed in Harrison's hand most of the time.

I need to pay more attention but I bet a resin one was in-holster for most of the shots.
 
Re: Denix / ROTJ Blaster Assembly Info

Noob questions here... just reading your tips...

How do you go about "degreasing" and when you say you usually bake them, exactly how are you going about that? and is that just to avoid waiting out the usual 24 hour set time?

Thanks! (Maybe I already know these things... just never using the correct terms)

pretty much, but I'm running low, so a typical roll of TP works when I'm out of Denixes:

http://www.scottandtemphotography.com/graflexSaber/efxtiewebley/IMG_7656.JPG

So yeah definitely you have to put some AL black on the bare metal... and I would degrease the denix completely. Then just a thin coat of flat or satin enamel. I did mine with everything on except the flash hider. Then used steel wool to rub exposed parts as they would naturally come into contact with things.

I usually bake my painted projects to cure them faster, but with the ROTJ blaster, I hung it up in direct sunlight for a few hours... that cooked the paint nicely and cured it fast.

There are too many variations on the ROTJ... the left side milling is different on them all, so just pick one or your favorite mix up of details and make your own. That's what I did.

I was thinking about it with my holster, and pretty sure the Stembridge or Live fire ROTJ has no right side piston for a couple of reasons. Probably to preserve feeding blank rounds, and also that it would get knocked off easily putting it in a holster. Other shots of the MGC hero version(s), I would imagine were placed in Harrison's hand most of the time.

I need to pay more attention but I bet a resin one was in-holster for most of the shots.
 
Re: Denix / ROTJ Blaster Assembly Info

I'm very close to wrapping up the shipping phase of this and I appreciate the help with the questions in my absence.
 
Re: Denix / ROTJ Blaster Assembly Info

I just use some simple green or water/vinegar 50/50 mix when I first get a denix. They're always greasy...

Then do your AL black on the bare metal parts.

Paint...

Then for small parts I put them in the oven at 220 degrees for 20 minutes. Enamel paints that is on AL, steel, resin, or other metals... but NOT plastics... it'll melt some plastics... like vintage V8 piston... melt.

Anyway, so the gun is too big and would have sit spots, so I hung it with a coat hanger, out in the sun... so the black soaks up the heat and bakes the paint on nicely. a few hours in the sun, and no more tacky paint. It's easy still to weather, but won't stick to your fingers. Once air cooled it's pretty much good to go. Will finally cure more over the next day or two, but the bake time means no waiting a day to even touch it.
 
Re: Denix / ROTJ Blaster Assembly Info

Sounds good. I'll likely do mine in this fashion... I was planning on AL black the bare metal, adding the small parts, then spraying to down... so good to know the best way to dry it. Too bad in BC we may be out of luck sun wise for the next 8 months... heh.

Any chance of posting some close ups of your scope weathering? I'd love to see a proper job on it... it's killing me to weather it, with it looking as great as it does anodized, but it needs to be done...

Reading your tips has me stoked now... may have to take a break from finishing off the OT hilts and do this on the weekend instead.

*btw... toilet denix discussion and pic was the funniest thing I've seen on this forum.

I just use some simple green or water/vinegar 50/50 mix when I first get a denix. They're always greasy...

Then do your AL black on the bare metal parts.

Paint...

Then for small parts I put them in the oven at 220 degrees for 20 minutes. Enamel paints that is on AL, steel, resin, or other metals... but NOT plastics... it'll melt some plastics... like vintage V8 piston... melt.

Anyway, so the gun is too big and would have sit spots, so I hung it with a coat hanger, out in the sun... so the black soaks up the heat and bakes the paint on nicely. a few hours in the sun, and no more tacky paint. It's easy still to weather, but won't stick to your fingers. Once air cooled it's pretty much good to go. Will finally cure more over the next day or two, but the bake time means no waiting a day to even touch it.
 
Re: Denix / ROTJ Blaster Assembly Info

I'm working on the final parts of the Blaster and Mauser tutorials today.

I will be updating the 1st and 2nd post all day.
 
Alright guys.. Question.. If I screwed up my dullcote on the flash hider and it comes out all spotty and crap, what's the best course if action to correct it? Thanks in advance!
 
Alright guys.. Question.. If I screwed up my dullcote on the flash hider and it comes out all spotty and crap, what's the best course if action to correct it? Thanks in advance!

Wipe it down with acetone and start all over again

Markus
 
Hmm.. I guess maybe it didn't come out enough, or the hunidity is making it chunk up.. I ended up just steel wool polishing off the stuff so that I could be careful not to remove all the black..
Is there anything else that can be used on it besides dullcote? Do you have to use anything? Could I just leave it? I don't plan on touching it much!?

Either way, thanks Markus for the tip!
 
Was it Testors Dullcoat?

If so, when you sprayed it how close were you?

I use a dry spraying technique which means I spray from about 12" - 16" and apply it in several very light coats, The paint is almost dry by the time it hits the fitem your painting


This can be used with any spray paint if you intend to achieve a dull look.
 
I sprayed about 12 inches away in sweeping motions. I don't paint much so I was probably just afraid of over coverage.. :/ and yes, it was testors dullcote.
Is the dullcote necessary for protection or anything? After removing a lot of it mine looks a little dull but still has a nice shine to it, and a lot more grimey look like I wanted! I really like the way it turned out actually..
 
Since Star Wars props look lie they have been put through the ringer nothing is really required.

if it looks right to you go with it.
 
Re: Denix / ROTJ Blaster Assembly Info

So yeah definitely you have to put some AL black on the bare metal... and I would degrease the denix completely. Then just a thin coat of flat or satin enamel. I did mine with everything on except the flash hider. Then used steel wool to rub exposed parts as they would naturally come into contact with things.

What's the prefered grade of steel wool for weathering... I could only find one place that even had steel wool near me, and they were in huge bags, and there were maybe 6 different grades (0000, 000, 00, 1, 2 etc.)

Figured I'd just try and get an opinion here before I spend 20 bucks trying out a garbage bag sized collection of different ones....
 
This thread is more than 3 years old.

Your message may be considered spam for the following reasons:

  1. This thread hasn't been active in some time. A new post in this thread might not contribute constructively to this discussion after so long.
If you wish to reply despite these issues, check the box below before replying.
Be aware that malicious compliance may result in more severe penalties.
Back
Top