You are using an out of date browser. It may not display this or other websites correctly.
You should upgrade or use an alternative browser.
You should upgrade or use an alternative browser.
DEC ANH Hero Blaster Kit Builds
- Thread starter Vanitas
- Start date

ObscureReferenc
Active Member
Re: Simplified, cheaper DEC ANH Hero Blaster Kit parts (posted with permission fr...
Has anyone used the JAX pewter yet? I'm real curious to see how that compares to the Super Blue.
Has anyone used the JAX pewter yet? I'm real curious to see how that compares to the Super Blue.
Re: Simplified, cheaper DEC ANH Hero Blaster Kit parts (posted with permission fr...
Nice Denix build! Can we see any more glam pics of it? :angel
Finally done! that Super blue and aluminum Black made this DL-44 perfectthe scope is just amazing lol i love it!
View attachment 341366
Nice Denix build! Can we see any more glam pics of it? :angel
kpax
Sr Member
Re: Simplified, cheaper DEC ANH Hero Blaster Kit parts (posted with permission fr...
...by closed ended I am guessing you did not disassemble the frame and the tap hit bottomed out and stripped the tap?
Sorry you had trouble.
Yes the epoxy will hold the rear rod very well.
Good luck with the rest of the build.!
...by closed ended I am guessing you did not disassemble the frame and the tap hit bottomed out and stripped the tap?
Sorry you had trouble.
Yes the epoxy will hold the rear rod very well.
Good luck with the rest of the build.!
I used a hand tap but have very little experience with doing it. I'm fine with open drilled holes, it's the closed end holes that get me & I got distracted at a vital moment & thats how it came to be. I think i'll epoxy it in as it's no longer a load bearing thread as the front & new middle bolt are good.
Re: Simplified, cheaper DEC ANH Hero Blaster Kit parts (posted with permission fr...
I'm slated to receive my Jax Pewter Black tomorrow so I'll try it on the scope, if not other parts, and post the picture(s)/results.
Has anyone used the JAX pewter yet? I'm real curious to see how that compares to the Super Blue.
I'm slated to receive my Jax Pewter Black tomorrow so I'll try it on the scope, if not other parts, and post the picture(s)/results.
Re: Simplified, cheaper DEC ANH Hero Blaster Kit parts (posted with permission fr...
Epoxy should work, you can also put a nut on the inside but you might not get the trigger assembly to work,
maybe silver solder it in
- - - Updated - - -
I didn't get a notification about that and I am included on all tracking, I will see if I can find anything out,
Ok, so I was going good on the build, then had a complete mishap, drilling the holes for the mount screws fine, tapped the forward hole fine, tapping the rear hole took my eye off the ball for a split second & bang over tapped & ruined the thread. Was completely devastated, sat back for about 30 minutes & came up with the solution. drill a third hole on the mount bar between the 2 hex screws & into the denix, countersink a hole & place a very thin bolt sandwiched between the mount bar & scope mount & hey presto nice strong support. Just need to figure out how to work the rear thread now. Will cutting the thread down & epoxying it in work??
View attachment 341249
Epoxy should work, you can also put a nut on the inside but you might not get the trigger assembly to work,
maybe silver solder it in
- - - Updated - - -
Sad news... my package made it to Sweden about two weeks ago, even passed through customs without any problems... but after that no one at the Swedish postal service seems to know where the package is! :confused They put out a search for it last week, but no luck so far.
Anyway, the stuff you're all doing looks great! This thread makes for a great manual to follow... if I ever get the parts that is :cry
Just wanted to share my pain with you all!
I didn't get a notification about that and I am included on all tracking, I will see if I can find anything out,
goldenry007
New Member
Re: Simplified, cheaper DEC ANH Hero Blaster Kit parts (posted with permission fr...
Looks great! What did you use for the scope mount? Paint? and what about the scope?
Finally done! that Super blue and aluminum Black made this DL-44 perfect
View attachment 341366
Looks great! What did you use for the scope mount? Paint? and what about the scope?
Re: Simplified, cheaper DEC ANH Hero Blaster Kit parts (posted with permission fr...
for the scope i used super blue on a cottonball and did about 11 passes and then washed it buffed it with 0000 steel wool and then hit it 4 times with aluminum black washed and buffed it with 0000 steel wool again and did a light coast of smoke black tamiya paint Ps-31
for the Denix body i used aluminum black buffed it VERY lightly with 0000 steel wool and hit it again with aluminum black
the FH i did Scotts zip-lock method washed it and buffed it with steel wool 000
for the mount it really did not want to take any of the chemicals i hit it with superblue at least 20 or so passes and all i could achieve was as dark steel look so after the 20 or so passes i washed it and hit it with satin black buffed it with steel wool 0000 washed it and buffed it one last time with 0000 steel wool.
As this was my first time working with bluing i followed scotts video. again not knowing i did the baggy method with everything and i can safely say...don't lol at least it did not work as i though on my parts. it will just cause oxide (or like carbon) buildup on the parts that just rubs off. the only thing i would do that to would be the FH and the crossbar.(but i painted my crossbar) Just take you time and do as many passes with the chemicals as desired and don't freak out. as it seems that any mistakes are easily fixed by buffing with 000 steel wool or a fine grade sand paper and just clean the area and use a q-tip to re blue lol
Thank again Guys for making such a great Kit anyone who bought one will be extremely happy with it!!!!!


Looks great! What did you use for the scope mount? Paint? and what about the scope?
for the scope i used super blue on a cottonball and did about 11 passes and then washed it buffed it with 0000 steel wool and then hit it 4 times with aluminum black washed and buffed it with 0000 steel wool again and did a light coast of smoke black tamiya paint Ps-31
for the Denix body i used aluminum black buffed it VERY lightly with 0000 steel wool and hit it again with aluminum black
the FH i did Scotts zip-lock method washed it and buffed it with steel wool 000
for the mount it really did not want to take any of the chemicals i hit it with superblue at least 20 or so passes and all i could achieve was as dark steel look so after the 20 or so passes i washed it and hit it with satin black buffed it with steel wool 0000 washed it and buffed it one last time with 0000 steel wool.
As this was my first time working with bluing i followed scotts video. again not knowing i did the baggy method with everything and i can safely say...don't lol at least it did not work as i though on my parts. it will just cause oxide (or like carbon) buildup on the parts that just rubs off. the only thing i would do that to would be the FH and the crossbar.(but i painted my crossbar) Just take you time and do as many passes with the chemicals as desired and don't freak out. as it seems that any mistakes are easily fixed by buffing with 000 steel wool or a fine grade sand paper and just clean the area and use a q-tip to re blue lol
Thank again Guys for making such a great Kit anyone who bought one will be extremely happy with it!!!!!
Re: Simplified, cheaper DEC ANH Hero Blaster Kit parts (posted with permission fr...
Try JB Weld. It can be used for a multitude of things. Two part system: Use equal parts and mix together. Fill the hole that you tapped and place tape on both sides of the hole that you just filled to keep the JB Weld in place as it cures. Once cure you can re-drill and tap the hole. It has worked for me before. J-B Weld | Original Cold Weld Formula Steel Reinforced Epoxy
Ok, so I was going good on the build, then had a complete mishap, drilling the holes for the mount screws fine, tapped the forward hole fine, tapping the rear hole took my eye off the ball for a split second & bang over tapped & ruined the thread. Was completely devastated, sat back for about 30 minutes & came up with the solution. drill a third hole on the mount bar between the 2 hex screws & into the denix, countersink a hole & place a very thin bolt sandwiched between the mount bar & scope mount & hey presto nice strong support. Just need to figure out how to work the rear thread now. Will cutting the thread down & epoxying it in work??
View attachment 341249
Try JB Weld. It can be used for a multitude of things. Two part system: Use equal parts and mix together. Fill the hole that you tapped and place tape on both sides of the hole that you just filled to keep the JB Weld in place as it cures. Once cure you can re-drill and tap the hole. It has worked for me before. J-B Weld | Original Cold Weld Formula Steel Reinforced Epoxy
Re: Simplified, cheaper DEC ANH Hero Blaster Kit parts (posted with permission fr...
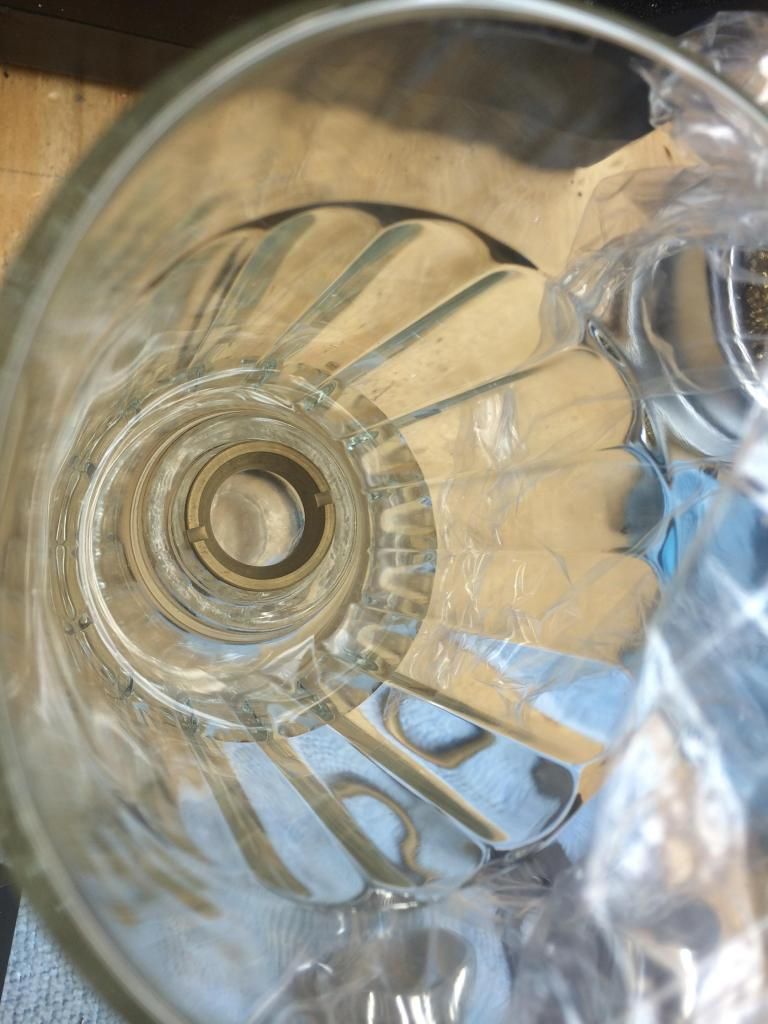
Another quick tip: How to age brass
In order to get the aged look of brass for the scope lens holders it's a simple process. Here's how I did it.
-You will need: Two glasses, two shot glasses, clear plastic wrap and the scope rings.
Place the shot glasses face down in the larger glass. Pour ammonia into the glass about 1/2" below the top of the shot glass. Get a pair of long tweezers and balance the scope ring on top of the shot glass and cover the larger glass with the clear plastic wrap. (It's key to have a clear larger glass this way you can observe the aging process.) Once it has aged to your liking remove the plastic wrap and use the tweezers to carefully remove the ring(s). Wash the rings in warm soapy water and dry with a soft cloth. If the process is too dark to your liking a bit of Brasso and some polishing will bring it back to the original shine. The pictures don't do it justice but they turned out great.
Looking down into the large glass:
Finished product:

Another quick tip: How to age brass
In order to get the aged look of brass for the scope lens holders it's a simple process. Here's how I did it.
-You will need: Two glasses, two shot glasses, clear plastic wrap and the scope rings.
Place the shot glasses face down in the larger glass. Pour ammonia into the glass about 1/2" below the top of the shot glass. Get a pair of long tweezers and balance the scope ring on top of the shot glass and cover the larger glass with the clear plastic wrap. (It's key to have a clear larger glass this way you can observe the aging process.) Once it has aged to your liking remove the plastic wrap and use the tweezers to carefully remove the ring(s). Wash the rings in warm soapy water and dry with a soft cloth. If the process is too dark to your liking a bit of Brasso and some polishing will bring it back to the original shine. The pictures don't do it justice but they turned out great.
Looking down into the large glass:

Finished product:

Re: Simplified, cheaper DEC ANH Hero Blaster Kit parts (posted with permission fr...
You can also fit the barrel with a bit of filing using just a flat file. I believe that Kpax had a tutorial showing how to fit the barrel on the ANH discussion thread somewhere...
i do feel that way now lol!
You can also fit the barrel with a bit of filing using just a flat file. I believe that Kpax had a tutorial showing how to fit the barrel on the ANH discussion thread somewhere...
majormalfuntion
Well-Known Member
Re: Simplified, cheaper DEC ANH Hero Blaster Kit parts (posted with permission fr...
Great work every one I have sanded my denix drilled and taped holes for the bracket just waiting for my aluminum black to arrive. How is everyone fixing there lenses inside the scope ?
Great work every one I have sanded my denix drilled and taped holes for the bracket just waiting for my aluminum black to arrive. How is everyone fixing there lenses inside the scope ?
Attachments

Re: Simplified, cheaper DEC ANH Hero Blaster Kit parts (posted with permission fr...
Lil' bit of superglue. Holds just fine for me. Don't use too much though, or it looks sloppy.
Great work every one I have sanded my denix drilled and taped holes for the bracket just waiting for my aluminum black to arrive. How is everyone fixing there lenses inside the scope ?
Lil' bit of superglue. Holds just fine for me. Don't use too much though, or it looks sloppy.
Re: Simplified, cheaper DEC ANH Hero Blaster Kit parts (posted with permission fr...
yup agreed i used every little and used a toothpick to apply it
Lil' bit of superglue. Holds just fine for me. Don't use too much though, or it looks sloppy.
yup agreed i used every little and used a toothpick to apply it
Country Paul
Sr Member
Re: Simplified, cheaper DEC ANH Hero Blaster Kit parts (posted with permission fr...
Ok, quick bluing question (not that I'm there yet)
the only other time that I've used Alu black was when I blued my denix for my ESB build, then I was told that it was best to heat the metal before applying (I used a hair dryer :lol)
has as anyone been heating the metal before using Alu black or super blue? Does it make a difference?
just wondering
thanks
Re: Simplified, cheaper DEC ANH Hero Blaster Kit parts (posted with permission fr...
YES! Sanding it just beforehand is also a great thing to improve the finish of a Denix. First, you take a sanding block (Which I've found works best at evenly sanding a Mauser) until it's a nice satin finish (It should be disassembled as well). Then, I actually recommend putting it into a mini oven, as you can get higher, more evenly consistent temperatures on the Denix, and it's more of a deep heat. After experimenting with various temperatures for different lengths of time, I found that the winning combination was about 300 degrees Fahrenheit for about 10 minutes. I then took my Alu Black and applied it with the finest grade of steel wool that I had (I don't remember which one it exactly was, but the finer, the better). It only took about two cotes of this to get a satisfactory finish. I didn't have any gun oil or wax sealer, so I allied a paper towel sipped into canola oil, which very gently removed some of the tarnish and helped to even it out. I ended up with a VERY nice tone that, in the right light, is quite blue, which is what I wanted (Dark blue, but blue nonetheless). There were a few spots that didn't quite color the same, but one of them is where I will add the mystery disc, so that doesn't matter, and the other is very small, and doesn't matter.
Shortly after this though, I found and bought my first MGC Mauser, so my modded Denix was left untouched afterwards. Again, because I never sealed it, the Denix got a little beat up around the edges, where the finish rubbed off a bit, but they're easily fixable. Hope this helps!
Ok, quick bluing question (not that I'm there yet)
the only other time that I've used Alu black was when I blued my denix for my ESB build, then I was told that it was best to heat the metal before applying (I used a hair dryer :lol)
has as anyone been heating the metal before using Alu black or super blue? Does it make a difference?
just wondering
thanks
YES! Sanding it just beforehand is also a great thing to improve the finish of a Denix. First, you take a sanding block (Which I've found works best at evenly sanding a Mauser) until it's a nice satin finish (It should be disassembled as well). Then, I actually recommend putting it into a mini oven, as you can get higher, more evenly consistent temperatures on the Denix, and it's more of a deep heat. After experimenting with various temperatures for different lengths of time, I found that the winning combination was about 300 degrees Fahrenheit for about 10 minutes. I then took my Alu Black and applied it with the finest grade of steel wool that I had (I don't remember which one it exactly was, but the finer, the better). It only took about two cotes of this to get a satisfactory finish. I didn't have any gun oil or wax sealer, so I allied a paper towel sipped into canola oil, which very gently removed some of the tarnish and helped to even it out. I ended up with a VERY nice tone that, in the right light, is quite blue, which is what I wanted (Dark blue, but blue nonetheless). There were a few spots that didn't quite color the same, but one of them is where I will add the mystery disc, so that doesn't matter, and the other is very small, and doesn't matter.
Shortly after this though, I found and bought my first MGC Mauser, so my modded Denix was left untouched afterwards. Again, because I never sealed it, the Denix got a little beat up around the edges, where the finish rubbed off a bit, but they're easily fixable. Hope this helps!
Attachments

Last edited:


Similar threads
- Replies
- 53
- Views
- 7,954
- Replies
- 19
- Views
- 3,499
- Replies
- 38
- Views
- 6,994
- Replies
- 4
- Views
- 1,221