JSConnolly
Active Member
Hey All...
I purchased a "Portumac" DV Chest and Belt Box and RotJ Belt Buckle last year.
I THEN Purchased a "Working/Moving Rocker Switch Frame and Switch" from a guy on "Shapeways".
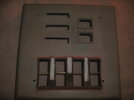
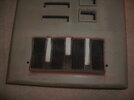
I've since cut out the OLD "Switch Panel" and have Modified the Main Box and basically "Grafted" the NEW Rocker Switch Panel in it's place.
This was NOT as easily done as I THOUGHT It would be?! But it was WELL WORTH IT!
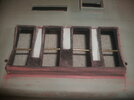
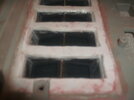
The "WHITE" Parts on the inside is the "Frame" I had to make out of Sheet Plastic that are two pieces of sheet plastic bonded together with Epoxy. THEN Epoxied in place!
I then add smaller frames to go INSIDE to raise the height profile of the new switch base part, UP, so that it didn't sit too low inside the cut out area.
I also had to make SURE that the middle sections were strong, so I added to those weaker, inner parts as well.
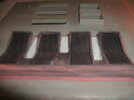
Then {as you can see from the Bondo, Auto Putty} I blended the Rocker Panel seams, into the main Box. I ALSO had to trim down the Inner plastic "Supports" in between and one the outer edges of the frame for the Rocker Switches, to make SURE each individual switch moved freely!
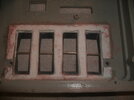
{*A Note on the Rocker Panel it's self... I removed the Original 3D Printed "Bars" or "Rods" that the Switches Rocked or Rotated on because I quickly found out that
they were WAY to Fragile to withstand constant use. So I snipped them out and drilled holes and replaced them with 1/16th. Brass Rod Stock. This works SO MUCH BETTER, AND they don't get stuck anymore like they originally did! }
I plan on using small switched under each "Rocker" on both ends to enable me to actually USE the box to turn on all of my "Electronics" like Main Power,
Breather Effect, Voice Amp. etc.
I will just keep the separate power for the belt boxes as they are. No need to ADD to the Electrical Nightmare that I will have already gotten myself
into!!! LOL
Here are Pics of my Progress. I will add more as I progress.
Comment or Message me if you have any questions?
Take Care all and May the Force Be With You... Always!
Joe
P.S.
When it comes to Painting the Boxes... I will be using an "Epoxy Appliance Paint" in "Stainless Steel" to simulate them being made of metal!
THEN I will use some form of "masking" substance such as Yellow Mustard, or Liquid Latex to "Mask Off" areas that will be "Chipped/Worn" from use
like the REAL Ones are!
I will also show pics of THAT progress as I go!
I purchased a "Portumac" DV Chest and Belt Box and RotJ Belt Buckle last year.
I THEN Purchased a "Working/Moving Rocker Switch Frame and Switch" from a guy on "Shapeways".
I've since cut out the OLD "Switch Panel" and have Modified the Main Box and basically "Grafted" the NEW Rocker Switch Panel in it's place.
This was NOT as easily done as I THOUGHT It would be?! But it was WELL WORTH IT!
The "WHITE" Parts on the inside is the "Frame" I had to make out of Sheet Plastic that are two pieces of sheet plastic bonded together with Epoxy. THEN Epoxied in place!
I then add smaller frames to go INSIDE to raise the height profile of the new switch base part, UP, so that it didn't sit too low inside the cut out area.
I also had to make SURE that the middle sections were strong, so I added to those weaker, inner parts as well.
Then {as you can see from the Bondo, Auto Putty} I blended the Rocker Panel seams, into the main Box. I ALSO had to trim down the Inner plastic "Supports" in between and one the outer edges of the frame for the Rocker Switches, to make SURE each individual switch moved freely!
{*A Note on the Rocker Panel it's self... I removed the Original 3D Printed "Bars" or "Rods" that the Switches Rocked or Rotated on because I quickly found out that
they were WAY to Fragile to withstand constant use. So I snipped them out and drilled holes and replaced them with 1/16th. Brass Rod Stock. This works SO MUCH BETTER, AND they don't get stuck anymore like they originally did! }
I plan on using small switched under each "Rocker" on both ends to enable me to actually USE the box to turn on all of my "Electronics" like Main Power,
Breather Effect, Voice Amp. etc.
I will just keep the separate power for the belt boxes as they are. No need to ADD to the Electrical Nightmare that I will have already gotten myself
into!!! LOL
Here are Pics of my Progress. I will add more as I progress.
Comment or Message me if you have any questions?
Take Care all and May the Force Be With You... Always!
Joe
P.S.
When it comes to Painting the Boxes... I will be using an "Epoxy Appliance Paint" in "Stainless Steel" to simulate them being made of metal!
THEN I will use some form of "masking" substance such as Yellow Mustard, or Liquid Latex to "Mask Off" areas that will be "Chipped/Worn" from use
like the REAL Ones are!
I will also show pics of THAT progress as I go!