Cyberman Foam and Pepakura Build

Mclabop

Active Member
My journey to this build started a year ago at SDCC 2014. My wife and daughter had costumed up two years in a row and I was frankly tired of holding the bag or taking the photo. I guess my inner narcissist was screaming, "look at me!" I'd considered an Iron Man or Stormtrooper for years, but hadn't really had motivation. And then we ran into a Cyberman last year, pretty sure it was another RPF member wondersquid. Also ran into someone with an Anubis headpiece from SG-1 and I talked with them a bit on construction and technique.

I started following his thread and doing research, watching youtube videos, soaking up RPF tutorials, etc. I built a paper (pep) helmet before deciding on a foam suit as I was still in the thinking/research stage. It seemed a harder task to do a paper build. Then I then stumbled into the foam section (and recalled the costumes I'd seen at SDCC) So about three months after SDCC I made my first trip to Harbor Freight, printed the first template from the modified pep-files by JF Custom (wondersquid hadn't released his files at this point), and my first cut into foam.

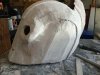
One week later I had the basics of the suit glued together. But the helmet came out wonky so I ended up using the paper one.

I learned a lot, and used several methods to finish it. Did a heck of a lot of experimentation and asking questions here and in other forums (the 13th Cyber Legion on FB is a great group of Cyber builders). But most of the work was bondo, sanding, bondo, sanding, etc...

Gloves are latex and were lent to me by Devlin on the 13th Cyber Legion. I felt better with those and they showed up in lots of people's selfies, or as I referred to them 'chokies' as my pose was one of strangling them as I was the pic with my friend in the River costume.

The suit did so well that they pushed me up on stage at the BBC's Doctor Who Meet-up. Ended up winning. They took me back for an interview, and unexpectedly Peter Capaldi and Steven Moffett were there. Peter came up and complimented me and signed the suit! Amazing experience.

11243992_10153063260297615_3137570530333948001_n.jpg11667446_379046442296719_6624454592337373532_n.jpg11693822_10153063247922615_4732271963900479029_n.jpg11698397_10153063247347615_7450423932178961862_n.jpg11755872_10153088909237615_345269203970047318_n.jpgpredator-and-cyberman-from-doctor-who-duke-it-out.jpgUnknown copy.jpegUnknown.jpeg

I'll post a blow by blow with images below, including some missteps I made and the eventual fixes. The whole build took eight months start to finish but most of that was resting, drying, thinking time.

Plans for Version 2
- Modify the mouth LED to activate on voice
- Incorporate a voice changer and speakers
- Fix helmet issues (top vent, make it close from front instead of back, add cheek detail)
- Make new front chest piece to replace signed chest piece
- Make chest logo removable and add goo and emotion inhibitor chip
- Finish the undersuit (knees and shoulders), and repair damage (elbows)
- Repair cod piece and put in side snaps (the diaper pull up method damaged cod piece undersuit)
- Make boots easier to get on/off


11243992_10153063260297615_3137570530333948001_n.jpg


11667446_379046442296719_6624454592337373532_n.jpg


11693822_10153063247922615_4732271963900479029_n.jpg


11698397_10153063247347615_7450423932178961862_n.jpg


11755872_10153088909237615_345269203970047318_n.jpg


predator-and-cyberman-from-doctor-who-duke-it-out.jpg


Unknown copy.jpeg


Unknown.jpeg
 
Last edited by a moderator:
Re: Cyberman Pepakura Build (and other methods)

1.jpg

First part done. I did it out of heavy card stock. My first time doing pep. I was quite impressed with the results. But also started some of the problems I later had to correct.

Tip 1 - Always have reference photos printed out and hanging up in eye sight.

I was using images on an iPad or laptop at the time, but the screen would shut off and I'd go about my merry way. The problem with that is small errors crept in that I might have been able to fix now and saved time finding solutions for later. Note the protruding "mohawk" to recessed upper facial ridge, more on that later.


2.jpg

Here you can see the pep sitting atop my completed foam chest piece. I actually started with a forearm part first as that was the easiest to do. Then a shin. Pretty sure chest was last. I wasn't thrilled with how the chest logo came out. It was ok, but spent a few months pondering it before finding an awesome solution.

3.jpg4.jpg4a the helmet mistake.jpg

Here's where you can start to see the helmet problems. Firstly, the foam version was all sorts of lopsided. I added internal dowels thinking I could heat bend it into place, or use smooth-on to harden it, but it stayed mis-shappen (vent was very off kilter). But, the upper U shaped face ridge was correct minus the missing mohawk. To the right, my first pass with bondo got me a little concerned. Something was off. So I threw paint at it and printed a ref photo. BAM. The ridge line to mohawk. I had no U shape and the mohawk protruded too far.

IMG_2459.JPGIMG_2456.JPG

Regarding the paper version, I temporarily hot glued dowels inside of the paper helmet to get it close to the correct shape and as square as possible. I then coated the outside of the paper with resin. After the exterior resin set, I removed the dowels and used fiberglass and resin to harden it from the inside. No idea why right photo is sideways, it's not that way on my computer (also unsure how to remove the weirdly upside down thumbnail at the bottom of this post)... together they show the resin'd exterior and the build up of skim coats to smooth the paper folds.

5.jpg

The fix was to cut a piece of 1/8" thick craft foam to the correct shape, seen above post primer. I'd already tried Smooth-On Eplison on another part and knew it would harden the foam. So gave it a few light coats and filled the gaps and cracks with bondo. Again, despite having a ref photo, I didn't pay enough attention to the cheek details and lost some lines. Not a huge deal, but enough to bug me when I'd "finished" everything.

Made another mistake right here:

IMG_3139.jpg

Which brings me to Tip 2 - Consider how you're going to get in and out of the damn thing before you make cuts.

I didn't consider where I needed to make my cut line properly. I'd figured on having the back half hold the head phones and antenna (the tube that runs across from the ears to the top). What I didn't think about was the hard to hide gap that would be created when assembled and how much damage/wear would show with successive removals/closures.

9.jpg

Above, you can see the "headphones" as I call them. Each set was 4-6 layers of 1/4" craft foam which I shaped first with a dremel. 2 coats with Epsilon. Then bondo and filler until smooth. There are a couple missing detail lines, but not enough to distract from the final. I did the same for the wrap around piece. That is several layers of 1/4" thick craft foam, heated to shape, glued in place, sealed with Epsilon and bondo'd till the cows came home.

10.jpg

The antennas are made from dowel and copper elbow joints. The fitted plastic ends are PVC pipe that I hand cut to a flush angle.

11.jpg

Nearly finished. This is another of the knock-on effects of improper planning. Because the front piece sits into the back, the vent has to be attached to the front. Which meant it was a PITA to get everything correctly set. I ended up getting it really close, but not perfect. I used screen window repair kit on the eyes, but should have gone with black instead of silver. The blue light is a bicycle LED lighting kit from ACE Hardware, really liked it as it still glowed brightly in full sun. Finished helmet is below:

Unknown.jpeg

The inside is lined with various layers of 1/4" and 1/8" craft foam. I built it up in places that were tight. The front is held to the back by partial pressure fit, and four rare earth magnets. I'll post an interior picture later on.
 

Attachments

  • IMG_2462.JPG
    IMG_2462.JPG
    1.3 MB · Views: 238
Last edited:
Re: Cyberman Pepakura Build (and other methods)

I talked about Smooth-On Epsilon before, but here is the in depth.

IMO, Smooth-on Epsilon is a really good product. It takes a lot longer than the PVA/plastidip method, but I think I got a much more even surface to work than I was able to with the PVA/plastidip. Epsilon basically gives you a thin M&M style candy shell, but it does soak into the foam a bit. You can still damage it, but it will likely be minor and repairable. I have several parts where I was poked or tapped that withstood abuse. Another couple parts which were thinner did some spider webbing. I think it depends on how many layers of the Epsilon and how thick the bondo is.

The chest piece is neigh impermeable by anything other than grenades. Withstood a drunk guy forcefully grabbing me. Nearly deleted him, lol. Fortunately my minders got him off of me.

6smothon.jpg

Not a great photo, but you can see the shininess and general hardness of the product on an bicep piece. I was squeezing fairly hard and it didn't budge. Compared to the malleability of the PVA parts.

One tip here is lighter coats are better. If they're too thick, it gets viscous and runs. Gravity does it's thing and you'll spend time sanding off little epoxy runs and knobs. Not hard to do, just time consuming. Plus the smaller batches of Epsilon take longer to set than the larger batches.

7.jpgIMG_3086.jpg

Still being fairly new, I was making rushing rookie mistakes. Lots more bondo in one go than I'd intended. Plus, who glues a chest logo on before doing the flat smooth surface below? I mean really... which led me to rip it out. The back side also had lots of nooks and crannies which required dremel or lots of folded up sandpaper on sticks. I would have done myself a lot of favors my doing the base chest and then placing the attachments on top of a smooth surface.

Which meant I had to replace it... hmm. A friend mentioned 3d printing a Dalek eye-stalk at his library in Chicago. I thought, I have a kick butt library system in San Diego, lo and behold, they have a shop. And it takes donations... hallelujah! Only issue was the one printer had a heater element problem so some layers didn't go down so well. Required some rework and smoothing at home, but otherwise very happy with the process and will do it again. In fact, I used the process to make the arm bolts.

chest 3d print.jpgfins.jpg

Pictured is one of the three fins and the central logo being printed. The bottom fin didn't sit flush with the chest. So I used the printed fin to make a template on poster board. Cut it large, and then trimmed it until flush. A little bondo and sanding later, I had the correct contour to fully attach and look right. I won't repost, but it can all be seen in the photo above with the comic con banner.


6smothon.jpg


7.jpg


IMG_3086.jpg


chest 3d print.jpg


fins.jpg
 
Last edited by a moderator:
Re: Cyberman Pepakura Build (and other methods)

Another issue I had was with the shins. I think this was the actual first piece I made, not sure why. But it was the last parts I finished. Yet another reinforcement of always have the ref photos when gluing/cutting/etc.

8.jpg

I messed up and made the front of the shin come to a point like medieval knight's armor would. As a result, I had to get creative. I cutout the bad pointed section (and an inch to each side). Then got my shin template back out and cut new replacements. Glued those into place, and then built everything up with bondo. The shins should have a rounded appearance as they do below. Still not quite as detailed and crisp lines, but not bad for a repair job with three weeks before SDCC.

shin.jpg

Which brings me to the boots. I'd used an old pair of timberland boots that had seen better days. Wrapped them in foam and did the Epsilon process on them. Everything worked great in trials, and then for some inexplicable reason, my feet grew/swelled. I couldn't get them on with the shins and everything without pushing the inner boot heel down and uncomfortable walking on.

Day 1 of SDCC, my attendance badge doubled as a shoe horn. Day 2-3, an actual shoe horn doubled as a shoe horn. ;)

Tip 3 - The trial run

I'd done a trial run the week before at a certain retail bookseller chain store that hosts pop culture events. A bunch of whovians gathered and I was able to spend about 40 minutes in the mostly completed suit. Undersuit was still in progress and the mouth light didn't work yet.

It mostly worked, but revealed some problems, sadly not the boot problem, mostly in the transportation area. I ended up using two large suit cases, holding the helmet and placing the handle of one suit case in the chest and reaching thru to roll everything around.

Tip 4 - Proper hydration before/during/after

The trial run revealed I was quite dehydrated before getting into the suit and I was miserable. I didn't put two and two together until I got out of it and downed about a gallon of water.

At SDCC, I managed eight hours on Day 1, six on Day 2, and six on Day 3 (the offsite meetup). The offsite was probably the worst as it'd been a long con, the Tested party was the night before, and it was the hottest day outside in the suit. But also the most fun as I walked the line around House of Blues getting lots of pics with other fans.

I took lots of small breaks with the helmet off, had lots of water on hand, and even a free slushy on 7/11 (the meetup day). Without the water I'd have died. As it was, I had to go to the bathroom literally zero times while wearing the suit as I sweat it all out. Which was fortunate because...

Tip 5 - Always plan for bathrooms


As I said, I didn't need one, but after careful consideration I will be modifying the design. The pull over undersuit I wore was full body with a back zipper. I'm going to modify it to have a slit opening in front (covered by the cod piece). I will also modify the cod piece to allow me to remove it without having to pull down past my leg armor (which wouldn't work anyway). I figure simple side clips will work fine.

All in all, it was a great, if frustrating, build. I will build up a version 2 as the signed chest piece will go on display on my wall. And I also have to decide on what to build next... first figure out latex gloves which I've sculpted but not made molds of...

m4G7B8f.jpg


And then I'm thinking about the Nightmare in Silver Cyberman... oh God, I'm an addict.

m4G7B8f.jpg


8.jpg


shin.jpg
 
Last edited by a moderator:
Re: Cyberman Pepakura Build (and other methods)

I just realized I hadn't talked about finishing. I used Krylon Covermaxx primer and Krylon CoverMaxx Metallic Silver. This is a great product for my needs and gave, IMO, the best metallic shine. I tried Rustoleum and a couple of others, but wasn't impressed. They seemed flatter and more plasticized than the Krylon.

One issue I had was with the top coat though. I grabbed Krylon Covermax clear coat and figured, right we go... and messed everything up. No matter how lightly I applied, it either washed away the metallic flake, or it dulled it to the point of looking like grey metal similar to what US Navy ships look like. Almost looks as flat as primer, which is why I panicked a bit.

I knew from my trial run that the metallic paint would easily rub off, potentially running other costumes around me. As it was, my wife had to wash her hands thoroughly each time she helped me with my helmet (which at the trial run I hadn't fully finished). So on to the trial and error...

12.jpg

At right is the metallic base coat (three coats). Left is with the clear coat applied. I tried a few different brands and types of clear coat later on test pieces with the same result. More head scratching and asking questions. A friend, can't remember which one and I'm so sorry, suggested using clear floor polish like Future or Pledge. Can't remember which I used, but it worked perfectly.

Also, this photo shows the only parts solely finished in PVA/plastidip. They look much rougher and I didn't spend as long on them. I also cheated here as I figured most would look at either the whole costume or mostly the upper body. I was right, but still bugs me enough that I will go back and finish this later.
 
Last edited:
I'll upload pics later, but the undersuit is one of the lycra body suits off of amazon. they run about $25-45. I got the black one since it was cheaper and a good base color.

The wires are made of foam window insulation. They're the type you'd use to fill large gaps between doors/windows and the studs and then fill the rest with expanding foam/caulk. Got them from Home Depot (couldn't find them at Lowes, but doesn't mean they don't carry it).

They come in three sizes 3/8", 1/4" and 1/2". I used shoe glue type stuff (forget the brand but they sell it at Michael's and Joanne's) at first but it didn't bond to the lycra very well. Ended up using a glue gun and it worked fine. Covered it all with plastidip. Make sure you test it a few times both for length (go longer than you think you'll need, and then add an inch or two either side).

Two small tips here:

Don't glue them too close together. I had to rip some off on the right elbow as I'd glued them too close together and made it very restrictive t the point where I couldn't get it past my forearm. I ended up tearing the lycra in a couple places before I made the adjustment to the wires.

I'd also cut 45 degree tips in so it will slide on and off easier without pulling a wire off.

After the insulation and plastidip, surprise, it has zero breathability. Go figure, insulation and sprayed plastic. Who would have guessed. All in all, it was very hot in the thing. If you are above about 75 degrees outside, I'd recommend getting a cool suit with ice water like Adam Savage did for his 2001 Space Odyssey spacesuit. Drink lots of water.

I still need to add some wires at the shoulders and the knees. Right now it is on the elbows and torso as those are the most consistently visible. The show's cybermen also have more detail in the wires, some are braided and others are ribbed. I intend on making a couple adjustments there as well.
 
This thread is more than 8 years old.

Your message may be considered spam for the following reasons:

  1. This thread hasn't been active in some time. A new post in this thread might not contribute constructively to this discussion after so long.
If you wish to reply despite these issues, check the box below before replying.
Be aware that malicious compliance may result in more severe penalties.
Back
Top