Custom Drone Head concepts, lots and lots of em!

FreddySchramm

Active Member
This is the last project I took on before I graduated California College of the arts. Very Important portfolio piece for me too. I wanted to take on something that would teach me how to use my airbrush and it quickly turned into a great way to experiment with different techniques

The helmet was designed in Rhino, and then 3d printed and molded. I casted them all in Smooth on onyx fast, half were coldcasted using aluminum and steel powder. Most of the rusted helmets are coldcasted and then oxidized using a variety of different techniques like patina sprays, vinegar baths, and exposed in the sun or in a hot shower. I experimented with some faux rust techniques like applying cinnamon to acrylic paint to builds up a rusty texture.

The helmets were all painted and highlighted with my airbrush, and masked off with different techniques. I mostly used hairspray in between layers and then rubbed the paint away with a toothpick and steel wool to get a paint chipped look, I also played around with removing the paint with duct tape by freshly painting a helmet, taking a strip of duct tape and pressing and ripping it off the helmets, taking paint with it( great way to get random paint chipping I got some great effects and textures by sandblasting the cold casted helmets too.

For some of the other helmets I relied more on model paints and rub n buff for more metallic looks. One of the best techniques I used was using a graphite pencil to shade in areas and then rubbed them with my finger to get more scratchy look to the exposed metal. I followed that up with a charcoal pen around the area to mimic blast residue.

Some of the helmets have more textured airbrush painted effect to them For those I put down a dark layer, put the helmet in pantyhios and then sprayed another lighter layer of paint to catch the “grid” effect of spandex.


Screen Shot 2017-06-10 at 10.17.20 PM.pngScreen Shot 2017-06-10 at 10.18.59 PM.png
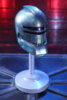
Cold Casted Steel, Graphite pencil Highlights Acrylic paint, Cinnamon,

Screen Shot 2017-06-10 at 10.18.43 PM.pngScreen Shot 2017-06-10 at 10.18.31 PM.png
Graphite Pencil Highlights, Charcoal Highlights Acrylic paint, Acrylic wash

Screen Shot 2017-06-10 at 10.18.18 PM.pngScreen Shot 2017-06-10 at 10.18.06 PM.png
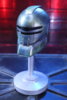
Acrylic paint, Cinnamon Cold casted steel, Vinegar bath, spray paint.

Screen Shot 2017-06-10 at 10.17.43 PM.pngScreen Shot 2017-06-10 at 10.17.29 PM.png

Oil paint wash , Spandex masking, Graphite highlights. Duct tape masking, Rub N buff, Graphite and Charcoal Highlights.

Screen Shot 2017-06-10 at 10.17.54 PM.pngScreen Shot 2017-06-10 at 10.19.10 PM.png
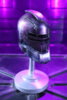
Acrylic paint, Graphite highlights, Rub N buff Acrylic Paint, Cinnamon

Screen Shot 2017-06-10 at 10.24.03 PM.pngScreen Shot 2017-06-10 at 10.24.12 PM.png

Cold casted steel, Hair spray masking, Duct tape masking, Patina solution, Acrylic, oil wash , spandex masking, Graphite Highlights
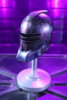
Vinegar bath

Screen Shot 2017-06-10 at 10.24.23 PM.pngScreen Shot 2017-06-10 at 10.24.37 PM.png

Cold Casted Steel, patina solution, vinegar, exposed sunlight. Sandblasted base, metallic paint, oil & acrylic wash


Screen Shot 2017-06-10 at 10.24.46 PM.pngScreen Shot 2017-06-10 at 10.25.00 PM.png

Charcoal, metallic paint, graphite highlights Charcoal, metallic paint, graphite highlights


Screen Shot 2017-06-10 at 10.25.12 PM.pngScreen Shot 2017-06-10 at 10.25.24 PM.png

Sandblasted paint, metallic paint, graphite highlights Metallic paint, graphite highlights, charcoal

Screen Shot 2017-06-10 at 10.25.38 PM.png

iron metal coating

Screen Shot 2017-06-10 at 10.17.20 PM.png


Screen Shot 2017-06-10 at 10.17.29 PM.png


Screen Shot 2017-06-10 at 10.17.43 PM.png


Screen Shot 2017-06-10 at 10.17.54 PM.png


Screen Shot 2017-06-10 at 10.18.06 PM.png


Screen Shot 2017-06-10 at 10.18.18 PM.png


Screen Shot 2017-06-10 at 10.18.31 PM.png


Screen Shot 2017-06-10 at 10.18.43 PM.png


Screen Shot 2017-06-10 at 10.18.59 PM.png


Screen Shot 2017-06-10 at 10.19.10 PM.png


Screen Shot 2017-06-10 at 10.19.20 PM.png


Screen Shot 2017-06-10 at 10.24.03 PM.png


Screen Shot 2017-06-10 at 10.24.12 PM.png


Screen Shot 2017-06-10 at 10.24.23 PM.png


Screen Shot 2017-06-10 at 10.24.37 PM.png


Screen Shot 2017-06-10 at 10.24.46 PM.png


Screen Shot 2017-06-10 at 10.25.00 PM.png


Screen Shot 2017-06-10 at 10.25.12 PM.png


Screen Shot 2017-06-10 at 10.25.24 PM.png


Screen Shot 2017-06-10 at 10.25.38 PM.png
 
Last edited by a moderator:
Here's some more!!!!!


Screen Shot 2017-06-10 at 10.27.02 PM.pngScreen Shot 2017-06-10 at 10.28.40 PM.png
Oxidized cold casted steel Iron Metal coating


Screen Shot 2017-06-10 at 10.28.26 PM.pngScreen Shot 2017-06-10 at 10.28.13 PM.png
Spray paint, Acrylic paint/ wash Cold casted 50% steel 50% aluminium

Screen Shot 2017-06-10 at 10.27.52 PM.pngScreen Shot 2017-06-10 at 10.27.34 PM.png

acrylic paint Metallic paint , graphite highlight, charcoal

Screen Shot 2017-06-10 at 10.27.18 PM.pngScreen Shot 2017-06-10 at 10.26.41 PM.png
Acrylic paint, oil paint, Cinnamon Cold casted aluminum, Spandex masking, hairspray, duct tape masking


Screen Shot 2017-06-10 at 10.26.50 PM.pngScreen Shot 2017-06-10 at 10.29.02 PM.png

Bronze dust left over from grinding on Bronze metal, cold cast & patina Graphite, acrylic, masking hex bag

Screen Shot 2017-06-10 at 10.30.54 PM.pngScreen Shot 2017-06-10 at 10.31.08 PM.png
Iron Metal coating, Acrylic, Cinnamon Cold casted steel, acrylic, graphite highlights


Screen Shot 2017-06-10 at 10.31.19 PM.pngScreen Shot 2017-06-10 at 10.31.31 PM.png

Oil wash , Rub N buff, Graphite highlights Cold casted steel, Duct tape masking, vinegar bath, spray paint

Screen Shot 2017-06-10 at 10.31.43 PM.pngScreen Shot 2017-06-10 at 10.31.56 PM.png
Spandex masking, graphite highlights, acrylic wash Oxidized cold casted steel


Screen Shot 2017-06-10 at 10.32.22 PM.pngScreen Shot 2017-06-10 at 10.32.31 PM.png

Charcoal, graphite highlights, Rub N buff Oxidized cold cast steel, Vinegar Bath, patina solution, exposed to shower

Screen Shot 2017-06-10 at 10.30.42 PM.png

Graphite highlights, charcole, acrylic
 

Attachments

  • Screen Shot 2017-06-10 at 10.33.42 PM.png
    Screen Shot 2017-06-10 at 10.33.42 PM.png
    1.4 MB · Views: 118
Wow, amazing work. Very interesting to see all the different weathering effects. Also goes to show the many ways of making the same item look different by the paint scheme.

If I had to pick a fave its the 'yellow stripe'
From your First Post, third row down, on the right.
 
Wow, amazing work. Very interesting to see all the different weathering effects. Also goes to show the many ways of making the same item look different by the paint scheme.

If I had to pick a fave its the 'yellow stripe'
From your First Post, third row down, on the right.


Glad you like them!

That one in particular I wish I did more iterations of, at least of that big stripe down the middle.
 
I recently did some more iterations with new airbrushing techniques. I'm playing around with more about lacquer and chrome airbrush paints. These are all from a new mold and are cast solid. I like to use these as swatches for experimentation.


IMG_3730.JPG
IMG_3728.JPG

This guy was painted glossy black then a light coat of Molotow Chroam thinned with guitar lacquer sealed with Alclad gloss II klear koat. The topcoat is actually Dykem marking fluid straight from the can. I love experimenting with this stuff it's really great for anodized finishes. Lightly buff it with steel wool and you get realistic scratch marks, doesn't take much.


IMG_3721.JPG
IMG_3719.JPG

Same Process as the first Head, just a bit more use of the Molotow pen for the battle damage. more use of a dark black lacquer paint for the battle damage.


IMG_3718.JPG
IMG_3716.JPG

Instead of regular gloss black, I used Rustoleum Hammered black for the base to experiment with texture, you can see how it shows. I applied the same chroam with clear coat , and then a light coat of blue Dykem fluid. This stuff can go on pretty thin and is great for building up chadows and highlights. I added a smidge of red Dykem to the blue Dykem for light highlights on certain areas for a subtle purple look. Finished with a very light buff with steel wool to bring out the texture from the hammered paint.


IMG_3703.JPG
IMG_3700.JPG


Again started with gloss black base, but for the chrome layer I ended up mixing Molotow with Guitar lacquer, plus a small amount of blue Dykem. if you look closely it has more of a Robocop blue like appearance then actual chrome. I love this finish so I decided to try tinting the Molotow even more for the next one.


IMG_3691.JPG
IMG_3688.JPG

I gave this guy a very light Hammered paint coat for texture. when it came time to mix the chrome I lightly tinted it a with a dab of yellow Mixol universal tint ( highly recommend those tints for anything like this) I got more of a greenish-gold, not what I wanted but still acceptable. Once that layer was sealed with a light Clearcoat I gave it a light spray with Red Dykem, then a light buff with fine steel wool to bring out the texture. this one's my favorite.


IMG_3652.JPG
IMG_3649.JPG

Here I just ended up doing the same Hammered/ chrome process but I had fun mixing both red and blue Dykem for a more anodized purple look. It's better if you use just straight red or blue after to highlight certain areas, brings out the color a little bit more.


IMG_3645.JPG
IMG_3648.JPG


This was a weird one. I used too much of an off-brand rattle can black and got a very nice intense hammered texture so I just went with it. I gave it a light rub down with graphite powder for a very nice metallic shine and went back and forth with light sprays of Dykem and graphite rubdowns.


IMG_3628.JPG
IMG_3624.JPG


This head, in particular, has a different texture than the rest. He was molded separately from a head that I sandblasted paint off of and ended up getting this really neat chipped spotty texture. The base is the same process as most, black, chrome, clear, etc. I just got to play more with mixing the Dykem topcoats and layers of blue on red and red on purple. Finished off with a nice fine steel wool buff for texture.
 

Attachments

  • IMG_3725.JPG
    IMG_3725.JPG
    1.6 MB · Views: 113
  • IMG_3724.JPG
    IMG_3724.JPG
    1.7 MB · Views: 98
  • IMG_3698.JPG
    IMG_3698.JPG
    1.6 MB · Views: 39
  • IMG_3695.JPG
    IMG_3695.JPG
    1.6 MB · Views: 100


I started a youtube channel recently. Just posted a video on a few techniques on how to achieve real rust finishes with metal paint and powder and ways to seal them. I use these Helmets a lot for swatches


93611341_886091048523938_5807583738892124160_n.png
93426636_546954576231369_7328755232651870208_n.jpg
93167760_531394101080162_7960403699073810432_n.png
 

Attachments

  • 93519503_1612687145539058_7344352071379845120_n.png
    93519503_1612687145539058_7344352071379845120_n.png
    1.9 MB · Views: 25
This thread is more than 3 years old.

Your message may be considered spam for the following reasons:

  1. This thread hasn't been active in some time. A new post in this thread might not contribute constructively to this discussion after so long.
If you wish to reply despite these issues, check the box below before replying.
Be aware that malicious compliance may result in more severe penalties.
Back
Top