Cooper Howard - AKA The Ghoul full cosplay outfit build

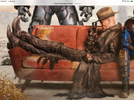
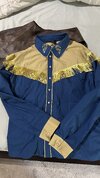
Yeah you could be right, I thought it might be black at first as well but other images seemed to show a shade similar to his shirt which is a dark navy blue ... you gotta hate lighting effects.
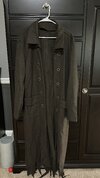
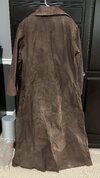
That weathering looks quite good actually, what did you use to distress it?
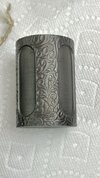
I started searching hat bands and here's one from Amazon that looks close, you'll have to dye it the correct color but since it's horse hair that should be easy ...

Ya I have that book marked, but wasn't sold on the width as it was mentioned to be small by more than one review... I'll keep looking as there seems to be quite a few out there that could be dyed in the end.

As for the hat... I took it in stages:
1) coffee grinds (right from the filter post made and still wet) I used the sink to hold the hat as I worked them in, kept scooping them back up. I started with the underside of the hat and once I got the hang of it, went to the top.
2) I then used a torch (I have a mini one for smoking cocktails); but honestly I didn't like how it seemed to darken very specific spots so I tried broader strokes and it seemed fine but focused mostly edges etc...
3) Next, I took some old reliable acrylic paint I had lying around. I lightly dipped the brush into the paint and then used several brush strokes on a pad so what was left on the brush was minimal. Then applied to the hat, being careful to apply against the grain. (if I made a mistake and went with the grain it seemed to lay a flat patch of paint and I needed to add some water and try and rub it out. It only happened a few times after my initial experience. I forget what that technique is actually called when you brush out the paint prior to applying, but hopefully you get the gist.
4) Lastly I did use a dry sponge, and a shoe stain applicator to brush, scrub and swirl in the paint spots etc...

I'll reserve judgement until I see it in the morning all dried.
Thanks for that tuto; it'll help future cosplay for sure;)
 
Boots & spurs have arrived .... not an exact match for sure but pretty darn close and I'm happy with them given the considerable difficulty in just finding boots that are close, used and in the correct size as I didn't want to spend 200-300 on boots. In my excitement of finding a pair that fit all 3 of those criteria I didn't notice that they have a pattern on top of the toe. I knew I'd have to dye them a different color which isn't really a big deal but maybe I'll be able to hide the etched patterns with sufficient weathering

I gotta say I like the used boots I found... I don't think the boots are actually brown... but more of a burgundy / espresso color. here's my reference pic and then my boots. I went with these DAN POST ESPRESSO BROWN LEATHER BUCKLACE COWBOY BOOTS. You'll find similar out there called Espresso or Burgundy or even Cherry color... A little dirt and weathering and I think I have a winner.
 

Attachments

  • IMG_1233.png
    IMG_1233.png
    6.5 MB · Views: 108
  • Photo Sep 24 2024, 2 59 13 PM.jpg
    Photo Sep 24 2024, 2 59 13 PM.jpg
    1.4 MB · Views: 114
That all looks good. I like the coffee grounds for the hat weathering. Have you settled on the material /pattern for the pants yet? Just got home from the FX studio completing the initial molding for my life casting. They said my stone life cast should be ready somet8me nex5 week.
 
That all looks good. I like the coffee grounds for the hat weathering. Have you settled on the material /pattern for the pants yet? Just got home from the FX studio completing the initial molding for my life casting. They said my stone life cast should be ready somet8me nex5 week.

I bet that was an experience! I'm actually starting with a ready made costume... Swapping out the coat for another to start, but I'll use the costume for this Halloween season and then continue to replace stuff. I'll share after I get it.
 
I had something similar done a long time ago when I needed to have a custom oxygen mask made for me when I started my flying career in the AF because standard ones would leak. You were sent to the base dentist who basically made a 1/2 version of the full head lifecast. These 3 artists have done hundreds of these so it was a very pleasant experience. Unless I get lucky this costume won't be ready for Halloween but we'll see.. I may be just climbing in Dalek Nim and driving around the neighborhood scaring everyone ... lol
 
I had something similar done a long time ago when I needed to have a custom oxygen mask made for me when I started my flying career in the AF because standard ones would leak. You were sent to the base dentist who basically made a 1/2 version of the full head lifecast. These 3 artists have done hundreds of these so it was a very pleasant experience. Unless I get lucky this costume won't be ready for Halloween but we'll see.. I may be just climbing in Dalek Nim and driving around the neighborhood scaring everyone ... lol
Interesting story, thanks for sharing. Ya the only way I’ll be Halloween ready is by cutting a few corners…. But ill keep working on it until its right.
 
I bet that was an experience! I'm actually starting with a ready made costume... Swapping out the coat for another to start, but I'll use the costume for this Halloween season and then continue to replace stuff. I'll share after I get it.

So here's what you get for less than $200 to start as a costume base... (not showing the gloves, they are ok); pants work nicely, belt is fake leather but the buckle looks very good, I did a close up to show you the pant material. The shirt is the pre-bomb cowboy shirt; I've ordered a darker blue shirt version as well. And the coat is surprisingly nice. I like the buttons on the vest and the shape that is fairly accurate but it fits a little snug. I can use it but will look for other options. I may in the end commission someone to make a more screen accurate one. It also came with the gun belt, holders for both rifle and pistol and the bandoleer (all fake leather). I've got real leather versions on the way.
 

Attachments

  • Photo Oct 02 2024, 1 59 51 PM.jpg
    Photo Oct 02 2024, 1 59 51 PM.jpg
    1.5 MB · Views: 94
  • Photo Oct 02 2024, 2 00 12 PM.jpg
    Photo Oct 02 2024, 2 00 12 PM.jpg
    1.3 MB · Views: 102
  • Photo Oct 02 2024, 2 01 47 PM.jpg
    Photo Oct 02 2024, 2 01 47 PM.jpg
    1.7 MB · Views: 106
  • Photo Oct 02 2024, 2 04 19 PM.jpg
    Photo Oct 02 2024, 2 04 19 PM.jpg
    1.4 MB · Views: 102
His pistol is now complete as well as the collection of bullets for his bandolier. The prop dept couldn't just make a single bullet type, they had to have 7 different kinds ... lol. I've never played the game so maybe this is cannon from that ... the wire connector between the barrel and trigger guard is some 16 gauge multi stranded wire, stripped off the insulation and then painted it a dark grey/black and matte clear
Looks like I have the same 3D revolver… first go at painting…
 

Attachments

  • IMG_8877.jpeg
    IMG_8877.jpeg
    2.7 MB · Views: 77
  • IMG_8878.jpeg
    IMG_8878.jpeg
    2.2 MB · Views: 83
Looking good! Where did you get those pants? I'm still struggling with that. My Cattleman's Crease cowboy hat just arrived and I ordered a new band for it. I also finished th3vfinal touches on the overcoat, I'm having a small button hole sewn in the back side by a seamstress from Michael's Men's Warehouse, he's been doing all my soft goods alterations. I'll explain what the button hole is for when I get it back ...
Finished his tin box and anti ghoul serum and completed the saddle bags by adding the requisite pieces of ass jerky ... lol
I pick up my life cast tomorrow so as soon as my Monster Clay arrives I can start pretending I know how to sculpt ...
 

Attachments

  • IMG_0211.jpeg
    IMG_0211.jpeg
    113.5 KB · Views: 96
  • IMG_0210.jpeg
    IMG_0210.jpeg
    798.4 KB · Views: 94
  • IMG_3546.jpeg
    IMG_3546.jpeg
    2.3 MB · Views: 94
  • IMG_3544.jpeg
    IMG_3544.jpeg
    2 MB · Views: 100
I bet that was an experience! I'm actually starting with a ready made costume... Swapping out the coat for another to start, but I'll use the costume for this Halloween season and then continue to replace stuff. I'll share after I get it.
It was $400 but I think that was a reasonable price to have a professional special effects shop do it. Not only does it save weeks of time but it will be perfect and because they make it as a stone cast you can put it in the oven for making latex masks as well as pouring silicon. Unless you drop it it's basically good forever ...
 
Looking good! Where did you get those pants? I'm still struggling with that. My Cattleman's Crease cowboy hat just arrived and I ordered a new band for it. I also finished th3vfinal touches on the overcoat, I'm having a small button hole sewn in the back side by a seamstress from Michael's Men's Warehouse, he's been doing all my soft goods alterations. I'll explain what the button hole is for when I get it back ...
Finished his tin box and anti ghoul serum and completed the saddle bags by adding the requisite pieces of ass jerky ... lol
I pick up my life cast tomorrow so as soon as my Monster Clay arrives I can start pretending I know how to sculpt ...
Love the tin! I'm a ways away from working on beyond the basics... Ya I realized I wasn't going to find the band (three rows, all brown, no tassels) so I went with this... I also got some dark brown dye but I think I'm going to leave well enough alone and keep an eye out for the perfect band.

Photo Oct 01 2024, 1 27 29 PM.jpg
 
Last edited:
It was $400 but I think that was a reasonable price to have a professional special effects shop do it. Not only does it save weeks of time but it will be perfect and because they make it as a stone cast you can put it in the oven for making latex masks as well as pouring silicon. Unless you drop it it's basically good forever ...
Now as long as you don't age :) - j/k
 
Looking good! Where did you get those pants? I'm still struggling with that. My Cattleman's Crease cowboy hat just arrived and I ordered a new band for it. I also finished th3vfinal touches on the overcoat, I'm having a small button hole sewn in the back side by a seamstress from Michael's Men's Warehouse, he's been doing all my soft goods alterations. I'll explain what the button hole is for when I get it back ...
Finished his tin box and anti ghoul serum and completed the saddle bags by adding the requisite pieces of ass jerky ... lol
I pick up my life cast tomorrow so as soon as my Monster Clay arrives I can start pretending I know how to sculpt ...
Ok so the "Halloween costume" quality pack I got off ebay; here's the link 2024 TV The Ghoul Cooper Howard Cosplay Costume Halloween Outfit FY0018 | eBay With shipping it was $175. I figured short term I could roll with the set for this Halloween and long term if I ended up with anything really worthwhile (between the buckle, pants, vest, gloves, shirt and coat) it would be worth it (honestly if I knew the coat was going to be this good I wouldn't have bought the "upgrade"). But now I have two to work on. It was definitely worth it as a starting point.
 
that all is looking good! yeah my first impression when I saw the mask was the same thing ... those eye holes look a little big ... but I get why they did that for a 'one size fits all', which is of course the other thing that would worry me would be sizing. what is your hat size? On Wednesday I'll be sitting for having my full face life cast made. here's the latest from my 2nd distressing/weathering pass of the coat ... I think I'm about 95% of where I want to be as compared to the ref images I have. I think the ragged pieces are a little to even - they are all basically the same length and spacing is too even, I need more randomness in the gaps. the sand staining is pretty close to where a want it I think. I'll let it sit for a few days and then see what i think of it again ...

I haven't done much with fabric coloring... do you put anything on the jacket after the fact to prevent the acrylic from bleeding (especially if it gets wet) or does it eventually set into the fabric?
 
Love the tin! I'm a ways away from working on beyond the basics... Ya I realized I wasn't going to find the band (three rows, all brown, no tassels) so I went with this... I also got some dark brown dye but I think I'm going to leave well enough alone and keep an eye out for the perfect band.

Love the tin! I'm a ways away from working on beyond the basics... Ya I realized I wasn't going to find the band (three rows, all brown, no tassels) so I went with this... I also got some dark brown dye but I think I'm going to leave well enough alone and keep an eye out for the perfect band.

View attachment 1866122
Yeah I'll need to dye my band too but since it's natural horsehair it should be easy
 
I haven't done much with fabric coloring... do you put anything on the jacket after the fact to prevent the acrylic from bleeding (especially if it gets wet) or does it eventually set into the fabric?
The stuff I'm using is fabric paint so no need to treat it with anything after the fact. I don't plan on washing the overcoat since it's an outer garment and any sweat will be absorbed by my shirt and pants which are regular washable cotton fabric. Don't know what would happen if I wore it in a rain storm ... which I don't plan to do ... lol. This outfit is for going to sci fi conventions so pretty much indoors always ...
 
Looking good! Where did you get those pants? I'm still struggling with that. My Cattleman's Crease cowboy hat just arrived and I ordered a new band for it. I also finished th3vfinal touches on the overcoat, I'm having a small button hole sewn in the back side by a seamstress from Michael's Men's Warehouse, he's been doing all my soft goods alterations. I'll explain what the button hole is for when I get it back ...
Finished his tin box and anti ghoul serum and completed the saddle bags by adding the requisite pieces of ass jerky ... lol
I pick up my life cast tomorrow so as soon as my Monster Clay arrives I can start pretending I know how to sculpt ...
Gotta ask, where did you find that metal plate for the saddle bag, or did it come like that? I've seen a bunch of serviceable bags... but none with plates already. thx
 
The stuff I'm using is fabric paint so no need to treat it with anything after the fact. I don't plan on washing the overcoat since it's an outer garment and any sweat will be absorbed by my shirt and pants which are regular washable cotton fabric. Don't know what would happen if I wore it in a rain storm ... which I don't plan to do ... lol. This outfit is for going to sci fi conventions so pretty much indoors always ...

Ok so here's the new coat... have to darken the inside and start the cutting / weathering process... but it's a good base I think and a step up.
 

Attachments

  • Photo Oct 07 2024, 2 37 32 PM.jpg
    Photo Oct 07 2024, 2 37 32 PM.jpg
    1.2 MB · Views: 84
  • Photo Oct 07 2024, 2 37 49 PM.jpg
    Photo Oct 07 2024, 2 37 49 PM.jpg
    1.3 MB · Views: 77
Last edited:
Gotta ask, where did you find that metal plate for the saddle bag, or did it come like that? I've seen a bunch of serviceable bags... but none with plates already. thx
I had to make it .... I found a base saddle bag that had 3 straps/buckles which was the hardest part and then I simply altered what I needed to make it screen accurate ... changed the front leather panels, added the copper pieces & leather straps, dyed & weathered as appropriate
 
Back
Top