saint357
New Member
So I am a huge fan of Steven Universe and i plan on busting out my Steven cosplay for Castle Point Anime Convention coming up in late April. I previously made Stevens shield and roses sword for it. they were some of my first foam props. While i was happy with the sword at first I've decided now that roses sword is broken in canon, that would try my hand at making Connie's new sword from the episode 'change your mind'. I've learned a lot since my first builds so anyway lets get cracking with the build.
the first hurdle was finding good references to work with. the swords only in the show for a few minuets at most so this was hard this is what i managed to find so far. a few screen shots from the episode.


not much to work with then the wiki for the episode gave me this great shot which looks like its from the actual model sheet so this is what i went with.

the next step was figuring out size and dimensions. Steven universe has never been good at staying on model. sizes change from episode to episode and sometimes even shot for shot. I tried to size the sword to Connie. but for the life of me could not find any kind of height scaling for her, forget cannon height i couldn't even find a rough estimate. so then i turned to this lovely bit of fan art that conveniently had Connie's sword next to roses.

so i went into paint and compared the sizes. it looked like the whole of Connie's sword was just as long as the blade of roses. after taking a look at my own rose sword i found this to be just about right. i cut a piece of pvc pipe to size that i plan on using as the core of the sword. found i liked the length and went from there.
with my length figured out i went about drawing up some templates.

i started with the weird double crystal v guard, (pictured top right) as it would determine the size of everything else. i free handed this using an angle ruler to get the right shapes. it took me a few times to get it where i wanted. luckily the shape is pretty simple. then using that i made the blade pattern in three parts starting with the bottom of the blade closest to the guard. i decided i wanted the blade to be as wide as the witch of the bottom v. then i made the middle and end templates for the blade and taped them together. then finely i took waaaaay to long figuring out the star in the center of the guard. really i suck at drawing stars. anyway once that was done. you can see all the mistakes i made since i decided to draw the star on the guard template for some reason. i traced it out on some baking paper and made my star template.
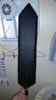
next i traced them out on to some eva floor mats. i did two pieces for the sword blade and three for the guard since i wanted it to be wider then the blade. i carved a channel going down the center of both and beveled all the edges with my dremel. i also had to cut a taper on the edges of the blade with an box cutter to save on sanding. this didn't go grate and i still had to remove lots of material with a dremel anyway. i glued all the halves pieces together and got this in the end.

(that's actually the first blade, i ended up remaking it because i wasn't happy with how i did the edges.)
since no mater how much i sanded the edges i wasn't happy with how the beveling i decided to take some tips form other makers and i mixed up some burham's water putty and applied it to the edges to smooth and fill in the foam from my dremling. and can i say I'm in love with this stuff it did wonder for the blade especially.

Now its starting to look like a finally crafted bismuth blade, instead of the rough orkish look i had going on before. while i wait for the putty to fully dry so i can give it a light sanding to clean up any irregularity that still remain.
i took the time to cut out some accent pieces out of thinner craft foam i got off amazon. this includes the star for the guard as well as the blue trim pieces the go on the blade and handle above and below the guard.

well that"s all i got until i can plastidip and paint everything. I'll keep this thread updated with my progress. feel free to comment down below or leave any advice if you see something i did wrong or could have down better. I'n the words of Steven himself, thanks and i love you.
the first hurdle was finding good references to work with. the swords only in the show for a few minuets at most so this was hard this is what i managed to find so far. a few screen shots from the episode.
not much to work with then the wiki for the episode gave me this great shot which looks like its from the actual model sheet so this is what i went with.
the next step was figuring out size and dimensions. Steven universe has never been good at staying on model. sizes change from episode to episode and sometimes even shot for shot. I tried to size the sword to Connie. but for the life of me could not find any kind of height scaling for her, forget cannon height i couldn't even find a rough estimate. so then i turned to this lovely bit of fan art that conveniently had Connie's sword next to roses.
so i went into paint and compared the sizes. it looked like the whole of Connie's sword was just as long as the blade of roses. after taking a look at my own rose sword i found this to be just about right. i cut a piece of pvc pipe to size that i plan on using as the core of the sword. found i liked the length and went from there.
with my length figured out i went about drawing up some templates.
i started with the weird double crystal v guard, (pictured top right) as it would determine the size of everything else. i free handed this using an angle ruler to get the right shapes. it took me a few times to get it where i wanted. luckily the shape is pretty simple. then using that i made the blade pattern in three parts starting with the bottom of the blade closest to the guard. i decided i wanted the blade to be as wide as the witch of the bottom v. then i made the middle and end templates for the blade and taped them together. then finely i took waaaaay to long figuring out the star in the center of the guard. really i suck at drawing stars. anyway once that was done. you can see all the mistakes i made since i decided to draw the star on the guard template for some reason. i traced it out on some baking paper and made my star template.
next i traced them out on to some eva floor mats. i did two pieces for the sword blade and three for the guard since i wanted it to be wider then the blade. i carved a channel going down the center of both and beveled all the edges with my dremel. i also had to cut a taper on the edges of the blade with an box cutter to save on sanding. this didn't go grate and i still had to remove lots of material with a dremel anyway. i glued all the halves pieces together and got this in the end.
(that's actually the first blade, i ended up remaking it because i wasn't happy with how i did the edges.)
since no mater how much i sanded the edges i wasn't happy with how the beveling i decided to take some tips form other makers and i mixed up some burham's water putty and applied it to the edges to smooth and fill in the foam from my dremling. and can i say I'm in love with this stuff it did wonder for the blade especially.
Now its starting to look like a finally crafted bismuth blade, instead of the rough orkish look i had going on before. while i wait for the putty to fully dry so i can give it a light sanding to clean up any irregularity that still remain.
i took the time to cut out some accent pieces out of thinner craft foam i got off amazon. this includes the star for the guard as well as the blue trim pieces the go on the blade and handle above and below the guard.
well that"s all i got until i can plastidip and paint everything. I'll keep this thread updated with my progress. feel free to comment down below or leave any advice if you see something i did wrong or could have down better. I'n the words of Steven himself, thanks and i love you.