[COMPLETE] The Visarch-Warhammer 40K

arborealkey

Active Member
EDIT: full reveal
49702357-768635916804326-7376445505829601280-o.jpg


Hello !

I'm finally starting a thread about my third eldar build (the first two were Lelith Hesperax, and Baharroth-phoenix lord of the Swooping Hawks-, for those who were wondering).


Here is the thread about the second build I'm currently working on: Legio Custodes-The Horus Heresy (Warhammer 40K)
(My English isn't good, sorry)
----------------------------------------------------------------------------------------
My armor is mainly based on this concept art by Jes Goodwin, but I used the miniature as a reference for some parts.
Visarch-Warhammer-40000-???????-Yvraine-3643749.jpeg


NOTE: Everything that's light grey is high density EVA foam (100kg/m3). The dark blue foam is craft foam I get from the local fabric store.

THE VANES


I started with the vanes (those blade-like things on his back). I used the same system I used for all my wing harnesses: multilayer pipe, a piece of wood, and backpack straps.

I first made a pattern, which is based on the miniature and not on the concept art. I opened a picture of the mini as a layer in GIMP, drew the main lines on another layer, and printed it to scale one (well, to my scale in fact...)

It looked like this:
20170703_130358.jpg

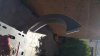
I then made my "core" with multilayer pipe (with a diameter of 20mm if my memory is correct), and bent them, using my paper pattern as a reference.

20170703_130255.jpg
This piece is in fact a hollow foam structure, with my multilayer pipe in the middle. The pipes were first sandwiched between two pieces of 5mm EVA foam. Those blue stripes are made out of craft foam. I was building this with what I had at hand, and it didn't include glue that would stick to both the pipe and the foam...so I just wrapped craft foam tightly around the pipe, gluing the strips to themselves with hot glue, and then glued the EVA to the craft foam.

20170703_143316.jpg
I added the missing sides, made out of 5mm EVA again. They are really light, I just attached them to the workbench with a piece of painters tape.

20170703_182849.jpg
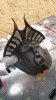
Next I added the blade-like part, with 5mm EVA again. I wanted all the blades on the character (he also has one on the elbow and one the knee) to look really different (material-wise) from the rest of the armor. While my armor will have a really smooth, sleek look, I chose to give those parts a totally different texture and to paint them with metallic colors. With this in mind, I detailled all those parts with a wood-burning tool.

20170717_210900.jpg
We can see the attachments a bit on this picture. The traingular pieces of wood are screwed directly to the multilayer pipe. I added wood wedges and metal brakets to make the vanes angled. They can be detached from the pieces of wood, as it holds thanks to bolts and nuts. A little back view (the picture was taken before I made my engravings and filled the holes in the blades).
19780324_679224815620011_7103951233837335338_o.jpg
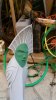
It was time for details ! I made a bunch of runes out of 2mm EVA foam. The miniature doesn't have this kind of detail (unless you decide to paint them), but the concept art mentionned "script" on this part, and I thought it could be interesting to bring it to life.

It was interesting. And REALLY time consumming. I miainly used the back cover of my special edition of "Jain Zar: the storm of silence", which has a bunch of eldar runes on it, as a reference. I chose 26 of them. I wanted mine to be roughly 4cm each, and drew them. I then cut them out of 2mm foam, and then sanded the edges.

Size of some of the pieces, tool for scale.

IMG_20170803_234227.jpg
Here is a little before sanding/after sanding (and heating to smooth them) comparison.

IMG_20170804_143311.jpg

Here are all the runes, a big puzzle game:
20170806_180845.jpg
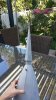
Once glued, it looked like this

IMG_20170806_192142.jpg

That's one side, the other side will only have 5 runes on each vane, but with extra foam details.

I also made some armor pieces, with the same "level" of detail, I'll complete the post tomorrow.
 

Attachments

  • 20170703_182849.jpg
    20170703_182849.jpg
    2.7 MB · Views: 774
Last edited:
Wow! You really know how to challenge yourself! This is yet another impressive work so far. You really get some fine detail work for foam. Definitely subscribing to this one!
 
Wow! You really know how to challenge yourself! This is yet another impressive work so far. You really get some fine detail work for foam. Definitely subscribing to this one!
Thanks again ! I want to make some rune work on my cape too (a line at the bottom), but given how large my cape is once unfolded, I will need to make way more than 26 of them this time...

So far I've made a few armor pieces: chesplate, arms, blades on the elbow and knee (I'll post about them tomorrow, I have to gather my pictures). The faces on the tassets and shoulderplate will be challenging, as I've never done this kind of thing before.
All the cloth parts too, I'm not good with fabric (YOU CANNOT SAND IT). I started working a bit on the cape too, and at least it moves as I want (I used a really heavy fabric). Working on this cape gave me a few ideas for the one I will put on the Custodes as well...

Given what I have in mind for the paint job, it will take forever too (compared to the Custodes or my glass armor).
 
Once again, you continue to amaze :)
Thank you !

Here's some progress on the chesplate.

I started with an older pattern I made in February for my Swooping Hawk. It doesn't have a back piece, as it was meant to be worn with wings (or vanes in this case). Again, it's 5mm EVA foam.

20170623_134203.jpg
It looks like this from the back.

20170726_231556_001.jpg
I also made the stomach piece (I sanded all the edges afterwards).

20170725_181130.jpg

I made all my details with 2mm foam. Here are a few of them before sanding (the large ones are 5mm thick, they go on the upper part of the chestplate).

20170726_193747.jpg
The model has straps on the chest holding his cape. Since my own cape will in fact be attached to my harness/backpack thing, I made fake ones out of foam. The texture was added thanks to aluminum foil pressed against the heated foam.

20170815_170952.jpg

I added some 2mm foam details on the straps, and attached them to the rest.

20170815_215659.jpg
I'll try to finish the shoulderplate appearing on the previous picture today...
 
Last edited:
Love the technique of pressing foil into heated foam for strap texture! Hadn't seen that before. I will definitely be trying that! Can't wait to see how it looks painted.
 
I'm not up on my 40k lore, but i do love the builds. Great work :)
Sometimes it's hard to keep up with the lore (especially recently). Thanks !

Love the technique of pressing foil into heated foam for strap texture! Hadn't seen that before. I will definitely be trying that! Can't wait to see how it looks painted.
I do not remember where I saw it for the first time...Someone was ironing craft foam with some foil between the iron and the foam. I first tried it in February, and made a craft foam bag. It looked like this:
For me, it was a bit too "matte". As it was an experiment, the craft foam wasn't primed, putting latex or something equally flexible before painting might help. Doing this kind of thing on craft foam makes it shrink a LOT more than I expected, I'm used to heat-sealing craft foam, but I didn't expect it to shrink that much. I will have to take that in consideration next time and cut bigger pieces. The first time, I ironed it instead of using a heat gun, so I could cover a bigger surface. It worked, but as you can't check the state of the foam while it's under the iron, you might end up heating it too much like I did. On a side note, it hardens the craft foam (a lot more than a typical heat-seal), making it more leather-like.
High-density EVA, on the other hand, doesn't shrink much.

Badass work! Very clean!
Thanks a lot !

I worked a bit on the shoulderplate. My base, and the...neck guard ? are made out of EVA foam again. The base of the neck guard is 5mm thick, and the grid-like part is 2mm thick. I sanded the "internal edges" before gluing them together so I wouldn't damage the base, and sanded the "external edges" afterwards so I could sand both layers at the same time (this sentence doesn't make any sense).

20170816_203041.jpg

It's one the pieces which has a face on it. At first I wanted to sculpt it, but since I didn't have the required materials (I'm trying to build this with stuff I have on hand), I tried something else.
This...huh...technique might be frowned upon, but it was kinda suited for what I was trying to do (a face without detail looking like it has been trapped in an armor, kind of an organic look etc).

What was available: a cheap plastic mask (those expressionless white masks), some magazines, a ****load of white glue, and EVA/craft foam of course. I kept the nose and a part of the cheeks of the plastic mask, and glued it on the shoulderplate to use it as a base. I then added paper mâché to form the volumes (forehead, brow, upper part of the cheeks, mouth etc).

It looked like this (yes, that's disgusting):
20170817_140525.jpg
To make the transition between the shoulderplate and the face, as well as the shapes of the face itself, smoother, I put craft foam on top. Once heated, it stretches well.
I started in the center of the mask:
20170817_165858.jpg
And in the end it looked like this (note: my chesplate has space in it for my boobs, even if they are really small, I still have some)

IMG_20170817_190241.jpg
I need to modify the shape of the mouth a bit... I have to make faces on the tassets and the knees as well, I might use the same technique, but maybe not with a mask as a base, I could make the nose out of paper as well...


I also made some spirit stones. I counted 32, hanging from his cape and belt (plus all the gems on the armor itself). I could have casted them out of resin, but used glass cabochons I got from AliExpress instead. I ordered metal settings at the same time, so I didn't built anything for this part, I just painted the glass.
I paid 5,80$ for 20 metal settings (I took 60 so I would have some for further uses) and 11$ for 25 30mmx40mm glass cabochons (I took 50).
I put nail polish on the back of the cabochons for the color, while the metal setting reflects the light.
(Note: this bright line appearing on each of them is the reflection of the tube light on the ceiling)

20170819_092258.jpg


20170819_141125.jpg
Don't pay attention to the scratches on the metal, that was just me doing weird experiments with sandpaper...
 

Attachments

  • 20170817_131043.jpg
    20170817_131043.jpg
    2.3 MB · Views: 728
This is looking great, the gemstones are brilliant for such a simple technique.
Thank you !

I also made the tassets wiith the same exact technique I used for the shoulderplate. The one in the middle has a flat back while the two others are curved to match the shape of my thighs.

20170825_190209.jpg

And the helmet. The faceplate was juts a flat piece of 5mm EVA foam, while the conical part is 5 identical pieces. Their shape, while free-handed, was inspired by sphere patterns (basically triangular with curved edges).

IMG_20170822_210651.jpg
(The details in the middle are not symmetrical, I have to glue them properly). All the elliptic details were made out of 2mm EVA with sanded edges.

I then added the ears, the little spikes (made out of foam as well) and the big spike on top (made with four foam triangles). It still need ome heat-shaping because it's not straight at alll...The transition between the top of the helmet is just a pile of foam discs with sanded edges.

IMG_20170826_214339.jpg
It fits my face perfectly. The problem people often seem to have with eldar costumes, is the size of helmets (probably because us humans have rounder faces...). Eldar helmets worn by human costumemakers often look too big (that was also the case of my Swooping Hawk). I'm lucky enough to have chosen a character with shoulderplates big enough so the helmet doesn't look like too out of place. I also made sure it had the shape of my own face so I don't put useless space inside. I use the big space in the conical part of the helmet to store my long hair...
 
That helmet is impressive! Lot of strange angles and curves, yet your keeping it very symmetrical and keeping with the fine detail. Very nice work. I had to Google the character you got my interests so peaked. I saw the line drawing in your first post, but wanted to get more of a feel for the character and you are NAILING it so far! I'm using pep files for my first build, and can't believe people can just SCRATCH build this well! Many projects away from taking that plunge myself...

Curious... What color are you going with? I see the character shown mostly in a crimson scheme but I have seen a few others as well...

Thanks a lot ! I'm not a fan of pep files, because it would take more time to adapt them to my body (IF I find files for my project to begin with) than making the patterns from scratch. And as for doing your own file...my problem is that even adapted to foam, it cannot take heat-shaping into account.

Due to fluff reasons, I'm keeping his armor red (eventually a slightly darker red than the "official" scheme). I was planning on giving a totally different aspect to all the blade-like parts (the ones with the engraved pattern, I haven't shown all of them...), maybe with iridescent colors (for the moment I tried a blue/purple gradient and it didn't look that bad).
My cape is dark purple on the outside, black in the inside, the belt and loincloth will be black as well and I used a gold setting for the spirit stones for this reason (so it stands out). Since I have nothing better to do I will probably make foam runes at the bottom of the cape, like the ones on the vanes.
 
Update about the legs !

My shin armor is made of 4 foam pieces (for each leg). The curve below the knee is here because of the shape of my pattern, I only use a heat gun to harmonize it, I didn't stretch the foam on a sphere like people sometimes do for boob armor. I close it thanks to an invisible zipper at the back. My details were made out of 2mm foam, except the face, which is Patarev. I still have to sand said faces a bit, they currently look like ****.
20170907_143907-1.jpg
As said in the first post of this thread, I want some parts to be metallic (iridescent colors), and gave them a particular pattern (thanks to a wood burning tool) to really differentiate them from the rest. I had already made it on the blade-like part of my vanes (those things on my back), and I added the upper part of my knees and my shoulderguard, plus the spikes on my helmet to the list.
engraving.jpg
I also tried my tassets on. The middle one is flat while the ones on the sides are curved to fit the shape of my thighs. I have yet to add the criss-crossed straps between them, I just used a random belt for the moment.

20170907_202128.jpg
My character has a blade on his right knee and another on his right elbow. I made them out of EVA foam as well. I started with a 10mm base, and I sanded the edge to form the blade.
20170723_165551.jpg
I then added a layer of 2mm foam on one part of my piece, added my engraved pattern on the rest, and the swirling details made out 2mm foam as well.

IMG_20170723_202216.jpg
ABOUT THE PAINTJOB
(you can skip this part)
At first, I didn't really know what kind of aspect I wanted this armor to have. Most references when it comes to 40K characters are painted miniatures, and I'm not limited by size to give particular textures and add details to my armors. In fact, I didn't choose the easiest character to paint...Eldar armor isnt't supposed to be metallic (or it's just a few pieces, and I feel like it's more for decorative purposes), so my (limited) skills with metallic and iridescent acrylics wouldn't be of much use. There is a bunch of videos about painting eldar armor, but they describe techniques which, while looking good on minis, aren't usable on actual armors.
A lot of eldar stuff is said to be made out of wraithbone, a psychoreactive material that is "grown". What should it look like ? Should it be smooth, like what we see on minis and a lot of illustrations ? Should it look extremely organic, like in the trailer of DoW3 ? The thing is, everyone has a different idea of what it should look like. I feel like eldar artisans could make wraithbone look like whatever they want (if they can control the shape, why couldn't they control the texture). My other problem here is that I took interest in Warhammer 40K a mere year ago, and I focused on the Horus Heresy more than the rest, so I don't know everything there is to know about eldar armor and weaponry.

So I forgot about all this and decided to try something else. The suit my character is wearing is supposed to reflect what eldar looked like before the Fall, and that's why it has aesthetics of the different eldar factions (craftworld eldars, dark eldar, harlequins etc). It was made by a renowned artisan, is very detailed, and is described as "baroque" and "ancient". Another character, when seeing the suit for the first time, immediately recognized it as a piece made by said artisan, meaning he has a particular style. The main color has to be a shade of red.

Starting from this, I made a list of the major features I thought it should have (color and texture wise)
-it has to look different from other eldar armor, while still being recognizable as one
-there should be an alien vibe about it (this one is more about my personal preference)
-it needs to stand out, be eye-catching (the guy stands out like a sore thumb on illustrations featuring a lot of characters)
-main color needs to be red, and the colors need to be harmonious

I chose a semi-organic texture for those reasons. It is an aesthetical choice some people won't like. I added veins-like details with dimensional fabric paint. While it's not a fully organic texture, I feel like it gives a small alien vibe to the armor and makes it different from what we usually see on eldar models and cosplays. This pictures shows my first color test, which will most likely evolve (I didn't bother filling in the seam in the middle for a color test).
received_498239037177350.jpeg
I said the artisan had a particular style, and decided to reflect this by adding metallic pieces (purely an aesthetic choice). The "official model" does have a few metallic pieces (the elbow and knee blades, along with the spikes on the helmet). The blades are copper-colored and the spikes are silver.
I originally decided to keep those pieces metallic and to add the bladed part of the vanes to the list. At first, I wanted them gold, but metallic parts on eldar models are often gold...Since I had already chosen the color of my cape (a dark purple), I finally went for a dark blue/dark purple gradient (with iridescent colors, to see what this kind of paint looks like, you can check the thread about my glass armor or my glass bow).
The engravings came after, I wanted all my metallic parts to have the same pattern, with really sharp angles to contrast with the round shapes and the swirling details of the red armor parts. Instead of leaving them black like I usually do on golden armors, I made them gold so they would stand out from the darker shade of puprle and blue. I have a picture of my first test somewhere...

After all this, the upper part of the knees and shoulderguard seemed too regular and sharp for my semi-organic tecture, and I finally chose to add them to the metallic list. That's why they now have the engraved pattern.
 

Attachments

  • 20170910_144327.jpg
    20170910_144327.jpg
    5 MB · Views: 790
  • 20170910_154740.jpg
    20170910_154740.jpg
    6.8 MB · Views: 557
  • 20170910_164213.jpg
    20170910_164213.jpg
    6.3 MB · Views: 602
If the whole armor comes out as good as that piece, I think you're really on to something there. I'm very curious to see what the whole thing looks like painted up. I agree about the comparison between miniatures and life size. One simple dob of a wash on a mini and you add depth to the entire thing. With life size armor you can get the same depth, but it has to be spread out over a wider area, and its hard to find that sweet spot between realistic for full size and over done. I think what you have here will look really good all together. Especially from far enough away to be photographed. I think it will all blend very nicely.
 
If the whole armor comes out as good as that piece, I think you're really on to something there. I'm very curious to see what the whole thing looks like painted up. I agree about the comparison between miniatures and life size. One simple dob of a wash on a mini and you add depth to the entire thing. With life size armor you can get the same depth, but it has to be spread out over a wider area, and its hard to find that sweet spot between realistic for full size and over done. I think what you have here will look really good all together. Especially from far enough away to be photographed. I think it will all blend very nicely.

I don't know, I'm not good when it comes to painting something...we will see !


I tried to paint the "leather" with acrylics...
IMG_0875.JPG


IMG_0891.JPG
 
wow that looks cool, personally when i look my eye line is drawn to the upper portion as more is going on there (if that makes sense ? )
 
wow that looks cool, personally when i look my eye line is drawn to the upper portion as more is going on there (if that makes sense ? )
Yes, I see what you mean. There will be a loincloth and a cape, so it will be more balanced.

Sent from my SM-N910F using Tapatalk
 
This thread is more than 5 years old.

Your message may be considered spam for the following reasons:

  1. This thread hasn't been active in some time. A new post in this thread might not contribute constructively to this discussion after so long.
If you wish to reply despite these issues, check the box below before replying.
Be aware that malicious compliance may result in more severe penalties.
Back
Top