Captain America: TFA Bucky / POW Rescue Suit with Off-the-Shelf Parts

Bulking Up

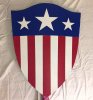
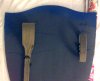
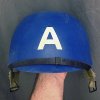
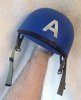
Steve's pockets on the cartridge belt appear to be nicely filled out by vaguely rectangular forms, and his left thigh pocket on his pants is quite full of ... something. I wanted to stuff my pockets & pouches as well. I wanted something light, cheap, and waterproof or water resistant (so it didn't absorb moisture if I got sweaty or washed the parts & hung them up to dry).

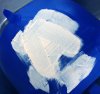
I thought at first about wads of aluminum foil, but that's porous, and might trap water in it. Then I realized that styrofoam would fit the bill nicely. In retrospect, I should have picked up a square of that hard insulation foam from the hardware store, but I went to the craft store instead and bought 2 dozen small styrofoam spheres and a larger hemisphere. The styrofoam spheres are about the size of a ping pong ball, and two of them stuff the belt pockets nicely. With 10 pockets on the belt, and 24 spheres, I luckily had some left over to stuff the compass pouches as well. The hemisphere should fill out the thigh pants pocket well.

In retrospect, it may have been cheaper to simply buy ping pong balls from the dollar store, or a 2 foot square of insulation foam, but that's why I'm writing this: so you don't have to make the mistakes I did.


-MJ
 
F for Effort

Well, that did not go as expected... I made a crude stencil out of some inkjet label paper, tried to stick it to the helmet and lightly paint-in the "A", but the paint bled everywhere and I can't get it off. So, soon, I'll be re-painting the blue. Then I'll try to spray-paint the white "A."


-MJ
 

Attachments

  • IMG_0345.jpg
    IMG_0345.jpg
    348.8 KB · Views: 297
Try, Try Again

Wish me luck!


-MJ
 

Attachments

  • IMG_0372.jpg
    IMG_0372.jpg
    752 KB · Views: 292
  • IMG_0375.jpg
    IMG_0375.jpg
    617.8 KB · Views: 301
A is for America

V is for Victory! Close enough for government work. Still a few straps short, but I'm close to calling it done on the costume parts and focusing entirely on the shield, transponder, and weathering all of the above.


-MJ
 

Attachments

  • IMG_0377 copy.jpg
    IMG_0377 copy.jpg
    112.9 KB · Views: 314
Haven't done much, but I've tried to dirty up the helmet a bit. I should hit it with a light coat of matte spray or two...

Ordered the chin straps for it as well. Still undecided on the leather chin cup; that seems like it might be cumbersome to wear and might unbalance the helmet. Also costs money.
 

Attachments

  • IMG_0387.jpg
    IMG_0387.jpg
    230 KB · Views: 279

Attachments

  • Screen Shot 2016-09-25 at 5.22.31 PM.jpg
    Screen Shot 2016-09-25 at 5.22.31 PM.jpg
    76.8 KB · Views: 316
Also added the second (third?) set of straps to the helmet and filth-ed it up some more. Still on the fence about the chin cup.

The shield is arguably the most distinctive part, and also the most daunting for me since I've never worked with foam before. I've drawn up a template for it, but I need to double check my sizes and then get it printed at the copy shop. Better get a couple, just in case...
 

Attachments

  • IMG_0401.jpg
    IMG_0401.jpg
    349.6 KB · Views: 294
Here's my template for the movie-style heater shield: traced from the auction photos, and scaled down to fit on a 2 x 2 foot foam tile, without going over the jigsaw puzzle edges. My max size is about 17.75 x 22.75 (when correctly oriented), but rotated 45 degrees, it's about 21.7 x 21.7 inches. Should fit with a little wiggle room left over.


-MJ
 

Attachments

  • Heater Art.pdf
    799.1 KB · Views: 546
  • Screen Shot 2016-09-26 at 6.10.14 PM.jpg
    Screen Shot 2016-09-26 at 6.10.14 PM.jpg
    44.7 KB · Views: 299
This is the stencil I made for the "A" on my helmet. Since my helmet is a cheapie plastic toy, your scaling may differ.


-MJ
 

Attachments

  • Screen Shot 2016-09-27 at 8.52.33 PM.jpg
    Screen Shot 2016-09-27 at 8.52.33 PM.jpg
    58.6 KB · Views: 300
  • Helm Letter.pdf
    650.3 KB · Views: 391
Finally got my shield template printed out by the friendly people at Office Depot. Two of mine will fit on a 2 x 3 foot sheet, arranged like on this PDF. A tight fit, but do-able.
 

Attachments

  • Shields Ganged 2x3.pdf
    1.3 MB · Views: 369
"I don't know if I can do this."

"Nothing to it..."
 

Attachments

  • IMG_0419.jpg
    IMG_0419.jpg
    318.5 KB · Views: 295
Using my small scrapbookers' heat gun, I tried to put a little bend into it, but wasn't satisfied.

Bent the remaining floor tiles into a crude curve, taped them to hold the shape and then taped the shield on top of them; and then poured boiling water over it, twice. Seems to have worked. Did seem to open up the scores a bit more than I'd prefer.

Decided not to seal the EVA foam, just hit it with a good coat of Krylon Fusion. I hope this works.

Ideally, I'll be able to use the scores in the shield to help in masking the designs for painting later.
 

Attachments

  • IMG_0421.jpg
    IMG_0421.jpg
    270.5 KB · Views: 276
Measure Twice...

Had to check the film to get the position of the arm hardware right. You gotta leave room for your cue cards ;)
 

Attachments

  • IMG_0424.jpg
    IMG_0424.jpg
    267.4 KB · Views: 296
The Cap's heater shield seems to have a leather-wrapped hand-grip and a leather cuff or loop for the arm.

I'm going for something much cruder, made from scraps at hand, but it will (arguably) hardly ever be seen, and the arm loop will be adjustable for tightness (in theory), so I can just tighten it up and let it hang on my arm all day rather than have to 'hold' it. In theory...

Remember to measure or test fit your straps / grip while you're wearing the suit / jacket and glove.
 

Attachments

  • IMG_0425.jpg
    IMG_0425.jpg
    452 KB · Views: 154
Masked off the shield for the coat of blue paint. Very tedious, those stars. The red & gold masking should be much easier.

Painted the blue on in the twilight's last gleaming.
 

Attachments

  • IMG_0431.jpg
    IMG_0431.jpg
    213.5 KB · Views: 265
And the masking goes on, and the paint goes on...
 

Attachments

  • IMG_0444.jpg
    IMG_0444.jpg
    257 KB · Views: 269
  • IMG_0446.jpg
    IMG_0446.jpg
    230.8 KB · Views: 295
Needs a few small touch-ups, but not too shabby!

Tomorrow night: the straps? And later: the gold paint? Finally: weathering?


-MJ
 

Attachments

  • IMG_0448A.jpg
    IMG_0448A.jpg
    195.1 KB · Views: 309
Strapped.

Ugly and non-canonical, but the price is right.
 

Attachments

  • IMG_0459.jpg
    IMG_0459.jpg
    144.7 KB · Views: 312
Back
Top