Captain America Shield Custom Flight Display / Transport Case

drakeprimeone

Well-Known Member
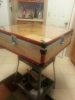
I love The Captain America movie style shield and my spun aluminum shield is my prized comic book possession. Up until now I have settled for setting it on a top shelf above my trade paper back books.

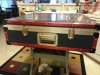
Mtrixman's military Hardigg transport case for his shield was just the push I needed to get one of my own. Initially I looked at Pelican and Hardigg but for the dimensions of my shield (25 inches) made the prospect of getting one somewhere upwards for 400.00 +. I then was resolved to look into making my own.

I opted to customize a ATA style Flight Case. Again buying a pre made case with a minimum interior dimension of 25" all the way around was more difficult than I thought so I decided to make one from scratch.

There won't be too many step by step instructions on how I built mine as it is fairly straight forward and there are several "how-to" videos on how to make your own flight case.
Hopefully you guys enjoy the progress pictures.
 
Last edited:
The majority of my case hardware have come from Reliable Hardware. They have pretty much everything you need to make your own case from panels to brackets and corners, to the spray on glue for the liner.

My particular case will be in two pieces with the main case and a removable lid that will attach to each other via butterfly latches all the way around the lid. The case will also have one recessed carry handle at the top.

To keep the cost down I purchased plywood from Lowes as opposed to buying pre cut panels. To make it a display case I am using plexiglass for the lid panel. The wood panels themselves will then be covered with Automotive Carbon Fiber Paper. All panels will be attached using a hand riveter.

 
The lid is currently about 95% complete with the corner brackets painted using left over Duplicolor Anodized paint and the top half of the butterfly latches all riveted together. As you can see I have added some decorative circuit designs to the plexiglass using this


- - - Updated - - -

A side view of the lid laying on top of the raw wood panels of the case itself to show you how it looks with the carbon fiber paper.

 
An overhead view with my shield for scale :D


- - - Updated - - -

Over the last week I've been sidetracked with completing a couple of shields but now that it is down I have finally been able to start of the body of the case. Here is the main body sitting upside down to again show off the carbon fiber paper with all the rivets staged. Again also with my shield for scale.


Thanks Kevin! Up next will be to paint the brackets for the main body of the case and cut out and stage the bottom half of all the latches while the brackets dry. More to come soon!
 
Your case is coming along beautifully. I love the circuitry decor, makes me think of something Tony Stark would have in the Avengers Mansion.
 
Made some progress today. Got the base brackets painted and attached. Starting to take shape
uploadfromtaptalk1402164704688.jpguploadfromtaptalk1402164704688.jpg

Sent from my SCH-I535 using Tapatalk
 

Attachments

  • uploadfromtaptalk1402164719229.jpg
    uploadfromtaptalk1402164719229.jpg
    65.8 KB · Views: 247
All hardware cut and staged.
uploadfromtaptalk1402252344267.jpg

Sent from my SCH-I535 using Tapatalk
 

Attachments

  • uploadfromtaptalk1402252360379.jpg
    uploadfromtaptalk1402252360379.jpg
    40.6 KB · Views: 213
Well I am at a stopping point until I decide how I want to line the inside as well as how I want to set up the foam. I had a spare piece of foam here but the dimensions aren't correct. May have to order a fresh slab of foam.

Otherwise my case is 90% done. All hardware attached and outer panels lined. I'm actually pretty pleased how this is turning out!


Attachments

  • uploadfromtaptalk1402277764244.jpg
    uploadfromtaptalk1402277764244.jpg
    76.2 KB · Views: 209
  • uploadfromtaptalk1402277785349.jpg
    uploadfromtaptalk1402277785349.jpg
    68.6 KB · Views: 188
  • uploadfromtaptalk1402277815850.jpg
    uploadfromtaptalk1402277815850.jpg
    57.7 KB · Views: 190
  • uploadfromtaptalk1402277832300.jpg
    uploadfromtaptalk1402277832300.jpg
    37.1 KB · Views: 734
  • uploadfromtaptalk1402277868362.jpg
    uploadfromtaptalk1402277868362.jpg
    58.7 KB · Views: 258
Last edited:
So a final update. I managed to cut and fit some hard foam for the case. I also attached a dummy keypad that actually works for further effect. With more money I'm sure I could have installed an actual electronic locking system but this will do just fine. Overall I'm very pleased with the results and now my prized comic possession can be safely displayed and transported around!


This looks amazing! Great job. How did you secure the shield inside the case if it gets tipped forward?
Thanks! The foam is actually very tight around the shield. I had to cut small pieces to remove at the top and bottom to remove the shield. That being said I'm sure if you turned it face down and started shaking it the shield would come loose.
 
Thanks! The foam is actually very tight around the shield. I had to cut small pieces to remove at the top and bottom to remove the shield. That being said I'm sure if you turned it face down and started shaking it the shield would come loose.

Where did you get the foam from? And how did you cut it?

If you ever think about of commissioning one of these let me know. I have a Cap shield as well and would love something like this.
 
Where did you get the foam from? And how did you cut it?

If you ever think about of commissioning one of these let me know. I have a Cap shield as well and would love something like this.

Foam can be bought online at most case supply stores. The link I have at the beginning of this thread where I got much of the hardware also carries the foam. To cut hard foam you generally want to use an electric knife and lots of patience to get a clean cut. For the most part you just lay the shield flat on the foam and trace out the circle. Once you have that you start cutting away.
 
Back
Top